


Shoulder impingement can feel like a constant, nagging roadblock, making everyday movements like reaching overhead, sleeping, or even putting on a shirt painful—but the right shoulder impingement exercises can help relieve discomfort and then restore mobility.
It happens when the rotator cuff tendons [2] or the fluid-filled sacs (bursae) in your shoulder joint get compressed, often due to poor posture, repetitive overhead movements, or injury.
But here’s the good news: the right shoulder impingement exercises can help relieve pain, strengthen weak muscles, and create more space in your subacromial space — all from home.
Furthermore, the shoulder is one of the most injured joints in the body.
One of the most common injuries to the shoulder is shoulder impingement. A key component in the recovery from this is exercise.
Let’s get right into the step-by-step exercises that can reduce pain and then rebuild strength in your affected shoulder.
These moves are designed to improve mobility, reduce inflammation, and then strengthen the rotator cuff and surrounding stabilizing muscles.
Note: Do not push through sharp pain. You should feel gentle activation or stretch, not stabbing discomfort.
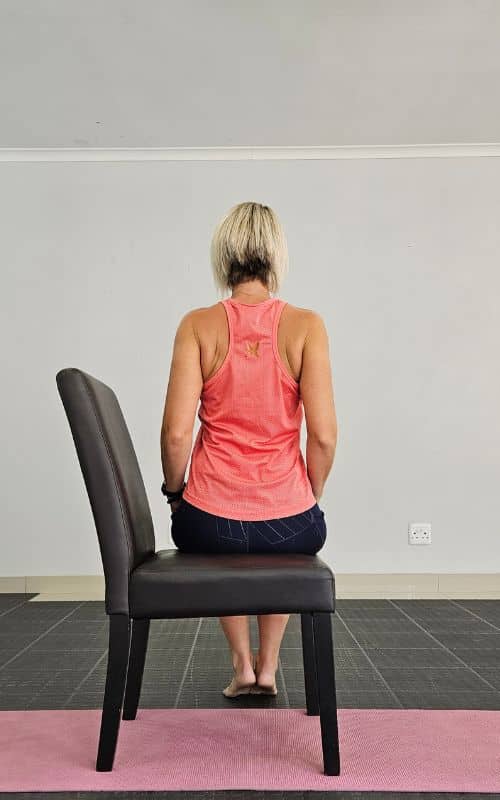
1. Shoulder Blade Squeeze

How to do it:
- Begin in an upright sitting position with your knees bent and feet flat on the floor.
- Maintain good alignment with your upper body.
- After that, place your hands on your lap.
- Engage your core muscles and move your chest forward as you squeeze your shoulder blades together.
- Hold the position for a couple of seconds.
- Relax and then repeat the movement for 5 repetitions.
Helps strengthen postural muscles and improve scapular control.
2. Wall Angels
How to do it:
- Begin in an upright standing position with your back against the wall, your feet hip-width apart, and then maintain good alignment from your head to your hips and legs.
- Move your feet about 6–12 inches away from the wall to increase the angle of your body.
- After that, engage your core.
- Raise your arms, bending your elbows until your hands are just above your shoulders to form a “W” shape with the backs of your hands against the wall, then slowly slide your arms up, forming a “V” shape.
- Furthermore, keep your shoulders up and back and your lower back pressed against the wall.
- Slide your arms back down to the starting position and then repeat the movement for 10-15 repetitions for 2–3 sets, resting for 30 seconds between sets.
Improves shoulder mobility and combats poor posture.
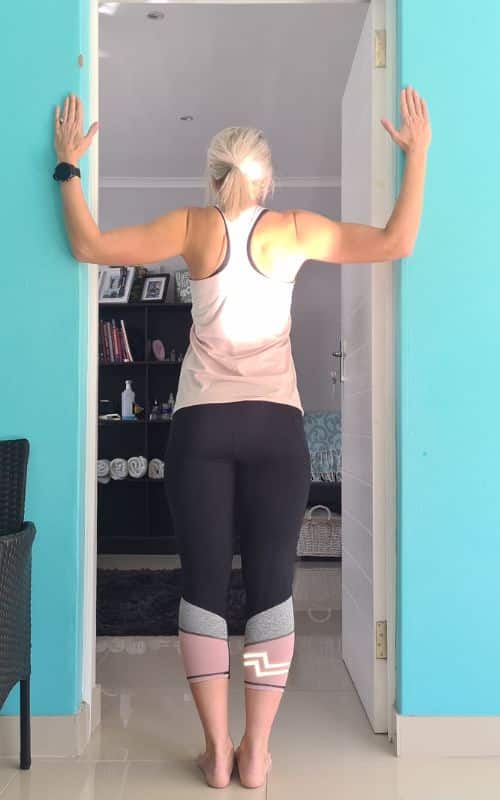
3. Doorway Chest Stretch
How to do it:
- Begin in an upright standing position in the center of a doorway, with your feet close together.
- Maintain good alignment with your head, shoulders, hips, and legs.
- Raise your arms to shoulder height and bend your elbows to 90 degrees so your upper arms are parallel to the floor and then your forearms rest on the sides of the doorframe—creating a goalpost or “W” shape.
- Engage your core muscles and gently lean your upper body through the doorway until you feel a stretch across your chest and the front of your shoulders.
- After that, keep your shoulders back and down, and avoid arching your lower back.
- Hold this position for 20–30 seconds, breathing deeply and staying relaxed.
- Step back to release the stretch.
- After that, repeat the movement 2–3 times on each side, resting for 30 seconds between sets.
Reduces tightness in the chest that contributes to shoulder impingement syndrome.
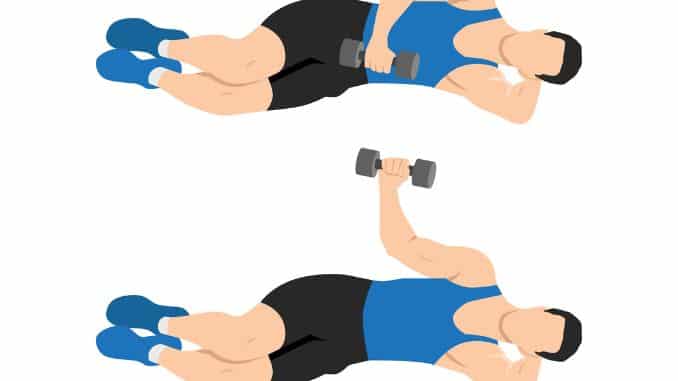
4. External Rotation (Side-lying with Light Weight)
How to do it:
- Begin by lying on your side on a firm, comfortable surface with a pillow or towel supporting your head.
- Keep your legs bent slightly for stability.
- Hold a light dumbbell (1–5 lbs) in the hand of your top arm, and bend that elbow to 90 degrees so your upper arm rests against your side and your forearm lies across your torso.
- Engage your core.
- Keep your elbow tucked in close to your side (you can place a rolled towel between your elbow and body to maintain alignment).
- Slowly rotate your forearm upward, pivoting at the elbow, until your hand points toward the ceiling.
- Pause briefly at the top of the movement.
- Slowly lower the dumbbell back to the starting position with control.
- Perform 10–15 repetitions for 2–3 sets per side, resting for 30–45 seconds between sets.
Strengthens external rotators of the rotator cuff and creates more space in the joint.
5. Internal Rotation with Resistance Band
How to do it:
- Begin in an upright standing position beside a stable object (like a treadmill or door anchor), with your feet hip-width apart and then your shoulders stacked above your hips.
- Maintain good alignment throughout your spine.
- After that, loop a resistance band to a fixed anchor at elbow height.
- Grasp the band with the hand closest to the anchor.
- Bend your elbow to 90 degrees and then tuck it firmly against your side—placing a rolled towel between your elbow and torso can help maintain proper form.
- Your forearm should be positioned outward, away from your body.
- After that, engage your core.
- Slowly pull the band inward across your body, rotating only at the shoulder joint, until your forearm crosses in front of your belly.
- Pause briefly, then slowly return to the starting position under control.
- Perform 10–15 repetitions for 2–3 sets on each side, resting for 30–45 seconds between sets.
Targets internal rotators and then stabilizes the shoulder joint.
6. Pendulum Swings
How to do it:
- Begin in a standing position next to a chair or sturdy surface.
- Place your non-injured hand on the chair for support and step your feet hip-width apart.
- Hinge forward at your hips while keeping your back flat and then your core gently engaged.
- Let your affected arm hang freely down toward the floor like a dead weight.
- From this relaxed position, begin to gently sway your body side-to-side or in small circular motions to allow the hanging arm to swing freely.
- The movement should come from your body—not the shoulder muscles.
- Perform for 30–60 seconds, gradually increasing the size of the swing as tolerated.
- Switch directions (forward-backward, side-to-side, circles) if comfortable.
- Repeat 2–3 rounds, resting 30 seconds between each.
Relieves tension and promotes blood flow in the injured side.
7. Isometric Shoulder External Rotation
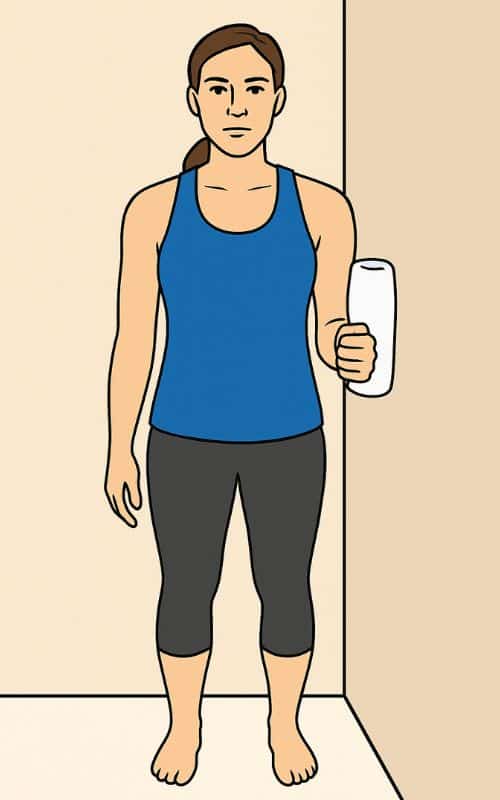
How to do it:
- Begin in an upright standing position beside a wall, with your feet hip-width apart and then your core gently engaged.
- Maintain good posture from your head to your hips.
- Position your elbow at a 90-degree angle, tucked snugly at your side, with your forearm pointing forward.
- Place a small towel roll between your elbow and torso to help maintain alignment.
- With the back of your hand or wrist pressing gently against the wall, apply light pressure as if you’re trying to rotate your arm outward, without actually moving your arm.
- This is an isometric contraction, so your arm stays still while the muscles engage.
- Hold this contraction for 5–10 seconds, then relax.
- Repeat the hold for 8–12 repetitions on each side, completing 2–3 sets. Rest for 30–45 seconds between sets.
Activates shoulder stabilizers without joint irritation.
8. Banded Rows
How to do it:
- Begin in an upright standing position with your feet hip-width apart.
- Step one foot slightly back and hinge forward at the hips, keeping your spine straight and chest lifted.
- After that, hold the band handles (or dumbbells) in each hand, arms extended down below your shoulders, palms facing in.
- Engage your core and then pull your elbows up and back along your sides, squeezing your shoulder blades together at the top of the movement.
- Pause briefly, then slowly lower your arms back down to the starting position.
- Maintain a strong, stable torso throughout the movement.
- Perform 10–15 repetitions for 2–3 sets, resting for 30–60 seconds between sets.
Builds strength in the upper back to support better posture.
9. Sleeper Stretch
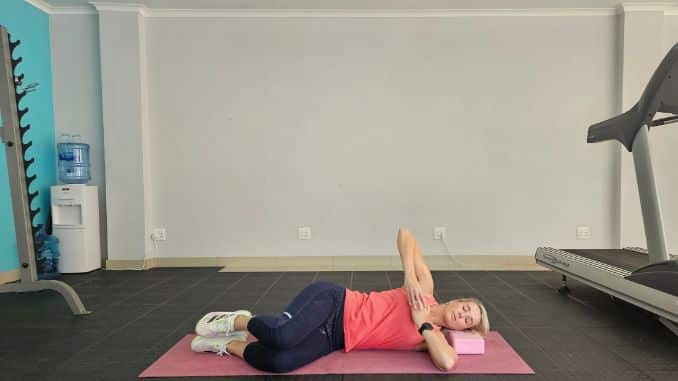
How to do it:
- Begin by lying on your side on a firm surface with a pillow or yoga block supporting your head.
- After that, bend your knees slightly and stack them comfortably.
- Position your bottom arm directly in front of your chest with your elbow bent at 90 degrees and your upper arm aligned with your shoulder.
- After that, engage your core.
- Using your top hand, gently press your lower forearm down toward the floor, rotating at the shoulder joint.
- You should feel a stretch deep in the back of your shoulder.
- Only go as far as you can without pain.
- Hold the stretch for 20–30 seconds, then release.
- Repeat for 2–3 repetitions on each side, resting briefly between reps.
Improves internal rotation and flexibility in the shoulder capsule.
10. Doorway Pec Stretch (One Arm Overhead)

How to do it:
- Begin in an upright standing position next to a doorway.
- Stand tall with your feet hip-width apart and then your core gently engaged.
- Raise one arm to about 120 degrees of shoulder abduction (slightly above shoulder height) and place your hand and forearm flat against the doorframe or wall.
- Keeping your arm fixed, gently rotate your torso away from the raised arm until you feel a stretch across your chest and the front of your shoulder.
- However, avoid shrugging your shoulders or letting your lower back arch.
- Hold the stretch for 20–30 seconds, breathing deeply and staying relaxed.
- Slowly return to the starting position.
- Repeat 2–3 times per side, resting briefly between sets.
Shoulder impingement exercises specifically target tight pectoral muscles that limit range of motion.
11. Scapular Push-Ups

How to do it:
- Begin in a high plank position with your hands directly under your shoulders, legs extended straight behind you, and feet hip-width apart.
- Maintain a straight line from your head to your heels, engaging your core and keeping your neck neutral.
- Without bending your elbows, slowly squeeze your shoulder blades together, allowing your chest to drop slightly between your arms.
- Then, press through your hands to spread your shoulder blades apart and lift your torso back up to the starting position.
- This movement should come strictly from the shoulder blades—not from your arms, spine, or hips.
- Perform 10–15 repetitions for 2–3 sets, resting 30–45 seconds between sets.
Reinforces scapular stability for better shoulder mechanics.
12. Elbow Slides on Wall
How to do it:
- Begin in an upright standing position with your back flat against a wall, feet hip-width apart, and then heels 6–12 inches away from the wall.
- Keep your lower back pressed gently into the wall by engaging your core and tucking your pelvis slightly.
- Raise your arms so that your elbows are bent to 90 degrees and the backs of your hands and elbows rest against the wall, forming a “W” shape.
- This is your starting position.
- From here, slowly slide your arms upward along the wall, aiming to straighten them into a “Y” or overhead position while keeping your hands, elbows, and shoulders in contact with the wall.
- Pause briefly at the top, then return to the starting “W” position.
- Repeat for 10–15 controlled reps for 2–3 sets, resting 30–45 seconds between sets.
When to See a Specialist for Shoulder Pain
If your shoulder pain:
- Persists longer than a few weeks
- Worsens despite exercise and ice packs
- Shoulder impingement exercises can help address pain that limits sleep or daily activities.
- Follows a car accident or traumatic injury
- Involves numbness, tingling, or weakness in the arm
It’s time to visit a physical therapist or orthopedic specialist. They can diagnose shoulder impingement using imaging and clinical tests, and recommend a tailored physical therapy plan.
Pro Tip: What Causes Shoulder Impingement?
Common culprits include:
- Poor posture [3] (slouched shoulders or forward head)
- Repetitive overhead movements (like lifting or throwing)
- Weak rotator cuff muscles
- Tight pectorals or biceps muscle strain
- Prior injury that narrows the subacromial space
What you Will Learn During the Webinar
- A 12-week shoulder impingement exercise [1] program that you can use right away with your shoulder impingement clients
- The exercises to DO and NOT do when training a client recovering from shoulder impingement
- Essential components of an exercise rehabilitation program when training a client recovering from it
- Recommended and research-backed exercises when training a client recovering from shoulder impingement
- Key structures
According to Dr. Benjamin Domb, MD – Orthopedic Surgeon & Founder of the American Hip Institute;
“Shoulder impingement is often driven by repetitive overhead activity and muscular imbalance. However, what surprises many patients is the significant role that posture plays in the problem. Forward head and rounded shoulders reduce the subacromial space, increasing the risk of tendon compression. Correcting posture and strengthening the rotator cuff and scapular stabilizers can drastically reduce symptoms, often more effectively than injections or surgery.”
These factors compress the rotator cuff tendons between the top outer edge of your shoulder blade and the upper arm bone — causing inflammation, impingement syndrome, and then a painful shoulder.
Bonus Tips to Speed Up Recovery
- Use a cold pack or ice pack post-exercise to reduce inflammation
- Avoid lifting your arm overhead repeatedly during flare-ups
- Shoulder impingement exercises focus on good posture throughout the day.
- Add chest stretches and then shoulder blade activation into your daily routine
- Progress slowly from bodyweight to light-weight exercises
Final Thoughts
Shoulder impingement doesn’t have to become a chronic problem.
With the right shoulder impingement exercises, you can reduce pain, improve function, and avoid surgery — all while gaining a stronger, more resilient shoulder joint.
Start small. Stay consistent. And if the pain lingers, don’t hesitate to consult a specialist who can build a customized exercise plan for your affected side.
Don’t let frozen shoulder hold you back. Download the Frozen Shoulder Solution now and start your journey to lasting relief with easy, proven exercises you can do at home.


Frequently Asked Questions
What exactly is shoulder impingement?
Shoulder impingement occurs when the rotator cuff tendons or fluid-filled sacs (bursae) in the shoulder joint get compressed between the upper arm bone and the shoulder blade (acromion). This compression leads to inflammation, pain, and limited mobility — especially during repetitive overhead movements like reaching, lifting, or throwing.
How do I know if I have shoulder impingement syndrome or something else?
Common signs include pain when lifting your arm overhead, reaching behind your back, or lying on the affected shoulder. You may also feel weakness, stiffness, or a dull ache that worsens with activity. To diagnose shoulder impingement, a physical therapist or orthopedic specialist may perform clinical tests or imaging to rule out rotator cuff tears or arthritis.
Can I treat shoulder impingement at home with exercises?
Yes — in many cases, targeted exercises can significantly reduce pain, improve mobility, and prevent the need for injections or surgery. Key moves include shoulder blade squeezes, external rotations, chest stretches, and wall angels. These exercises help create more space in the shoulder joint and retrain proper movement patterns.
1. Author links open overlay panel
MD David S. Morrison a, MD Brad S. Greenbaum a, PT, CSMT Andy Einhorn b
https://doi.org/10.1016/S0030-5898(05)70148-6
2. Field T. Blevins, MDa ∙ Mladen Djurasovic, MDc ∙ Evan L. Flatow, MDc ∙ Kathryn G. Vogel, PhDb
Affiliations & NotesArticle Info
Footnotes:
Address reprint requests to Field T. Blevins, MD, Department of Orthopaedics, University of New Mexico Medical Center, 2211 Lomas NE, Albuquerque, NM 87131
DOI: 10.1016/S0030-5898(05)70260-1
External Link
Also available on ScienceDirect
External Link
Copyright: © 1997 W. B. Saunders Company.
3. (With a Recitation of the Harmful Sequelæ)
Norman C Delarue
Copyright and License information
PMCID: PMC1824033 PMID: 13446812