which is not common mistakes when doing plank exercise?
Disclosure: This blog is meant to share general information and should not be taken as medical advice. Before starting any exercise routine, including planking, you should talk to your doctor or a fitness expert. This is especially true if you have any health issues or injuries that could make certain exercises unsafe for you. Always make sure you’re cleared to exercise before jumping in!
Let me be real—planking is one of the simplest yet most effective exercises out there. Whether you’re working on anterior core muscles, core strength, posture, or overall body stability, it’s a powerhouse move that delivers serious results.
But here’s the thing: doing planks wrong can cause pain instead of helping you. Knowing how to avoid common mistakes will keep you safe and make your workouts even more effective.
Now Let’s Look At 3 Common Plank Mistakes
Mistake # 1: Teepee Flank (Hips Too High)
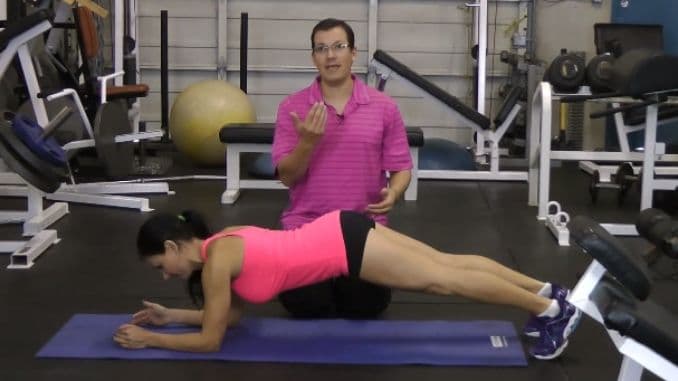
I once trained with a friend who kept raising her hips too high during planks because she thought it “helped her back.”
Understanding which is not common mistakes when doing plank exercise, such as proper hip alignment, helps protect your lower back.
In this common mistake, you elevate your hips, creating a teepee shape.
Holding this position can cause excessive activation and contraction of the hip flexors, altering the position of the lower back. This increases the amount of stress placed on the lower back.
In addition, it places additional strain on your shoulders.
How to fix it:
- Increase the width of your shoulder blades to relieve weight from your upper body while engaging the necessary core muscles.
- When holding a plank, there can be a lot of unnecessary shrugging in the shoulders that occurs. Depress your shoulders (wide) and keep them away from your ears.
- In addition, having your palms and hands spread in front of you on the floor can help to create more upper body stability.
After fixing her form, my friend started visualizing a straight line from her head to her heels. She told me she felt her core “turn on” for the first time, and her shoulder pain vanished after a week!
Mistake # 2: Dropping The Hips (Hips Too Low)
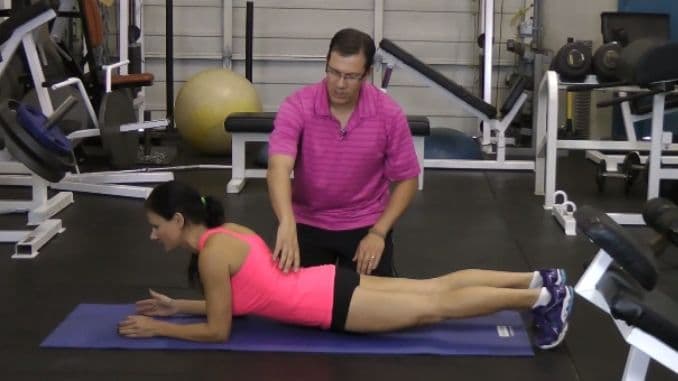
This was my biggest mistake early on. My lower back would arch because my hips kept sagging, and I didn’t even realize it was happening. It took several sessions with a physiotherapist to identify the problem and correct it.
In this demonstration, you can see the hips have dropped, creating a noticeable drooping appearance, and arching in the back.
This position places unnecessary stress on the back, specifically in the joints. Holding this position and continually making this mistake may result in irritation and potential damage and pain.
How to Fix It:
- Pointing the tailbone down a little and squeezing your glutes together will help to keep your hips up.
- Take several deep breaths while contracting and engaging your abdominal muscles [²]
- Give the feet more space between them to help you establish a more stable and stronger base.
Mistake # 3: Muscle Imbalances
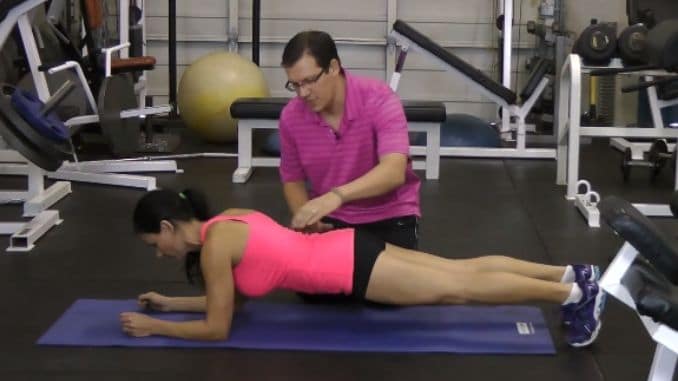
When I first started planking, I was over-relying on my shoulders, which left me feeling tight and exhausted.
It wasn’t until I learned to distribute the work that I started to feel the true power of a properly held plank.
Putting more of the workload on one muscle group than the others can cause muscle imbalances.
Doing this over time can increase stress on joints and tendons, creating unnecessary muscle tension as well as poor posture. Focusing too much on only one part of the body when performing plank can lead to muscle imbalances.
How to Fix It:
- Focus on isolating both the large and small core muscles.
- Keep your back straight and do not rest on your feet or hands.
- It’s important to keep in mind that the goal of the exercise is to strengthen your core, so you should maintain this position and stability all throughout the body while holding plank.
Planks aren’t just for fitness enthusiasts—they can be transformative for anyone at any age. Take Mary Carney, a 71-year-old who turned her health around with the 21-Day Fix program.
By committing to consistent exercise and proper form, Mary achieved an incredible milestone: holding a five-minute plank. At 71, she impressed her friends and even herself with this accomplishment, proving that age is no barrier to fitness. Reflecting on her journey, Mary shared:
“That is crazy at my age. At the end of the program, I did a five-minute plank.”
Planks became a powerful part of Mary’s routine, helping her build strength, lose weight, and feel more energized—all without injury.
Planking
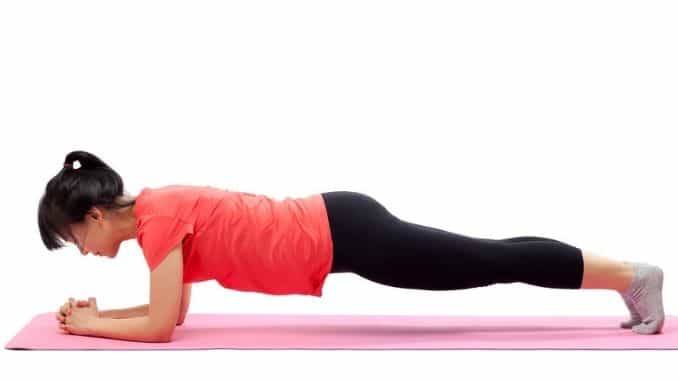
The plank is considered an isometric core strength exercise that is similar to the position of a push-up, without actually doing the push-up.
Whether you’re holding a “high plank” or “low plank”, knowing which is not common mistakes when doing plank exercise will make your workouts more effective and safer.
The lower body weight is held on the toes in both of these variations.
You can also consider many other variations of this exercise as extra challenges as your plank game improves. Commonly, planks are used in yoga, pilates, boxing, and many other sports for training purposes.
However, planks can be an amazing addition to any workout routine for many reasons.
Jenna Louise, a performance leader from The Yard Gym, highlights planks as an essential exercise for injury recovery due to their ability to strengthen core muscles and improve stability. By focusing on proper form, planks enhance core engagement, supporting the spine and reducing strain on other areas of the body. This promotes better posture and balance, which are critical for safe and effective movement during rehabilitation.
1. How To Perform Plank (forearm plank)
To ensure you’re following a proper plank position:
Begin in a 4-point position on the floor. Plant your elbows directly under your shoulders and contact your core. Step back with both legs to your toes, maintaining good alignment with your head, shoulders, hips, and legs. Hold this position for several deep belly breaths, in through your nose and out through your mouth. Relax and return to the starting position.
Besides forearm plank, you can also try plank variations, such as Reverse Plank, Side Plank, and Plank with Shoulder Taps. Hold each position for a few seconds to maximize the benefits.
Plank Duration and Progression Tips
- Beginners – Start with shorter holds (e.g., 10-20 seconds) and increase duration gradually.
- Intermediate – aim to hold a standard plank for 30 to 60 seconds with proper form. Once you consistently maintain a 60-second hold, consider adding variations or increasing intensity.
- Advanced – Incorporate variations such as side planks, plank with arm/leg lifts, or dynamic planks to increase intensity.
Modifications for Different Fitness Levels:
- Beginners – Perform planks on the knees to reduce strain and focus on core activation.
- Intermediate – Transition to standard planks and experiment with wider foot placement for stability.
- Advanced Add weights or use an unstable surface like a balance ball to challenge stability.
An inspiring story of recovery:
DonnaJean Wilde, a grandma from Canada, started doing planks after having wrist surgery. She wanted to get her strength back and used planks as part of her recovery. At first, she just focused on small goals, but over time, her core got super strong. She kept pushing herself and ended up holding a plank for 4 1/2 hours!
Her story shows how something as simple as planks can help you heal and become stronger than ever.
2. Safety Considerations When Practicing Planks
Practicing planks can be an amazing full body workout [¹], however, knowing which is not common mistakes when doing plank exercise can prevent unnecessary pain or injury.
If you have conditions that affect your back, joints and legs, like blood pressure or your pregnancy, make sure to use modifications or consult a professional before starting.
Using your best judgment and knowing your body when starting something new is always best. You can often make modifications to accommodate certain injuries.
Sarah Lindsay, a three-time Olympian, fitness expert and owner of Roar Fitness, emphasizes proper form is crucial to reap the benefits and avoid injuries.
She points out that planks not only tone the abs but also strengthen the entire midsection, supporting better posture and reducing strain on the lower back.
Take Away
Planks don’t have to hurt to work! By focusing on proper form, you can unlock the full benefits of this amazing exercise.
Doing this over time can increase stress on joints and tendons, creating unnecessary muscle tension as well as poor posture. Focusing too much on only one part of the body when performing plank can lead to muscle imbalances.
I’ve seen my back pain disappear, my core strength improve, and my confidence grow—and I know you can too.
If these tips help you, I’d love to hear your story.
We’d love to share even more helpful strategies for staying strong and healthy and preventing injuries. Check out our 7 Best Daily Habits for a Healthy Back just for you!
References
1.Evangelista, A. L., Braz, T. V., La Scala Teixeira, C. V., Rica, R. L., Alonso, A. C., Barbosa, W. A., Reis, V. M., Baker, J. S., Schoenfeld, B. J., Bocalini, D. S., & Greve, J. M. D. (2021). Split or full-body workout routine: which is best to increase muscle strength and hypertrophy? Einstein (São Paulo), 19. https://doi.org/10.31744/einstein_journal/2021ao5781
2. Iscoe, S. (1998). Control of abdominal muscles. Progress in Neurobiology, 56(4), 433–506. https://doi.org/10.1016/s0301-0082(98)00046-x

