

Medical Disclaimer: The information in this blog is for educational and enlightening purposes only and is not intended as medical advice. The content in this post is not meant to substitute for a professional medical diagnosis, advice, or treatment. Always ask advice from your physician or other qualified health providers with any questions you may have regarding a medical condition.
Femoral Anterior Glide Syndrome (FAGS) occurs when altered muscle activation disrupts the femoral head’s movement in the hip socket, causing pain, joint overuse, and inflammation.
Femoral Anterior Glide Syndrome occurs when the femoral head translates excessively anteriorly in the hip socket during hip flexion, leading to pain and restricted movement.
What Is the Anterior Femoral Head?
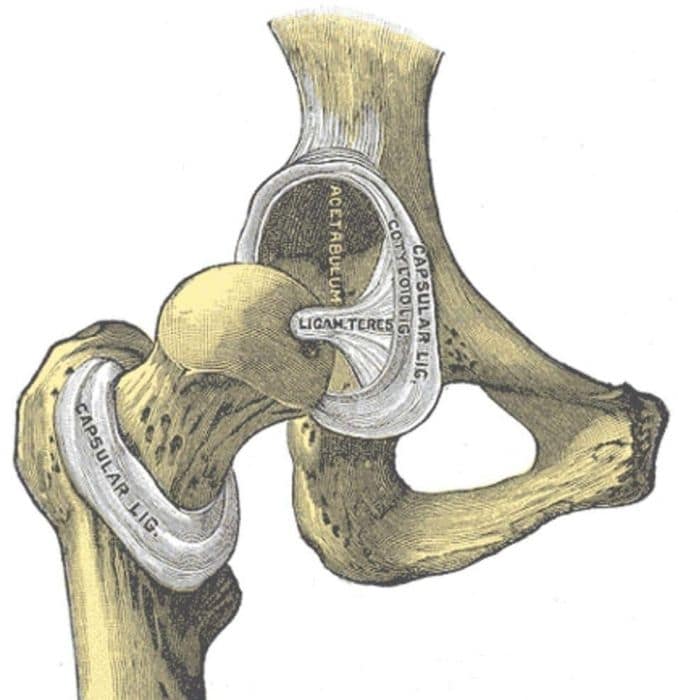
The femur is the medical term [1] for the thighbone, and the femoral head is the very top of that thighbone. It looks a little like a doorknob, extending out from the end of the thighbone via the femoral neck. The rounded end (sometimes called the “ball”) fits directly into the hip socket (the acetabulum), and thus forms part of the hip joint.
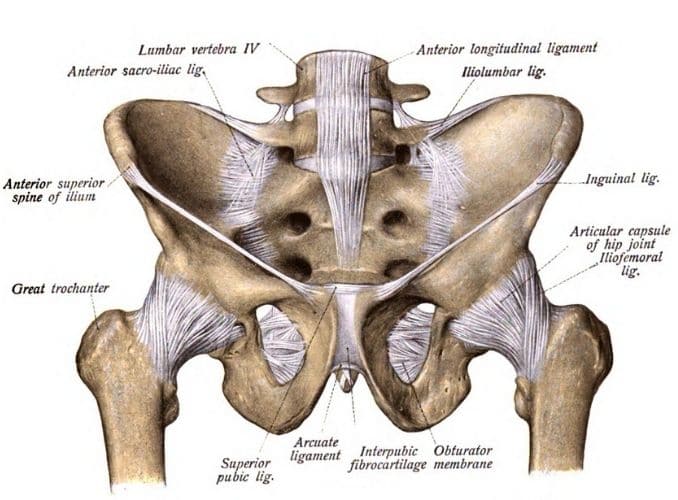
Bands of tissue called ligaments hold the femoral head into the socket, stabilizing the hip joint and forming the joint capsule. The capsule is lined with a thin membrane called the synovium, which produces a lubricating fluid that helps the hip joint move back and forth smoothly. Fluid-filled sacs called “bursae” also help cushion the joint and reduce friction between the bones.
Muscles Support the Femoral Head in the Hip Joint
Large muscles, including the following, surround the hip, supporting it and controlling movement:
- Gluteal muscles: These are the buttocks muscles and are located at the back of the hip.
- Abductor muscles: These are located on the inner thigh and help pull the leg inward.
- Iliopsoas muscles: These muscles start in the lower back and connect to the upper thighbones on each side.
- Quadriceps: There muscles exist at the front of the leg, running from the knee to the hip.
- Hamstrings: These muscles oppose the quadriceps, running up the back of the thigh from the hip to just below the knee.
Together, all these muscles help keep the femoral head centered in the middle of the acetabulum (hip socket), so that the hip moves easily and properly. When you bend your knee or make other movements involving the hip joint, the femoral head (ball) rolls and glides easily inside the socket unless something inhibits that movement.
What Is Femoral Anterior Head Syndrome?
Also called “femoral anterior glide syndrome” or “hip impingement,” this condition occurs when the femoral head, instead of remaining centered in the hip socket as you move, slides forward instead, pressing against the tissues at the front of the joint capsule, causing pain.
This condition is quite common among athletes, particularly runners, dancers, gymnasts, and martial arts practitioners — even those who love yoga. Others who regularly engage in activities that involve hip extension and hyperextension can also be at risk for this syndrome.
Symptoms of femoral anterior glide syndrome may include the following:
- Aching and pain in the hip joint, often radiating into the side of the thigh and the buttocks
- Dull aching, like bruising, progressing to a more piercing pain in the hip
- Groin pain, particularly during hip flexion or while standing
- Pain during squats or when you run, walk or engage in other physical activity
- Pain that limits mobility and makes exercise more difficult
- Tightness in the hips and a feeling like one needs to stretch more
- A pinching feeling in the hip joint
- Swelling in the hip joint
- A clicking sound in the hip when you walk
Without treatment, the syndrome will get worse and could cause additional injury within the hip joint, including muscle strains, bursitis, and tendonitis.
What Causes Femoral Anterior Glide Syndrome?
Muscle imbalances are usually to blame for anterior glide syndrome [2], which means that some muscles supporting the hip joint are stronger or weaker than others, resulting in abnormal stress that pulls the femoral head forward.
The problem usually shows up most prominently when you’re moving from a seated to an upright position or when you’re coming out of a squat.
As you move up, the hamstrings and gluteal muscles extend your hips, and it’s at this time that the femoral head moves forward too much, actually sort of “banging” into the front of the joint capsule. You are likely to feel this contact toward the top of the movement.
We can blame weak gluteal muscles for the issue because it’s up to them to keep the femoral head in place as you’re performing a movement like this.
The hamstrings are doing their job, but since the gluteal muscles are weak, they fail to do their part, so an imbalance occurs between the glutes and the hamstrings, and the strong hamstrings pull the femoral head too far forward.
Another potential cause is a general tightness or weakness in the iliopsoas muscles, which are the strongest hip flexor muscles.
They begin in the lower spine, cross the hip joint, and then connect to the femur. Also called the “anterior hip muscles” or “inner hip muscles,” these are especially important for standing, walking and running. They also help stabilize the lower back and allow you to bend your hips and legs toward your chest as when you’re going upstairs.
If the iliopsoas muscles [3] become too tight, they tend to pull the hip forward, creating a swayback posture and placing stress on the hip, leading to instability in the hip joints.
Tight iliopsoas muscles can also cause low back pain because they pull on the pelvis and affect the range of motion in the low back and hip.
If the iliopsoas muscles are weak and tight, other muscles are forced to compensate, pulling the body out of whack and causing hip pain as well as lower back pain, cramping and strains and a higher risk of injury.
You may be prone to gluteal weakness and iliopsoas tightness and weakness if the following apply to you:
- You sit for long periods of time. Prolonged sitting causes the femoral head to move up and forward in the hip socket and also tilts the pelvis forward, increasing strain on the hip.
- You sleep in the fetal position.
- You do a lot of sit-ups.
- You run and walk a lot without adequate rest in between or without adequate strengthening exercises.
- You suffer from lower back pain.
- You suffer from constipation. A tight iliopsoas muscle can make it more difficult to move your bowels.
- Your posture looks swaybacked.
- You have a “flat butt” because of a flattened lumbar spine.
Symptoms:
- Pain during hip movements: Bending or straightening the hip can worsen the pain.
- Movement changes: Exercises like straight leg raises or hip extensions may cause the hip bone to move oddly.
- Pain starts in the groin and can spread to the whole hip.
- Often linked with lower back, sacroiliac (SI) joint, and lower leg issues.
Femoral Anterior Glide Syndrome is caused by:
- Tight hamstrings that limit posterior pelvic tilt indirectly contribute to anterior translation of the femoral head.
- Weak gluteus maximus muscles fail to provide adequate posterior support, allowing anterior glide of the femoral head.
- Weak Psoas is not stabilizing the hip properly.
- Tight Hip Muscles restrict proper movement.
- Muscular Imbalances between hip flexors and extensors.
- Poor Hip Mechanics or posture affecting movement patterns.
Exercises to Help Treat Femoral Anterior Glide Syndrome

Unfortunately, we do not have a program that is specific to treat femoral anterior glide syndrome. There are many exercises, however, that you can do to correct this problem.
First, start with rest. The tissues in the hip joint may be bruised, so it’s important to give them time to heal. Begin by limiting for a few days to a week those exercises that cause repeated forward movement of the femoral head, including squats, lifting and heavy running.
Then, focus on strengthening neighboring muscle groups that are likely to be weak, including the gluteal muscles and the iliopsoas muscles as well as the abdominal muscles.
Finally, stretch and lengthen muscles that may be tight, including the iliopsoas and other surrounding muscles.
Exercises That Address Weak Gluteal Muscles
1. The Bridge
- Lie on your back on the floor with your knees bent and feet flat on the floor.
- Spread your hands on the side, contract your core, and press through your heels to lift your hips towards the ceiling, forming a straight line from your knees to your shoulders.
- Hold the position briefly, then slowly lower your hips back to the starting position.
2. Lateral Band Walks
- For this exercise to treat femoral anterior glide syndrome, place a resistance band around the legs above each ankle.
- Separate the feet slightly as you move into a 45-degree angle squat with your abs tucked in ― try to touch your belly button to your backbone.
- Step laterally across the room, then back.
3. Standing Leg Lifts
- Begin in an upright standing position beside a chair with your feet hip-width apart.
- Maintain good alignment with your head, shoulders, hips, and legs.
- Place one hand at the back of the chair for support while the opposite hand is on your hip.
- Engage your core muscles.
- Lift one and extend one leg to the side.
- Hold the position for 3 seconds.
- Return to the starting position and repeat the movement with 10 repetitions.
- Relax and repeat the movement on the opposite side.
Exercises That Address Weak Iliopsoas Muscles
1. Standing Gate Openers
- Begin in an upright standing position with your feet hip-width apart, maintain good alignment with your head, shoulders, hips, and legs.
- Place your hands on your hips.
- Engage your core muscles.
- Lift your your knees at hip level, then move it to the side, opening your hip as far as possible.
- Hold the position for 3 seconds.
- Return to the starting position and repeat the sequence of movements with 10 repetitions.
- Relax and repeat the movement on the opposite side.
2. Leg Throws
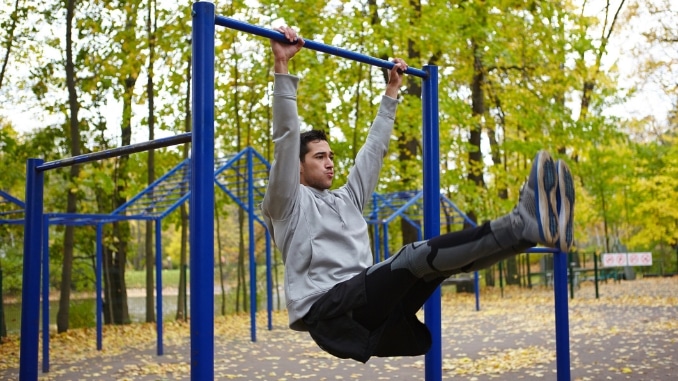
- Using a pull-up bar positioned high enough so that your feet can’t touch the floor, hang from the bar with your hands shoulder-width apart, palms facing forward, and feet together.
- Draw your knees upward as high as possible, then slowly return to the starting position and repeat.
- Avoid swinging your legs to build momentum into the upward phase of the exercise.
- Wear ankle weights to increase the resistance.
3. Seated Marches
- Begin in an upright sitting position on the edge of a chair, with your feet flat on the floor, and knees aligned with your hips.
- Keep your shoulders relaxed and engage your core.
- Slowly lift one knee towards your chest, bringing your foot off the floor, then lower it back down.
- Alternate lifting each knee in a slow, controlled march.
- Focus on maintaining good posture and steady breathing.
- Perform the movement for several rounds, taking deep belly breaths in through your nose and out through your mouth.
- Repeat the movement for a set duration or number of repetitions.
Exercises That Lengthen a Tight Iliopsoas Muscle
1. Hip Flexor Stretch
- Begin in a standing position with one foot forward and the other knee on the floor.
- Keep your posture upright with good alignment in your head, shoulders, and hips.
- Gently shift your hips forward, feeling a stretch in the hip flexor of the knee that is on the floor.
- Hold this position for several deep belly breaths, in through your nose and out through your mouth.
- Return to the starting position and repeat on the opposite side.
2. Knee to Chest
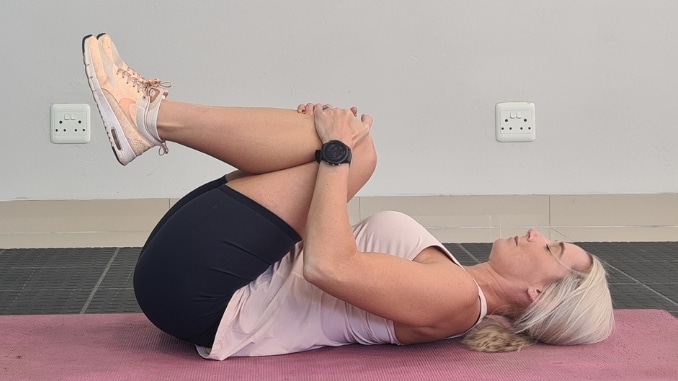
- Lie on your back with your knees bent and your feet flat on the floor.
- Raise both legs, holding your lower leg with both hands.
- Pull your knee closer to your chest to intensify the stretch.
- Hold the position for several deep belly breaths, in through your nose and out through your mouth.
- Relax, return to the starting position, and repeat the movement on the opposite side.
3. Pigeon Pose
- Start in a plank position.
- Draw in your left knee toward your chest, then turn it out so that the leg is bent, your foot is on the inside and the left leg is and near perpendicular to the right one.
- Let the knee and leg fall to the floor and lower down to the ground gently.
- Keep the right leg extended behind you and stabilize yourself on your elbows.
- Hold for 10 to 15 seconds, and then switch to the other side.
Conclusion
Femoral Anterior Glide Syndrome (FAGS) occurs when the femoral head moves incorrectly in the hip socket, causing anterior hip pain and limiting hip motion. It’s often caused by weak glutes and iliopsoas muscles, along with tight hip muscles.
Exercises like glute bridges, standing leg lifts, and prone hip extension help strengthen these muscles, promoting proper posterior glide and improving hip extension. Stretching exercises, such as the hip flexor stretch and pigeon pose, can relieve tightness and improve flexibility.
Regular exercise reduces pain, improves hip movement, and prevents future issues like inadequate posterior glide.
For the best exercises to strengthen your glutes, check out The Best Gluteus Medius Exercises now!
Frequently Asked Questions
What direction does the femoral head glide?
In a healthy hip, the femoral head (the ball of the thigh bone) should glide posteriorly (backward) during activities like hip flexion, allowing for smooth hip motion and full hip extension. In conditions like Femoral Anterior Glide Syndrome, the femoral head moves anteriorly (forward), causing anterior hip pain and limiting hip extension and flexion range of motion, particularly during dynamic activities. This abnormal glide can also contribute to groin pain and restrict complete hip extension, especially when the hip is flexed.
What is the most common direction of hip dislocation?
The most common direction of hip dislocation is posterior. This occurs when the femoral head is pushed backward out of the hip socket, often due to trauma like a car accident or fall. This type of dislocation results in significant posterior pelvic tilt and an inability to achieve hip external rotation and hip extension.
How do you treat femoral head impingement?
- Physical therapy to improve hip strength and flexibility, particularly strengthening the gluteus maximus, which helps promote posterior glide during hip extension and hip internal rotation.
- Manual muscle testing to assess muscle weakness or tightness that may be affecting hip motion or the hip extension angle.
- Anti-inflammatory medications are used to reduce pain and swelling in the hip and surrounding muscles.
- Rest and activity modification to avoid movements that aggravate symptoms, such as exercises that require active straight leg raise or excessive hip flexion.
Can you fix hip impingement without surgery?
- Physical therapy to strengthen the muscles around the hip, improve posterior glide, and correct movement impairments like inadequate posterior glide or limited hip adduction.
- Stretching exercises to improve flexibility, particularly focusing on areas that restrict hip internal rotation or limit complete hip extension. According to PT Professors, Techniques to improve joint mobility and soft tissue flexibility can be beneficial.
- Anti-inflammatory treatments, such as medications or injections, to reduce pain.
- Lifestyle modifications, such as avoiding positions or activities that exacerbate symptoms, like activities requiring a large hip extension angle or prolonged hip flexion.