

Floor slides are a gentle mobility exercise done lying on your back, sliding your arms in a goalpost or snow angel motion.
They help improve posture, shoulder mobility, and then reduce upper body tension.
Great for desk workers, tight shoulders, or age-related stiffness.
While usually done with arms on the floor or wall, variations can include sliders under hands or feet for added challenge.
Simple, effective, and then bodyweight-friendly.
Alternative to Floor Slides Exercise
1. Floor Wall Slide
- In the traditional Floor Wall Slides, your arms are out to the side.
- You will slide your arms along the floor, bringing your arms overhead, bringing you together, and then returning slowly.
- This is important because the last 10% puts your shoulder under greater stress and risk of injury.
- You have to work on this to have the full range of motion in your shoulder.
2. Foam Rolling the Thoracic Spine
- Place the foam roller on the lower part of your mid-back.
- Pop yourself up and then roll down and back up in a floor slides exercise.
- Remain straight over the foam roller and roll over that mid-back area.
- We are loosening up the thoracic spine [1] more by putting pressure on it and loosening it up in the anterior direction.
- After that, start at the lower back, rolling back to the mid-shoulder or upper shoulder blades.
- Do not roll onto your neck.
3. Arms Over Head on the Foam Roller
- This is a slightly more aggressive thoracic exercise.
- Have your arms shoulder-width apart, and then place the foam roller in your thoracic area.
- You can use tubing or put something in your hands to provide some resistance.
- A belt or dog leash will work.
- Bring your arms overhead and arch at that spot, trying to loosen up that vertebrae segment.
- The tubing gives you something to grasp, and having the arms overhead gives you more leverage to place more force on the thoracic spine.
- As you work through the exercise, move the foam roller slightly higher on your thoracic spine, working on mobility in different areas of the thoracic spine.
4. Isometrics into a Foam Roller
- Use a full foam roller or a half foam roller.
- In some ways, a half foam roller works better.
- You can use a rolled-up towel if you do not have a foam roller.
- Lie on your back and find that spot where you can’t bring your arms to the ground when you lift your arms out to the side.
- At that point, you are going to bring in the foam roller.
- Point your thumb up and push into that foam roller, then relax.
- And then move up about 30 degrees.
- After that, this will be your gauge.
- Focus on pushing it back and working those scapular muscles [2].
- You can continue with that isometric into the foam roller overhead.
5. Wall Slides (Against a Wall)
- Begin in a standing position with your back flat against a wall, feet about 12 inches away from the wall and shoulder-width apart.
- Bend your knees slightly and maintain contact between your head, upper back, and tailbone against the wall.
- Raise both arms to shoulder height, elbows bent at 90 degrees and the backs of your hands touching the wall.
- This is your starting position.
- Slowly slide your arms upward, extending them overhead while keeping your arms, shoulders, and back in contact with the wall.
- Pause briefly at the top, then slowly slide your arms back down to the starting position.
- Repeat the sequence for 10–15 repetitions, focusing on controlled motion and breathing deeply.
- Maintain a strong core throughout the movement.
6. Scaption Wall Slides
- Begin in an upright standing position facing a wall, feet hip-width apart, and maintaining good alignment with your head, shoulders, hips, and then legs.
- Hold a small ball or foam roller between your palms and the wall at shoulder height, with your elbows bent and forearms vertical.
- After that, engage your core.
- Slowly slide the ball up the wall at a 30–45° angle from your body (scaption plane), keeping light pressure on the ball.
- Pause briefly at the top, then slowly return to the starting position.
- Perform the movement for several repetitions, maintaining a smooth motion and steady breathing throughout.
7. Dead Bug
- Begin by lying on your back on the floor with your knees bent and then feet flat.
- Extend your arms toward the ceiling without weights for better control and stability.
- Engage your core and lift your legs into a tabletop position, keeping your knees bent at 90 degrees.
- While maintaining core tension and a flat lower back, slowly extend your right leg and left arm away from your body without touching the floor.
- Return to the starting position, then repeat the movement on the opposite side.
- Perform the sequence for several controlled repetitions, maintaining steady breathing and then proper alignment throughout the exercise.
8. Arm Circles
- Begin in an upright sitting position, maintaining good alignment with your upper body.
- Extend your arms out at your sides at shoulder-height and open your chest.
- After that, during the floor slides exercise, engage your core and move your arms in a large circular motion.
- Repeat the movement.
9. Shoulder Rolls
- Begin in an upright sitting position, maintaining good alignment with your upper body.
- Rest both hands on your upper legs.
- After that, engage your core.
- Shift your shoulders forward, then roll them up and back until you feel resistance in your shoulder blades.
- Relax and then repeat the movement.
10. Overhead Reach
- Begin in an upright standing position with your feet hip-width apart, maintaining good alignment with your head, shoulders, hips, and then legs.
- After that, engage your core.
- Gently lift one arm overhead and reach up and over to the opposite side, feeling a light stretch along the side of your body.
- Keep your hips level and then avoid leaning forward or backward.
- Hold the stretch briefly, then return to the starting position.
- Repeat the movement on the other side for several repetitions, breathing deeply and then moving with control.
11. Doorway Stretch
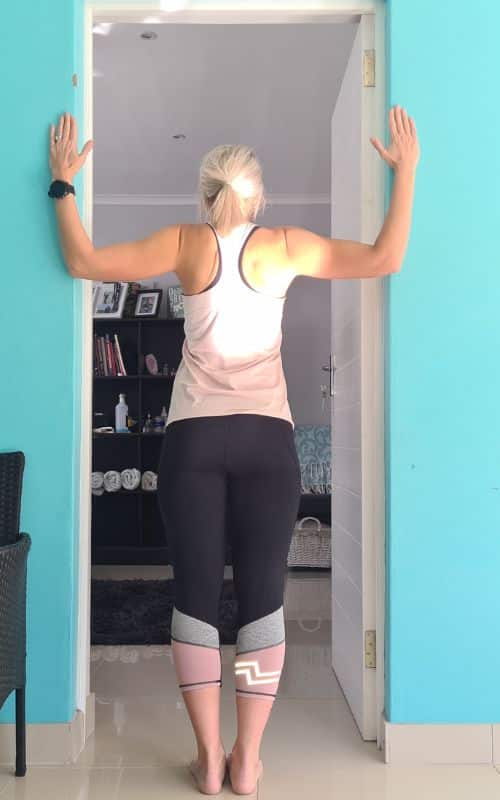
- Begin in an upright standing position in a doorway, maintaining good alignment with your head, shoulders, and hips.
- Position your arm at a 90-degree angle against the door frame.
- Lean forward gently to stretch your shoulder and chest.
- Hold this position for 20-30 seconds, taking deep breaths in through your nose and out through your mouth.
- Return to the starting position and then repeat the movement on the opposite arm.
12. Heel Slides
- Begin by lying on your back on the floor with your legs extended and arms resting at your sides, palms facing down.
- Maintain good alignment with your head, shoulders, hips, and legs.
- After that,engage your core.
- Slowly bend your right knee, sliding your heel along the floor toward your glutes.
- Pause, then slide the heel back to the starting position.
- Repeat the movement with your left knee, keeping your motion smooth and controlled.
- Perform the sequence for several deep belly breaths, in through your nose and out through your mouth.
Warm-Up and Preparation
- Begin with light cardio and dynamic stretches to warm up your muscles.
- Engage your core, relax your shoulders, and then bend your arms at 90 degrees with palms facing up.
- Take a moment to focus on your breath and then get mentally ready.
How to Properly Do the Floor Slide Exercise

- Begin by lying on your back with your knees bent and feet flat on the floor, maintaining good alignment with your head, shoulders, hips, and spine.
- After that, engage your core.
- Raise your arms into a goalpost position with elbows bent at 90 degrees and the backs of your hands, elbows, and shoulders resting on the floor.
- Slowly slide your arms upward along the floor, keeping as much contact as possible.
- Pause at the top, then slowly return to the starting position.
- Hold each position for several deep belly breaths, in through your nose and out through your mouth.
- Repeat the movement.
What Does It Do?
- Activates your core (abs, obliques, and deep stabilizer muscles).
- The floor slides exercise helps build trunk stability, which protects your lower back.
- Engages your core muscles more effectively than static exercises [3].
In this video, I will answer a question I received from the Exercises for Injuries Secret Facebook Group. It relates to a previous video where I had Donnalee go through Floor Wall Slides. In that exercise, you are lying on your back, moving your arms along the floor to overhead and back down to help with proper movement in the shoulder, firing all the muscles properly in the shoulder, and having all the joints work properly in the shoulder.
Benefits of Postural Corrective Exercises
The floor slides exercise is a gentle postural correction [4] movement that helps improve shoulder mobility, open the chest, and retrain proper alignment by activating key upper back and scapular stabilizer muscles.
- Helps pull your shoulders back to improve your body posture.
- Reduces pain in the neck, shoulders, and then upper back.
- Improves the range of motion and coordination in shoulder and arm movements.
- Loosens tight chest muscles that pull shoulders forward.
- Strengthens weak back muscles that support good posture.
- Lowers the risk of injury during daily tasks or workouts.
- Helps you sit and stand taller without extra effort.
- The floor slides exercise improves how your body looks and feels overall.
- Good for people who sit at a desk often.
- Easy, safe, and can be done without equipment.
Safety Precautions
- When performing any exercise, it’s essential to take safety precautions to avoid injury and ensure a successful workout.
- Start with a warm-up and stretching to prepare your muscles, and make sure to listen to your body and rest when needed.
- Use proper form and technique, and avoid pushing yourself too hard or trying to do too much too soon.
- Make sure to have a safe and supportive environment, with a smooth and even floor that won’t cause you to slip or fall.
Conclusion
Floor slides and slider exercises strengthen your core, glutes, and improve posture.
Floor slides engage your upper body, core, and glutes effectively, enhancing coordination—including wrists, torso, and legs.
Using sliders or paper plates on a hard floor adds resistance and improves control.
These low-impact moves help with balance, joint health, and better movement in the plank position or full-body exercises.
Simple, safe, and effective for all levels.
Discover simple, proven exercises in Shoulder Pain Solved to ease discomfort, restore mobility, and get back to doing what you love—pain-free. Start your recovery today!
FAQs
What are the benefits of sliding exercise?
Slider exercises—also known as slider planks, heel slides, or sliding core workouts—are powerful for building full-body strength and control. Because you must pull your body forward, back, or side using tools like paper plates or sliders on a hard floor, these movements challenge your entire body in a low-impact way. They activate stabilizing muscles in your wrists, legs, torso, and even your right knee, improving balance, coordination, and plank position endurance. Some movements also involve lifting the arms overhead with palms facing up, which improves posture and shoulder activation. Plus, these exercises engage more of your core than traditional static workouts.
What is a floor slider?
A floor slider is a compact tool—like a disc or gliding pad—that allows your hands or feet to glide smoothly across a surface. For example, you can slide your left foot, right knee, or right arm during a lunge, stretch, or core move. Whether you’re using actual sliders or makeshift paper plates, they introduce controlled instability to enhance muscle engagement in the torso, shoulders, and hips. Some variations even include reaching arms overhead with palms facing forward while engaging the core—great for total-body strength and control.
Are floor pedals good exercise?
Yes! While different from slider movements, floor pedals (like under-desk bikes or mini ellipticals) are great for low-impact cardio. They’re especially helpful for people with limited mobility or those sitting for long periods. Pedals help strengthen the legs, improve circulation, and support gentle calorie burn—without putting stress on the joints. While they don’t use the same sliding motion, you can pair them with light upper body stretches like overhead reaches with palms facing up for extra benefit.