
Are you looking to amplify your core and take your fitness to the next level? We’ve got you covered if you want to bring your workout to the next level and build a strong, powerful core. In this article, we’ll share five killer core workouts that will push your body to its limitations and help you achieve your fitness goals. These exercises will challenge you and leave you feeling stronger and more confident. So grab your workout mat and get ready to sweat—it’s time to unleash your inner fitness beast and take your core strength to new heights!
Why Are Core Exercises Important?
Killer core workouts are important because they help to develop and strengthen the muscles in the abdomen, pelvis, lower back, and hips. These muscles are critical for everyday activities such as lifting, twisting, and bending.
Similarly, a strong core is necessary for the following reasons:
- Responsible for stabilizing the body during movement.
- Improved balance and stability. When you have good core strength, you are less likely to fall or lose your balance during everyday activities or exercise. This is because the muscles work to keep your body stable and centered.
- Improved posture. Bad posture can lead to various health problems, including back pain, neck pain, and headaches.
- Improve athletic performance. Most sports require a strong core for optimal performance by improving core strength.
- Lose weight. The muscles in the abdomen support the spine and pelvis during exercise, and a strong core can help you perform more challenging exercises and burn more calories.
A strong core is essential for good overall health and fitness that is. It can improve balance, stability, posture, athletic performance, and weight loss. If you want to improve your core strength, consider incorporating exercises such as planks, sit-ups, and Russian twists into your workout routine.
5 Killer Core Workouts
Killer Core Workout is an exercise created to sculpt and strengthen the abdominal muscles. These killer core workouts have been designed to give a total-body workout that helps improve posture and mobility. The activities in the Core Moves are easy to follow, both for beginners and those with more experience. These exercises focus on basic movements such as crunches, planks, and leg lifts. They can help improve breathing and muscle coordination. The killer core workouts are particularly useful for people who sit at a desk all day.
Warm-Up
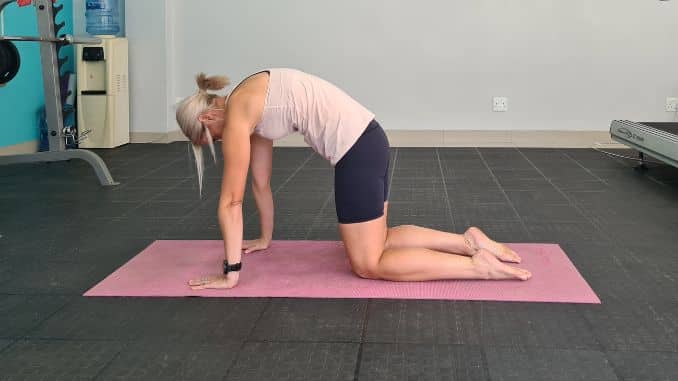
Cat-Cow
Begin in a 4-point position with your hands beneath your shoulders and your knees under your hips. Inhale and contract your abdominal area. Exhale and slowly round out your mid-back as you drop your head downward. Then alternate by inhaling as you slowly lift your head and arch your mid-back. Repeat the movement, alternating directions. Complete 5 repetitions.
 |
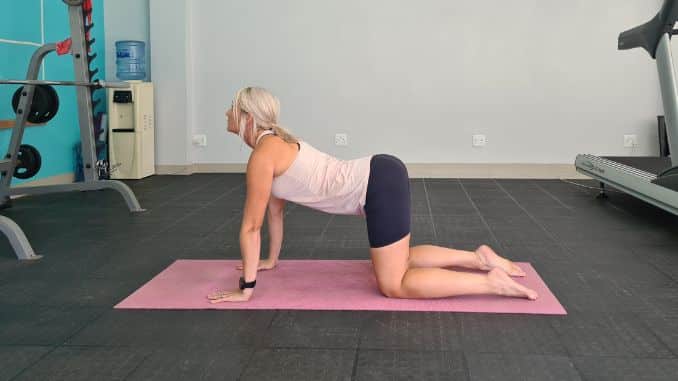 |
Cat-Cow
Routines
1. Roll Downs
Begin in an upright sitting position on the floor with your knees bent and toes raised toward the ceiling. Place your hands under your thighs and tuck your tailbone as you engage your abdominal muscles. Take a deep belly breath, then slowly roll your spine down towards the floor, one vertebra at a time. Lengthen your body at the end position by doing a full-body stretch, reaching through your fingertips and toes. Hold the position for a couple of seconds. Exhale and reverse the movement to return to the starting position. Repeat the movement for 6 repetitions.
 |
 |
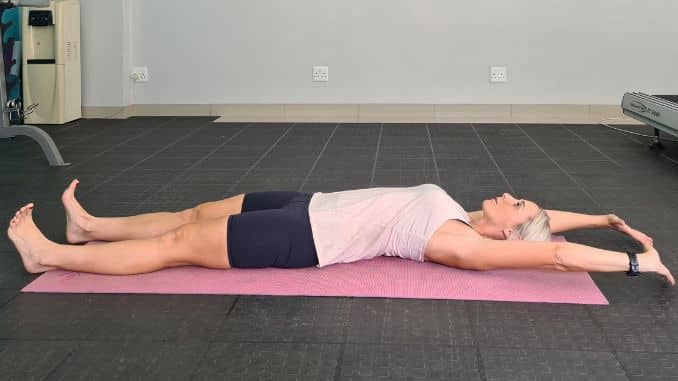 |
Roll Downs
How Roll Downs challenge your core stability and Control
Roll downs are a classic Pilates exercise commonly used to challenge core stability and control.
While Roll Downs may seem simple, they require a great deal of core stability and control. This is because the movement involves a slow and controlled lowering of the spine, which requires the abdominal muscles to engage and stabilize the spine as it moves.
Modifications for beginners and advanced
While this exercise can be challenging for beginners, it can also be modified to make it more accessible or more challenging for advanced exercisers.
For beginners:
a. Use a prop
Beginners may benefit from using a small ball or a rolled-up towel placed behind their lower back to provide support as they roll down.
b. Take it slow
Encourage beginners to take their time with the exercise and focus on the movement rather than speed. This will help them develop proper form and prevent injury.
c. Modify the range of motion
If rolling down to the floor is too difficult, beginners can stop at a comfortable point and gradually work towards a deeper stretch.
d. Use the arms for assistance
Beginners can use their arms by either reaching them forward or holding them behind their legs to help them roll down and come back up more easily.
For advanced exercisers:
a. Add resistance
Advanced exercisers can hold a small weight or resistance band to increase the intensity of the exercise.
b. Increase the range of motion
Encourage advanced exercisers to go deeper into the stretch and roll down to the floor, pausing briefly before rolling back up.
c. Add complexity
Advanced exercisers can add variations to the exercise, such as incorporating a rotation or a balance challenge.
d. Decrease the base of support
Advanced exercisers can challenge their balance and stability by performing Roll Downs on an unstable surface, such as a stability ball or a foam roller.
Benefits of Roll Downs for Your Core Exercises
Here are some reassuring words about the benefits of Roll Downs for your core:
- Strengthen your abdominals. Roll downs engage your abdominals, which is essential for maintaining good posture and supporting your lower back.
- Improve your spinal mobility. By slowly rolling down one vertebra at a time, you are increasing the mobility of your spine, which is essential for preventing back pain and injury.
- Enhance your mind-body connection. Roll downs require a lot of focus and control, which can help improve your mind-body connection and overall body awareness.
- Tone your glutes and hamstrings. As you roll down, you will also be engaging your glutes and hamstrings, which will help tone and strengthen these important muscles.
- Increase your overall stability. By improving your core strength and stability through roll downs, you will also improve your overall balance and stability, which is important for all aspects of daily life.
For example, if you are a runner, improving your core strength and stability can help you maintain good form and prevent injuries. That is why it is good to have a killer core workout. If you are a desk worker, improving your core strength can help you maintain good posture and prevent back pain.
2. Single Knee Bent
Single Knee Bent Variation 1
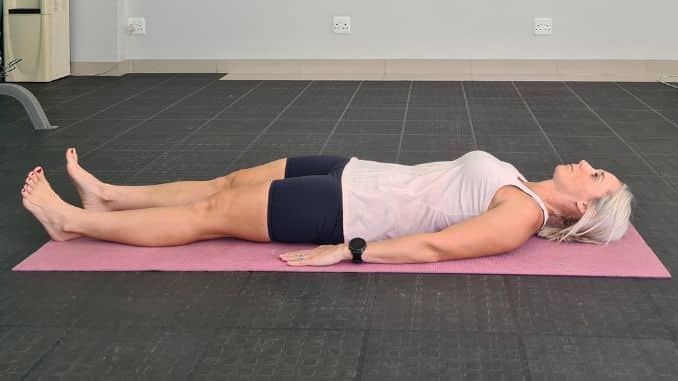
Lie on your back on the floor, maintaining good alignment with your head, shoulders, hips, and legs, relaxing your upper body. Place your hands at your sides. Engage your abdominal muscles, then bend one knee towards your chest, ideally at a 90-degree angle. Straighten your leg back down to return to the starting position and repeat the movement on the opposite side. Perform the movement for 6 repetitions, alternating sides. This way, it can help you in your killer core workout goal.
 |
 |
Variation 1
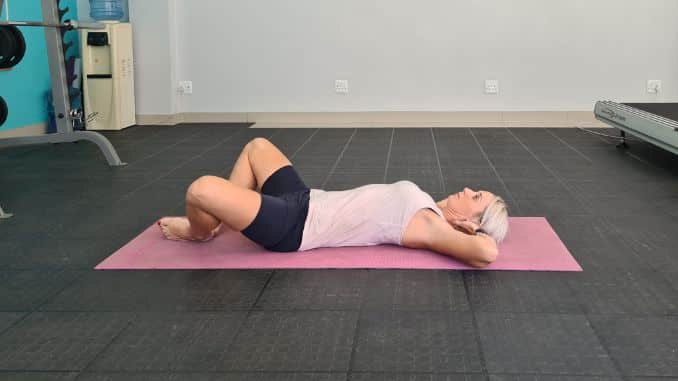
Single Knee Bent Variation 2
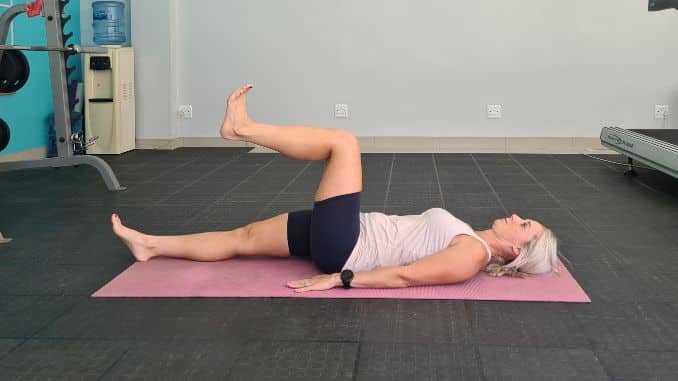
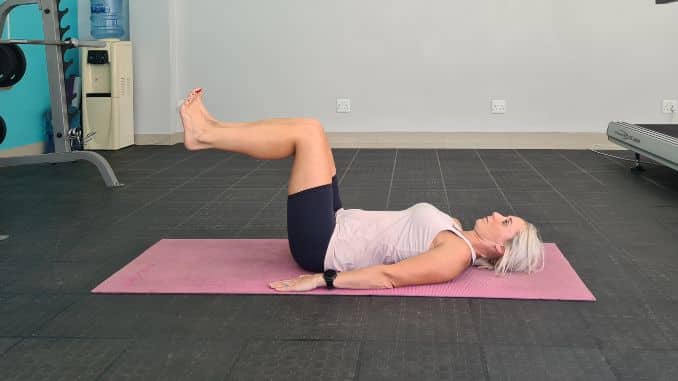
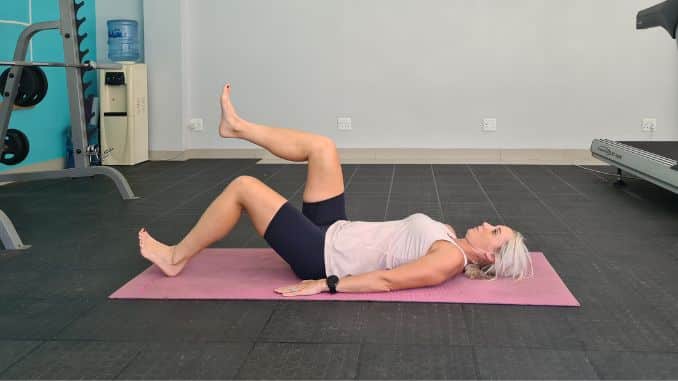
Lie on your back on the floor with your knees bent and feet flat on the floor. Place your arms at your sides and raise both knees to a 90-degree angle. Tighten your abdominal area and lower one leg down, tapping your heel on the floor. Return to the starting position and repeat the movement on the opposite side. Perform the movement for 6 repetitions, alternating sides. This variation can help you in a killer core workout.
 |
 |
Variation 2
Single Knee Bent Variation 3
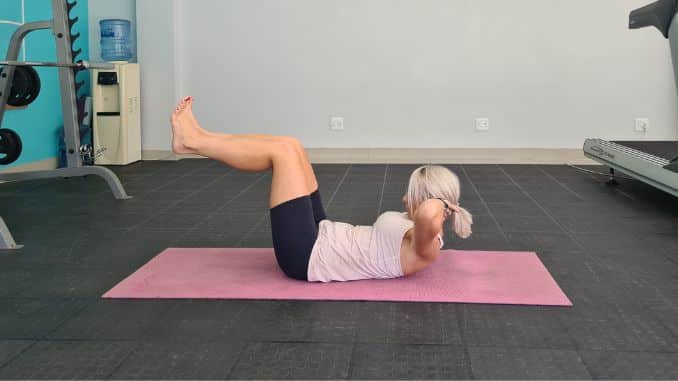
Lie on your back on the floor with your knees bent and feet flat on the floor. Place your hands by your ears or behind your head and raise both knees to a 90-degree angle. Engage your core and crunch your upper body forward. Lower one leg down, tapping your heel on the floor. Return to the starting position and repeat the movement on the opposite side, keeping your upper body curled up. Perform the movement for 6 repetitions, alternating legs.
 |
 |
Variation 3
How single knee bent challenges your core stability and control
This exercise challenges your core stability and control because it requires you to maintain a stable and neutral spine while moving one leg.
The weight shift caused by moving one leg can cause your core muscles to engage to maintain balance.
Modifications for beginners and advanced
For beginners:
a. Using a support
Use a support, such as a chair or a wall, for balance. This can help beginners maintain proper form and avoid falling over.
b. Reducing the range of motion
Start by lifting your foot slightly off the ground. As one gets stronger and more comfortable with the exercise, one can gradually increase the range of motion.
For advanced:
a. Add a pulse
At the end position, pulse your hips up a few inches before lowering back down. This will increase the intensity of the exercise and add an extra challenge to your glutes.
b. Use of weights or resistance
Use weights or resistance tubing to add resistance and make the exercise more challenging.
Benefits of single knee bent for your killer core workout
- Improved stability. Supine Knee Bents engage the deep stabilizing muscles in your core, which are responsible for providing stability and balance to your body.
- Better sports performance. Knee Bents can improve your core strength, leading to better performance in physical activities.
- Increased flexibility and strength. Increasing flexibility and strength can help reduce the risk of injury and improve overall mobility.
- Improved posture. The exercise can also help to improve your posture by strengthening your muscles in the abdomen, which can lead to better alignment of your spine and pelvis.
3. Bridge
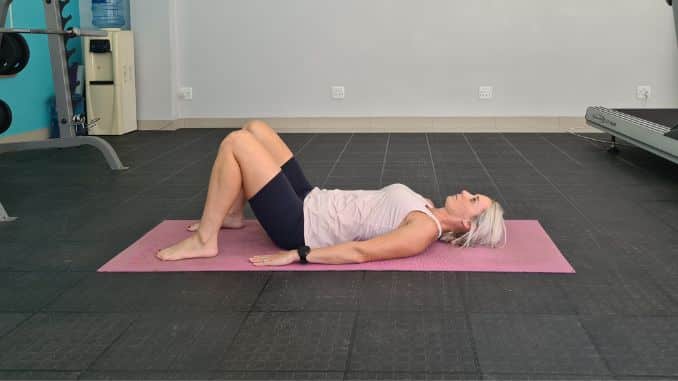
Lie on your back with your knees bent and your feet flat on the floor, relaxing your upper body. Place your hands at your sides. Engage your core, then push from your heels to lift your hips. Hold this position for several deep belly breaths, in through your nose and out through your mouth. Relax and return to the starting position.
 |
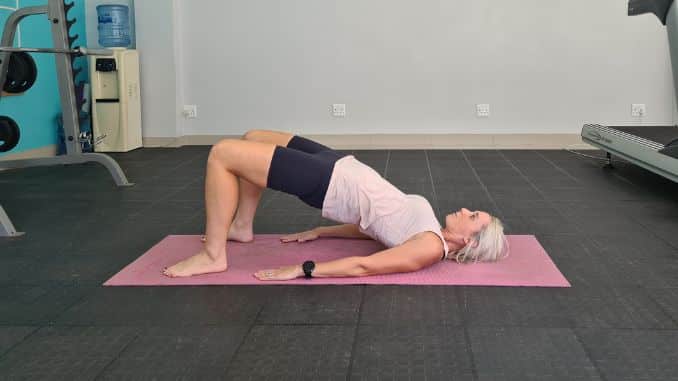 |
Bridge
How Bridge challenges your core stability and Control
Isometric exercises, such as Bridge, require the engagement of the glutes and hamstrings to lift the hips off the ground. However, to maintain balance and prevent the hips from dropping, the core muscles must also engage to keep the lower back stable. This requires activation of the deep abdominal muscles, which help to support the spine and pelvis.
If the lower back arches too much, it can strain the lumbar spine and lead to discomfort or injury. Therefore, the core muscles must maintain the spine in a neutral, stable position throughout the pose.
By incorporating movement. For example, adding a leg lift or alternating leg lifts while holding the pose can further engage the muscles and increase the challenge to balance and stability.
Modifications for beginners and advanced
Here are some modifications you can use for different levels:
For beginners:
a. Use a block under the sacrum
This modification can help you stay in the pose longer and build strength without straining your lower back.
b. Practice the half-bridge pose
Lie on your back on the mat with your legs bent and feet hip distance apart. Keep your feet and arms planted on the floor and lift your hips halfway up, keeping your shoulders and head on the mat. Hold for a few breaths and release.
c. Use a strap:
If you have tight hip flexors or hamstrings, wrap a yoga strap around your legs just above your knees to help engage your legs and glutes more effectively. Lift your hips and press your knees out to the sides to activate your outer thighs.
For advanced:
a. Lift one leg
Once comfortable in the Bridge pose, lift one leg off the ground and extend it toward the ceiling. This modification challenges your balance and strengthens your core and glutes on one side.
b. Practice Wheel Pose
The Wheel Pose is a full backbend that requires more strength and flexibility than the Bridge Pose. To come into the wheel pose, start by lying on your back with your knees bent and feet flat on the floor. Place your hands next to your ears with your fingers pointing toward your shoulders.
Press into your hands and feet to lift your hips and chest off the ground, coming into a full backbend. Hold for a few breaths and release down.
c. Use a block between your thighs
Place a yoga block between your thighs, then squeeze it to engage your inner thighs and glutes more effectively. This modification can make the Bridge pose more challenging and strengthen your legs and hips.
Benefits of Bridge for your core
Here are some key benefits of Bridge exercises for your killer core workout:
- Improved Posture: The Bridge exercise targets the muscles in the lower back, glutes, and hamstrings, contributing to good posture.
- Increased Flexibility: The Bridge exercise also helps to improve flexibility in your hip flexors and lower back muscles.
- Stronger Glutes and Hamstrings: Bridge exercises are excellent for targeting the glutes. Strengthening these muscles can help improve your balance, stability, and power. Strong glutes also reduce the risk of injury to your knees and lower back.
- Better Athletic Performance: A strong core is crucial for athletic performance. By strengthening your core muscles, you can improve your performance in any sport or physical activity.
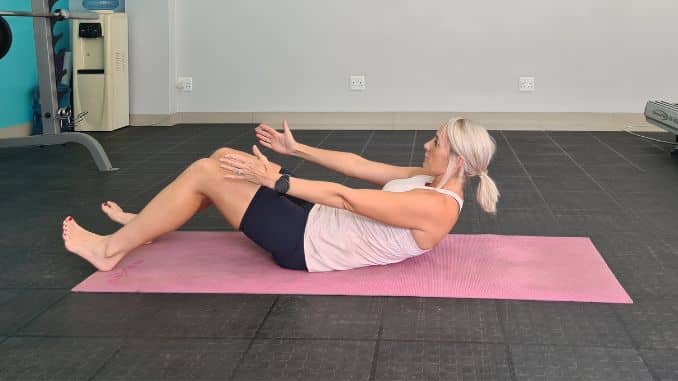
4. Butterfly Crunches
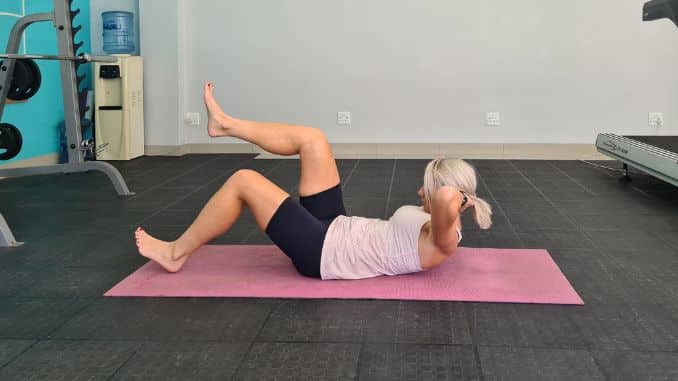
Lie on your back on the floor with your knees bent and feet flat on the floor. Place your hands by your ears or interlace your fingers behind your head. Inhale, bring the soles of your feet together, and open your knees out to the sides. Tighten your core, exhale, then crunch your upper body forward as you pull both knees in to touch your elbows. Inhale to return to the starting position, opening your chest and keeping your knees wide open. Perform the movement for 6 repetitions.
 |
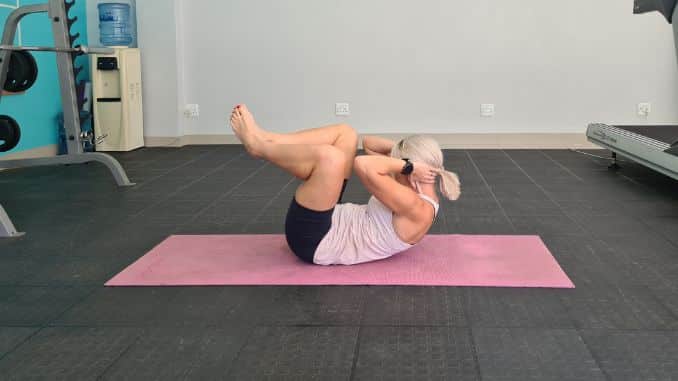 |
Butterfly Crunches
How Butterfly Crunches challenge your core stability and Control
Butterfly Crunches is a popular exercise that targets your rectus abdominis, the muscle responsible for creating the coveted six-pack look. During Butterfly Crunches, the movement targets your abs and engages your core muscles to keep your body stable and balanced. The butterfly position also adds extra resistance to the exercise, increasing the challenge for your core muscles. This is because your legs are in an open position, which means your core has to work harder to keep your lower body stable while you lift your upper body.
Modifications for beginners and advanced
Butterfly Crunches are a variation of traditional crunches that target the muscles in the abdomen. Here are some modifications you should try.
For Beginners:
a. Knee Tuck Butterfly Crunches
Lie on your back with your legs bent and your feet flat on the floor. Bring the soles of your feet together and let your knees fall open to the sides. Place your hands behind your head and engage your core. Raise your upper body and hinge through your hips to curl your upper body forward, bringing your elbows toward your knees. Hold this position for a few deep belly breaths, in through your nose and out through your mouth. Return to the starting position. Repeat the movement.
b. Butterfly Leg Raise
Lie on your back with your legs bent and your feet flat on the floor. Bring the soles of your feet together and let your knees fall open to the sides. Place your hands under your head for support. Engage your core and lift both legs, squeezing your inner thighs. Lower your legs down to the starting position and repeat the movement.
For Advanced:
a. Weighted Butterfly Sit-Ups
Lie on your back with your legs bent and your feet flat on the floor. Bring the soles of your feet together and let your knees fall open to the sides. Hold a weighted plate or dumbbell in both hands with your arms extended above your chest. Contract your abdominal muscles and raise your upper body to a sitting position, keeping your arms extended. Lower back down to the starting position and repeat the movement.
b. Toe Touch Butterfly Sit-Ups
Lie on your back with your legs bent and your feet flat on the floor. Place your hands above your head, bring the soles of your feet together, and let your knees fall open to the sides. Contract your abdominal muscles and raise your upper body to a sitting position, touching your toes with both hands. Return to the starting position and repeat the movement.
Benefits of Butterfly Crunches for your Killer Core Workout
Butterfly Crunches are a popular exercise that targets, particularly, the rectus abdominis, obliques, and transversus abdominis.
Here are some of the benefits of Butterfly Crunches for your core:
- Strengthening of abs muscles: Butterfly Crunches target the rectus abdominis, obliques, and transverse abdominis, which are responsible for maintaining core stability and improving posture.
- Improved Flexibility: Butterfly Crunches require a full range of motion, which can help improve flexibility and mobility in the spine.
- Increased Endurance: By working the muscles in the core, butterfly crunches can help increase endurance, allowing you to perform other exercises more efficiently.
- Reduced Risk of Injury: This core workout can assist in reducing the risk of injury during physical activities by providing support and stability to the spine and surrounding muscles.
5. Plank
Plank Variation 1
Begin in a 4-point position with your knees below your hips and your hands beneath your shoulders. Engage your core. Move into a straight-arm plank position from your knees, maintaining good alignment with your head, shoulders, hips, and knees. Hold this position for several deep belly breaths, in through your nose and out through your mouth. Relax and return to the starting position.
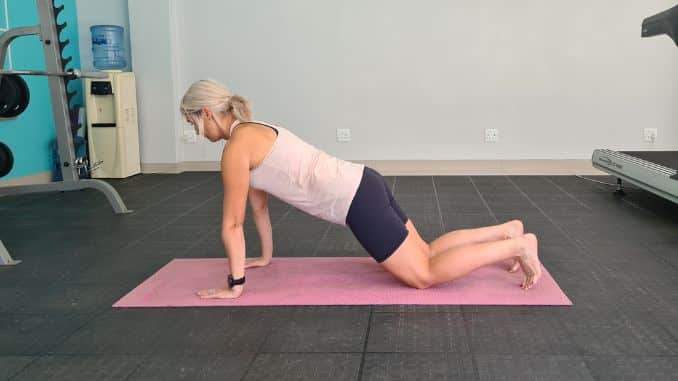
Variation 1
Plank Variation 2
Begin in a 4-point position with your knees below your hips and your hands beneath your shoulders. Engage your core. Move into a forearm plank position, maintaining good alignment in your upper body. Hold this position for several deep belly breaths, in through your nose and out through your mouth. Relax and return to the starting position.
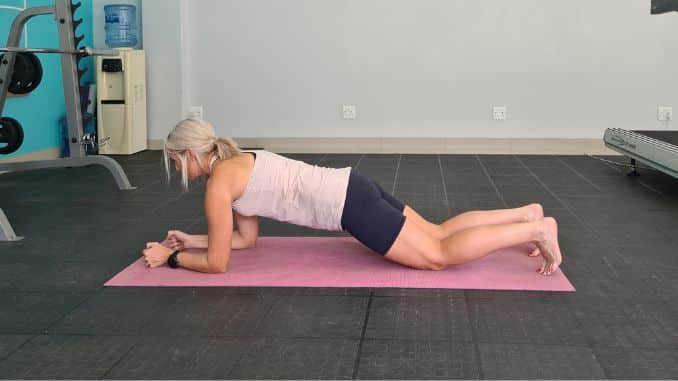
Variation 2
Plank Variation 3
Begin in a 4-point position with your knees below your hips and your hands beneath your shoulders. Engage your core. Move into a straight-arm plank position, maintaining good alignment with your head, shoulder, hips, and toes. Hold this position for several deep belly breaths, in through your nose and out through your mouth. Relax and return to the starting position.
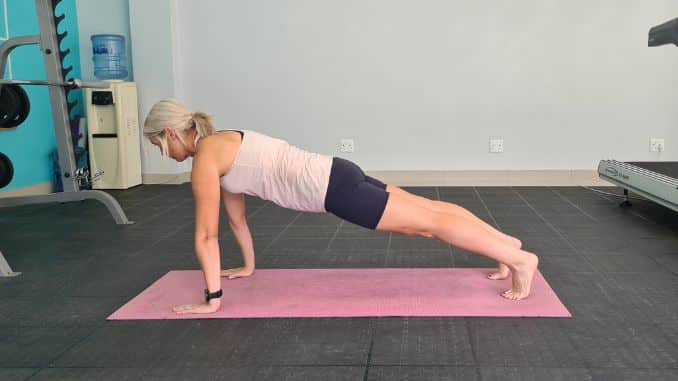
Variation 3
Plank Variation 4
Begin in a 4–point position with your knees below your hips and your hands beneath your shoulders. Move into a forearm plank position, maintaining good alignment with your head, shoulders, hips, and toes. Hold this position for several deep belly breaths, in through your nose and out through your mouth. Relax and return to the starting position.
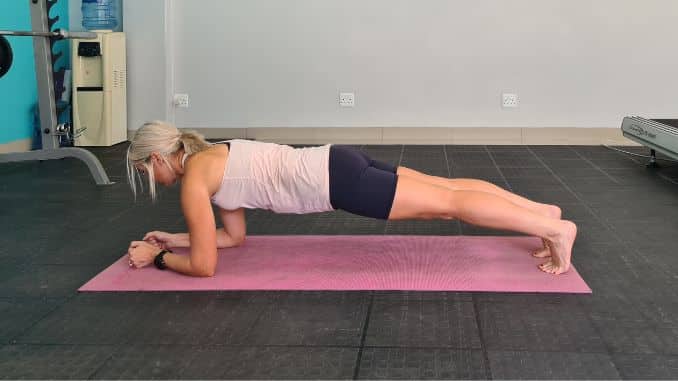
Variation 4
How Planks challenge your core stability and Control
Planks challenge your core stability and control by holding your body in a straight line. This requires constant engagement of your abdominal and lower back muscles to keep your spine in a neutral position.
Modifications for beginners and advanced
Aside from the above variations, here is one Plank modification a beginner should try.
Elevated Plank
For this exercise, use a bench, step, or chair that can support your body weight in a plank position.
Begin in a straight-arm plank position with both legs on top of a bench or chair, maintaining good alignment with your head, shoulders, hips, and legs. Hold the position for a few seconds or as long as your body can maintain proper form without arching your back or dropping your hips. Lower your feet back to the floor and rest for 10-15 seconds before repeating the exercise for 2-3 sets.
For added variation, you can also perform the movement with your arms resting on a stable and elevated surface instead.
This modification activates and lengthens your core, shoulders, legs, and lower-back muscles, increasing your stability and improving posture.
For advanced:
a. Side Plank
Move into a forearm plank position, maintaining good alignment with your head, shoulders, hips, and toes. Tighten up your abdominal area and move into a side plank position, extending one arm towards the ceiling.
Hold this position for several deep belly breaths, in through your nose and out through your mouth. Repeat the movement on the opposite side.
This modification requires you to balance on the one hand and the outside edge of your feet.
b. Plank Jacks
Begin in either a forearm or straight-arm plank position with your feet close together, maintaining good alignment with your head, shoulders, hips, and toes. Engage your core and glutes.
Depending on your comfort level, jump your feet wide apart, landing softly on your toes as far as your body allows. Jump your feet back in to return to the starting position while keeping your core tight. Repeat the movement.
This modification adds a cardio element to the plank exercise and stabilizes your hips and spine.
c. Spiderman Plank
Move into a straight-arm plank position with both your feet and hands shoulder-width apart. Take a big step forward with one foot and plant your foot on the outside of your hand to widen your hips. Keep your toes pointing straight ahead.
Hold this position for several deep belly breaths, in through your nose and out through your mouth. Step back to the starting position and repeat the movement on the opposite side.
This modification targets your obliques and hip flexors.
d. Plank Up-Downs
Start in a straight arm plank position, maintaining good alignment with your head, shoulders, hips, and toes. Engage your core. Lower yourself on one forearm to the floor, followed by the opposite forearm. Leading with the same arm, straighten one arm back up to return to a straight-arm plank position. Repeat the movement.
This modification reinforces and tones your core, glutes, arms, wrists, and shoulders.
e. Weighted Plank
For this exercise, use a light sandbag, stack of books, or weighted plate for added resistance.
Move into a straight-arm or forearm plank position, maintaining good alignment with your head, shoulders, hips, and toes. Keep your core engaged. Ask a workout buddy to place a light sandbag or stack of books on your back. Hold this position for a few seconds. Relax and remove the weight to return to the starting position. Repeat the movement.
You can increase the weight and duration of the exercise as you get stronger and aim to hold the plank position for a longer time or as your body allows.
Adding weight assists in building back power and stability and greatly increases core strength.
Benefits of Plank for your core
- Improve core strength. Planks help strengthen your core muscles responsible for supporting your spine and keeping you stable.
- Enhance balance and stability. Regular plank exercise can help to improve your balance and stability by engaging the muscles in your hips, lower back, and shoulders. This can also translate to better performance in all physical activities that require balance and stability.
- Increase flexibility. Planks work the muscles in your hips, lower back, and shoulders which can help to increase your flexibility over time.
- Better for back support than crunches. Crunches can cause strain to your lower back if they are not done correctly. Planks are a better exercise for supporting your back than traditional crunches because they don’t put as much pressure on your lower back.
- Boost metabolism. Planks help to increase your metabolism by engaging your core muscles responsible for burning more calories throughout the day.
Remember, if an exercise is too difficult, start with a modification and gradually work your way up to more advanced progressions. Similarly, if an exercise is too easy, challenge yourself by progressing to a more difficult variation.
Cool Down
1. Child’s Pose
Begin in a 4–point position with your knees below your hips and your hands beneath your shoulders. Tighten your abdominal area. Shift your hips back to your feet and extend your arms in front. Drop your forehead on the floor, relaxing your mid-back area for a light stretch. Hold this position for three deep belly breaths, in through your nose and out through your mouth. Return to the starting position.
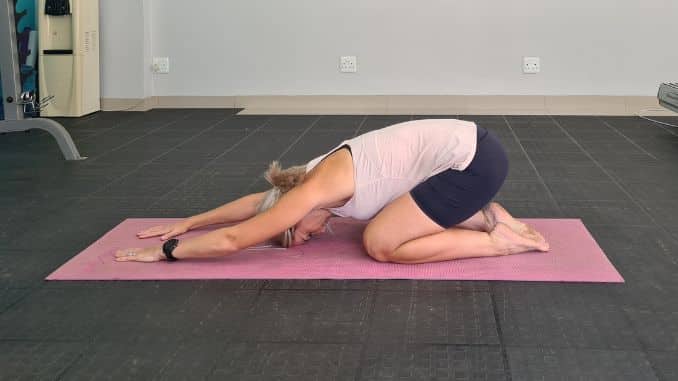
Child’s Pose
Conclusion
The primary role of the core is to maintain your spinal alignment while supporting the weight of your body. The core muscles must work together to keep the spine stable during movements and protect the organs in your abdomen from damage. A strong core protects the spine, prevents injury, and helps you perform everyday exercises efficiently. The core muscles are essential for balance, strength, and endurance. As you get older, these muscles tend to become lax. Doing these 5 Killer Core Workouts regularly can help reverse this trend and improve your balance and posture.