

Back pain [1] can disrupt daily life, limit activity, and then lead to weakening of major back muscles over time, making back strengthening exercises essential for recovery and prevention.
The good news is that with the right exercise program, you can strengthen your core muscles, improve flexibility, and then create balance across key muscle groups.
Below, you’ll find a complete spine conditioning program of bodyweight-based [2] back strengthening exercises.
These moves will help target the back, abdominal, and upper back muscles, while relieving stiffness and preventing future discomfort.
1. Back Arch
Starting position: Stand upright with your feet shoulder-width apart and hands on your lower back or pelvis.
- Slowly arch your back, focusing on movement in the low spine, and then return to the neutral spine position.
- Perform one set of 5 reps, moving in a smooth, controlled manner.
This mobility drill improves spinal movement and relieves stiffness without adding stress.
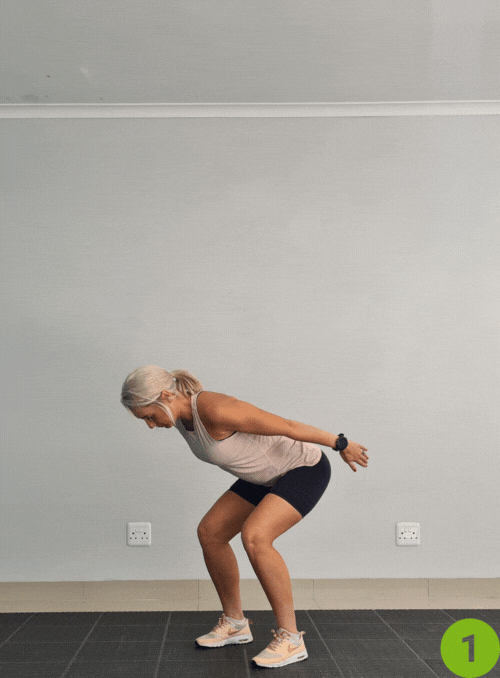
2. Deadlift Movement
Starting position: Stand with feet hip-width apart. Keep your knees straight but not locked.
- Tighten your abdominal muscles and then hinge forward at the hips, sliding your hands down the thighs toward the shins until your upper body is in a straight line.
- Slowly return to the starting position.
This teaches you to hinge at the hips instead of the spine, reducing strain and strengthening the extensor muscles.
3. Bridging Exercise
Starting position: Lie on your back with knees bent and feet flat on the floor, arms at your sides.
- Push through your feet, keeping them flat on the floor, and tighten your core muscles as part of your back strengthening exercises.
- Lift your hips until your shoulders, hips, and knees form a straight line.
- Hold briefly, then lower down.
Strengthens glutes, hamstrings, and back muscles, while stabilizing the spine.
4. Open-and-Close Exercise
Starting position: Lie on your left side with knees bent, legs stacked, and arms extended.
- Keeping your spine neutral, slowly rotate your right arm outward to open your chest.
- After that, slowly roll back to the starting position.
This targets the upper back and improves rotation while reducing muscular imbalances.
5. Modified Open-And-Close Exercise
- For those with limited mobility: move only partway, then return to the start.
- Gradually increase the range as your back loosens.
6. 3-Way Plank Movement
Starting position: On your elbows, with legs extended and body in a straight line.
- Hold the front plank for 2–3 breaths.
- Shift to a left side plank for a few seconds, then back to the center.
- Shift to the right side plank, and return.
Engages abdominal muscles, improves hip stability, and conditions multiple muscle groups [3].
7. 90/90 Hip Flexor Stretch
Starting position: Kneel with your right foot forward and then left knee bent at 90 degrees.
- Keep your spine neutral, contract your glutes, and then gently push your hips forward.
- Hold for 20 seconds, then switch to the other side.
Loosens tight hip flexors, which often contribute to back pain.
8. Bird Dog Exercise (Superman Variation)
Starting position: Lie face down with arms and legs extended.
- Lift your left arm and right leg straight off the ground.
- Hold, then lower.
- Alternate sides.
Strengthens the major back muscles, shoulder blades, and core muscles, improving stability.
9. Figure 4 Stretch
Starting position: Lie on your back with knees bent. Cross your left foot over your right knee.
- Gently pull the right leg toward your chest.
- Hold for several deep breaths, then switch to the other side.
Provides a gentle stretch for the glutes and hips, easing tension that affects the low back.
10. Back Bends
- Begin in an upright standing position with your feet together.
- Put your hands on your hips and then arch your back.
- Bring your head back and arch your midback and lower back.
- Hold for a few seconds and then return to the starting position.
- Repeat.
- After that, perform one set of 5 reps.
- Do this exercise in a smooth, controlled movement with a good stop at the end for a couple of seconds.
- The intensity is light.
- This is mainly a mobility exercise, so we are working on improving the movement of the spine, especially in the lower back area.
11. Full Body Openers
- Begin in an upright standing position with your arms at your sides.
- After that, squat down.
- Bend your knees, bringing your seat back, and then bending your hips.
- Bring your arms overhead slowly, straighten out, and then slightly arch with your head and back.
- Return to the squat position and then repeat the movement.
12. Classic Superman
Starting position: Lie face down with arms extended and toes pointed.
- Lift both arms and both legs, engaging erector spinae, glutes, and upper back muscles.
- Hold for 1–2 seconds before lowering.
A staple for building endurance in the back workout routine, supporting long-term pain relief.
13. Squat to Overhead Reach
Starting position: Stand tall with arms at your sides.
- Squat down with knees bent, then raise your arms overhead, straightening into an extended posture with a slight back arch.
- Return to squat and then repeat.
A full-body movement that integrates hip hinge mechanics, strengthens the core muscles, and improves posture.
According to Dr. Stuart McGill, PhD (Canada-based but highly recognized in the U.S. for his work with American athletes and back pain patients), Author of “Back Mechanic”: “Bodyweight strengthening and core stabilization are often more effective than traditional sit-ups or crunches for preventing back pain. The key is to train the spine to resist harmful movement, rather than flexing it repeatedly. Exercises like the bird dog, bridge, and modified planks help build endurance in the back muscles, creating a stable foundation that protects the spine during daily life and sport.”
Final Tips for Exercising Correctly
Slowly lift, slowly raise, gently pull — avoid jerky motions.
Focus on taking three deep breaths, holding each one to maintain stability and relaxation.
Keep your spine neutral whenever possible, hinging at the hips instead of the back.
If symptoms worsen, stop and consult a physical therapist or consider physical therapy as part of your recovery.
By following these targeted exercises, you’ll strengthen your back muscles, abdominal muscles, and then other muscles that support good posture.
This not only provides immediate pain relief but also builds resilience against future injuries.
Get fit anytime, anywhere with Bodyweight Workouts 101! No equipment, no excuses—just simple, effective moves to build strength, burn fat, and boost energy. Start today and discover how your body is the only gym you’ll ever need. Ready to transform? Let’s get moving!

Frequently Asked Questions
How often should I do back strengthening exercises?
Most people benefit from doing these back workouts two to three times per week. If you’re recovering from pain, begin slowly with fewer repetitions and then progress gradually.
Can bodyweight exercises really help with chronic back pain?
Yes. Research shows that targeted exercises like bridges, bird dog, and planks build endurance in the core muscles and major back muscles, which support the spine and provide long-term pain relief.
Should I consult a physical therapist before starting?
If you have severe or ongoing back pain or if your symptoms worsen during exercise, it’s always wise to consult a physical therapist. They can help tailor a safe spine conditioning program to your needs.