

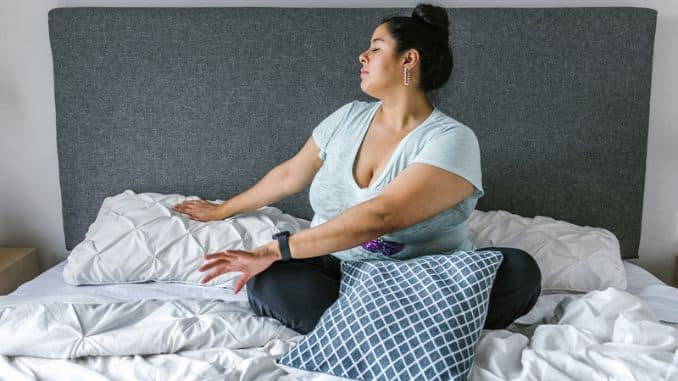
When it comes to back pain, most people assume that heavy lifting and bending over are to blame. But in most cases, tight muscles are the real culprit. Tight back muscles can lead to various issues, such as difficulty sitting upright, reaching overhead, or even just sitting without pain. However, you can do some simple movements to help improve your back mobility and ease the pain. Simple movements can help to relieve tension and increase movement range, allowing you to get through your day with less back pain.
That being said, there’s nothing more annoying than fully recovering from a nagging injury only to have it come back later because you didn’t continue to work on your recovery process. If you want to stay ahead of the game next time your back starts acting up again, keep reading for our top 4 tips on improving your back mobility.
4 Easy Movements to Improve Back Mobility
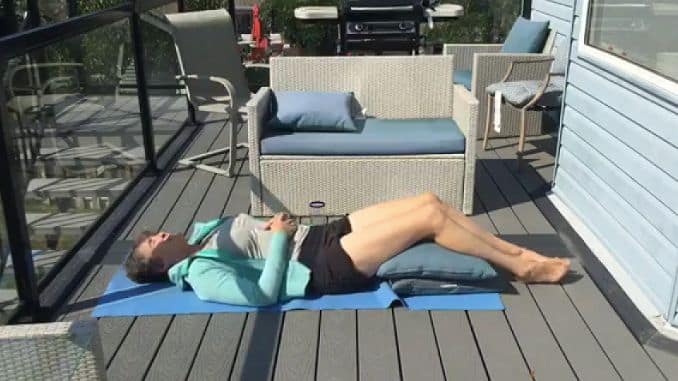
Starting Position:
Lie on a bed or the floor with your knees supported with pillows. This position allows your pelvis to fall back with a bit of a posterior tilt. It not only takes the weight of your leg off your body but also helps to give you a gentle letting go through your low back. Take some nice, deep breaths into your belly and your back ribs. This is a nice place to allow gravity to push you into the ground, thus allowing some letting go.
Question: I am recovering from a prolapsed disc. Is this okay? – Alison Roberts
Answer: Absolutely. All of these exercises can be very safe for that kind of condition. These are all very nice and safe. Getting some gentle movements going is important. If you feel uncomfortable or have pain in your legs, make the movements smaller. Getting into this static lying position is one thing, but getting some movement happening is your best medicine. As you start to feel more comfortable, getting some gentle movement is a great thing to do.
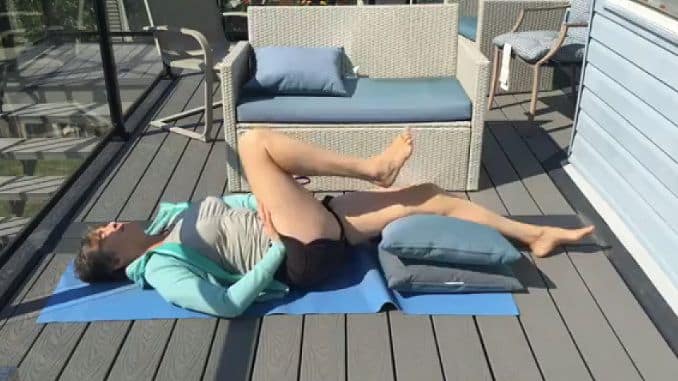
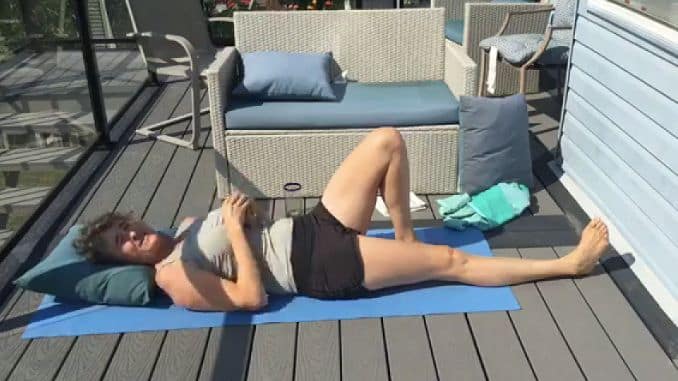
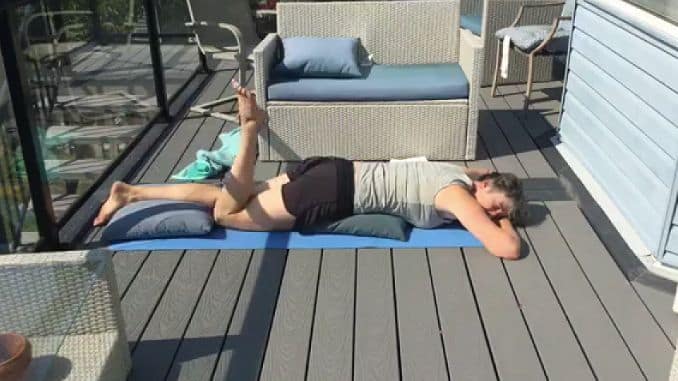
1. Knee To Chest (Flexion)
Lie on the floor, relaxing your upper body with your legs supported with pillows. Bend one knee towards your chest, then gently press your upper body up. Afterward, return to the starting position and repeat the movement on the opposite side.
To make the exercise more challenging, press your hands against your bent knee to create resistance.
This movement lets your hip flexors, abdominals, and trunk work a little more as you move in and out. If this movement is challenging, just let your leg come in and give it a gentle hug.
 |
 |
Knee To Chest
Alternative Exercise 1: Isometric Back Stretching (Extension)
For this exercise, you can use the wall, couch, or anything stable to push your hands against to create tension.
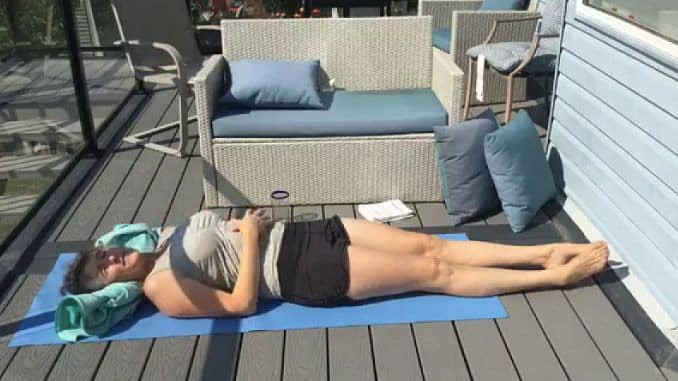
Lie on your back with your knees bent and your feet flat on the floor. Straighten one leg as you extend your arms overhead against the wall while maintaining good alignment with your arms, shoulders, hips, and legs. Press your hands against the wall and tighten your glutes on your extended leg. Afterward, hold this position for a couple of seconds. Relax to return to the starting position and repeat the movement on the opposite side.
You can point and flex your toes on your extended leg side to get your posterior pattern working.
Start with 1 set of 10 repetitions on each side.
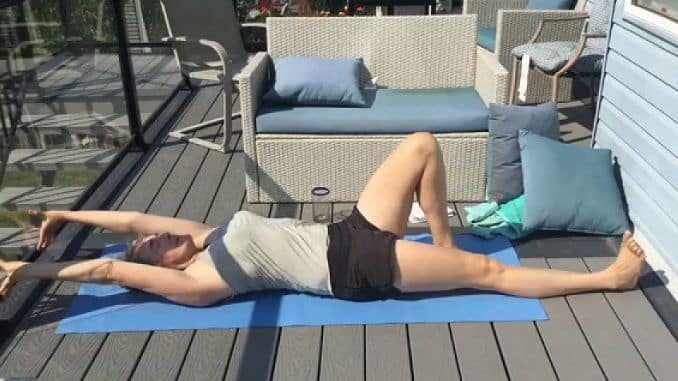
Isometric Back Stretching
Question: Are all these exercises safe if you have a herniated disc in your neck? – Michelle
Answer: Yes. We suggest that if you have disc issues in your neck, you can put a pillow under your head to fill in the space under your neck if it is uncomfortable to lie down without a pillow. You can also use a rolled-up towel or pillowcase under your neck.
Modifications if there is the presence of Cervical Disc Herniation:
If you suffer from cervical disc herniation, you know how debilitating the pain can be. The good news is that you can do some simple movements to help improve your back mobility and ease the pain.
- Put a pillow under your neck to fill the space on your neck
- Put a pillowcase or small towel under your neck
Alternative Exercise 2: Supine Side Bending
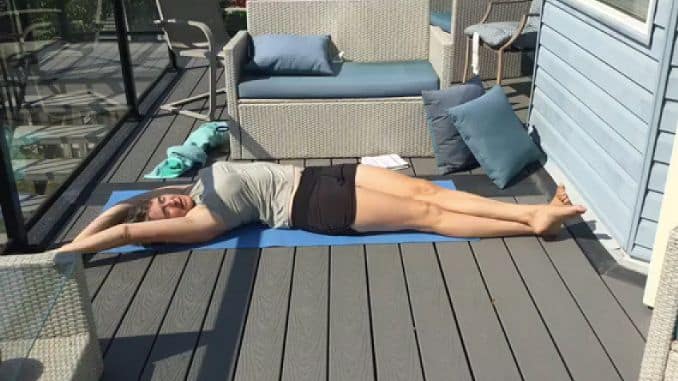
Lie on your back on the floor, maintaining good alignment with your head, shoulders, hips, and legs. Extend your arms overhead and cross one leg over the opposite foot. Bend your upper body to one side to get a light stretch on the side of your trunk and arms. Afterward, hold this position for 3–5 seconds. Relax to return to the starting position and repeat the movement on the opposite side.
 |
 |
Supine Side Bending
Alternative Exercise 3: Prone Back Stretching
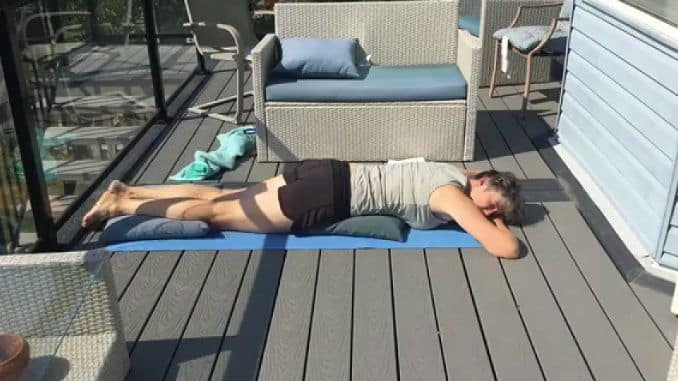
Lie on your stomach on the floor, maintaining good alignment with your head, shoulders, hips, and legs. Place a pillow underneath your hips and calves while resting your head on your hands. Bend one knee, pulling your heel in towards your seat. Afterward, lower your leg and repeat the movement on the opposite side.
Start with 1 set of 10 repetitions on each side.
 |
 |
Prone Back Stretching
If you want, lift your bent knee towards the sky to intensify this movement before lowering your leg back down.
Question: Are these movements appropriate for someone with bulging discs? – Peggy
Answer: Yes, absolutely, because making these kinds of movements is very important. Sometimes, discs protrude because of a lack of movement in one direction, so the spine is seeking movement in another direction, and that’s when things can happen.
Finding some gentle and easy movements that allow the back muscles to let go in both directions is important. The big thing is that you should feel comfortable doing it, so make sure you’re supported and that as you move, you can breathe.
If you feel stiff and uncomfortable, that’s okay as long as you can breathe through it, and as you go, it should ease, and the moving should get easier over time. If you’re getting pain down your leg and can’t make that go away by changing your position to make it easier, please consult a healthcare professional.
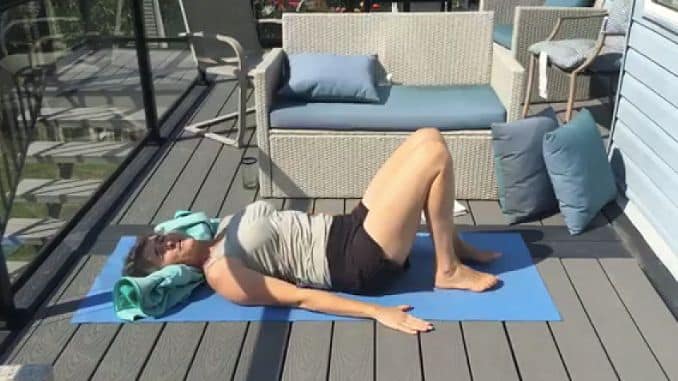
2. Trunk Rotation
Lie on your back with your knees bent and your feet flat on the floor. Place a pillow or rolled-up towel under your neck for support. You can either place your hands at your sides or extend them to the sides at shoulder height. Tighten your core and rotate your lower body to one side while bringing your knees toward the floor. Afterward, return to the starting position and repeat the movement on the opposite side.
 |
 |
Trunk Rotation
Question: How many times do we need to do each side? – Diane Scooby
Answer: We suggest 8–12 repetitions on each side. You can do 20 repetitions on each side if you’re rhythmically rotating.
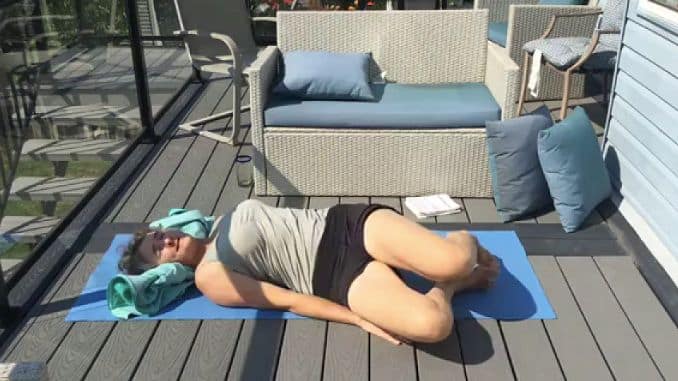
Alternative Exercise 1: Trunk Rotation with Pillow
Lie on your back with your knees bent and your feet flat on the floor. Squeeze a pillow between your knees. You can either place your hands at your sides or extend them to the sides at shoulder height. Tighten your core and rotate your lower body to one side while bringing the pillow towards the floor and turning your head to the opposite side. Afterward, return to the starting position and repeat the movement on the opposite side.
Trunk Rotation with Pillow
Question: Are these exercises safe with two total hip replacements? – Cindy
Answer: Absolutely. These exercises are safe if you keep your hip flexion at 90 to 100 degrees. If your hip replacement procedure is less than 3 months old, keep the hip flexion at 90 degrees. If it’s after 3 months, you can nudge that a little bit between 90 to 100 degrees, depending on where you’re comfortable. Everyone with a hip replacement will benefit from being in a position where a pillow supports their knees. It’s nice to have mobility in that situation.
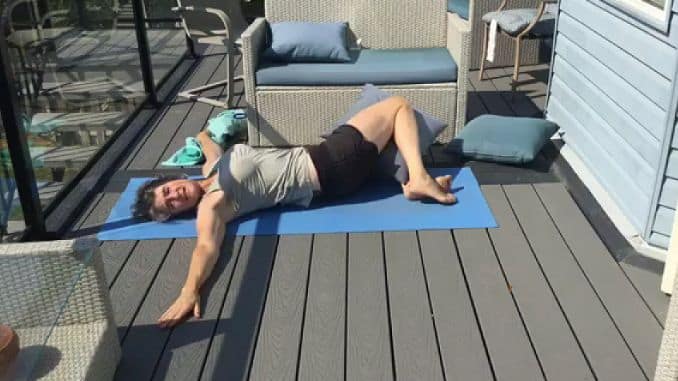
Alternative Exercise 2: Side Lying Trunk Rotation
For your neck support, you can either place a pillow or a rolled-up towel on the side of your head. Move into a side-lying position with your knees bent at 90 degrees, and squeeze a pillow between your knees. Straighten your arms in front of your body at shoulder height. Afterward, tighten your core and rotate your upper body, extending your top arm to the opposite side. Return to the starting position and repeat the movement on the opposite side.
You can use the resistance band to create tension to make the exercises more challenging.
Start with 1 set of 5–10 repetitions on each side.
 |
 |
Side Lying Trunk Rotation
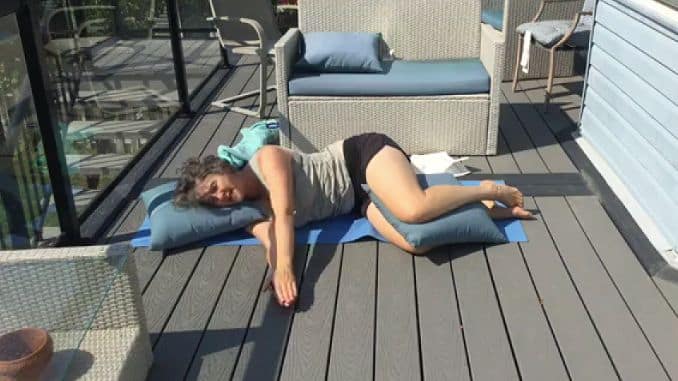
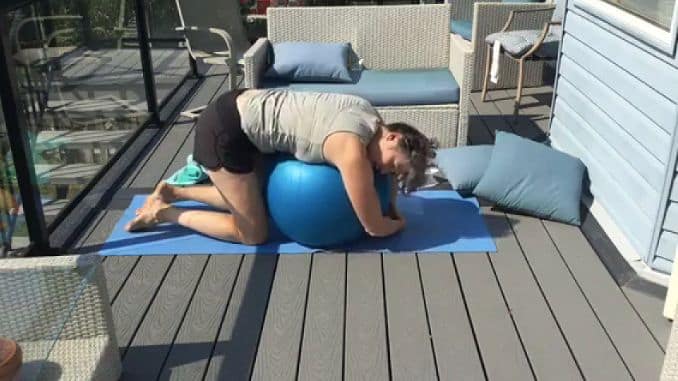
3. Child’s Pose
Begin in a 4-point position, with your hands underneath your shoulders and your knees underneath your hips. Use pillows to support your head, arms, and legs. Tighten your abdominal area, then shift your hips back to your feet. Rest your head on your hands while relaxing your midback area for a light stretch. Hold this position for a couple of seconds. Afterward, raise yourself back up and repeat the movement.
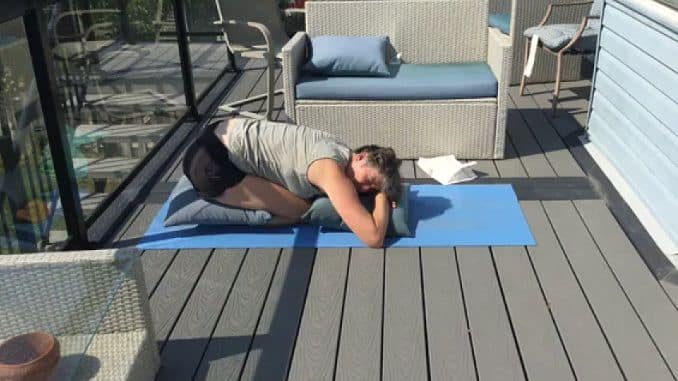
Child’s Pose
Alternative Exercise 1: Child’s Pose
To make the exercise more challenging, begin in a 4-point position, with your hands underneath your shoulders and your knees underneath your hips. Tighten your abdominal area. Shift your hips back to your feet while extending both arms out. Drop your head to the floor while relaxing your midback area for a light stretch. Afterward, hold this position for a couple of seconds. Return to the starting position and repeat the movement.
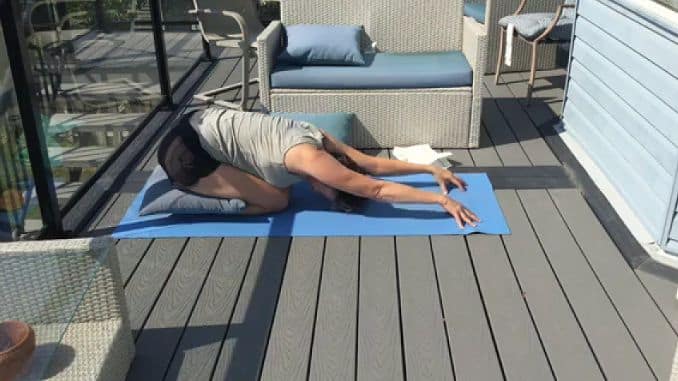
You can rest on a ball and rock back and forth if you want a little movement. This is a completely refreshing position.
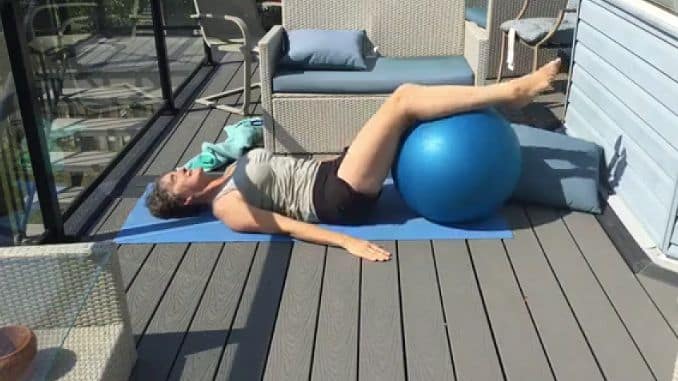
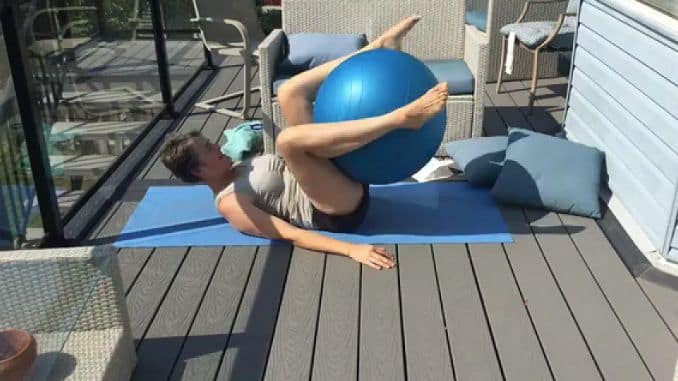
4. Reverse Sit Ups Variations
Lie on the floor, relaxing your upper body and placing your legs on the stability ball, ideally at a 90-degree angle. Afterward, tighten your core and rock the stability ball from side to side or in circles. Repeat the movement.
This movement allows “letting go” of your back and working on the trunk.
 |
 |
Reverse Sit Ups Variations
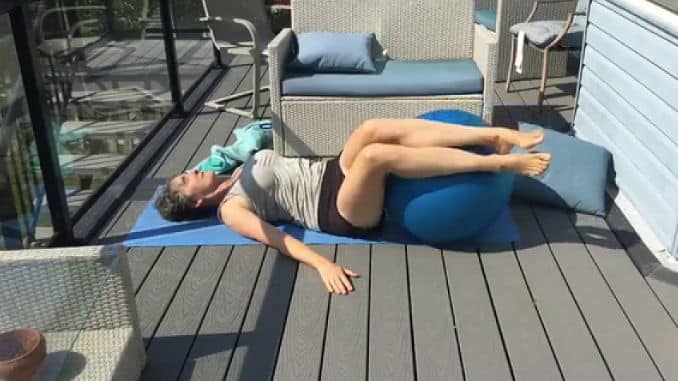
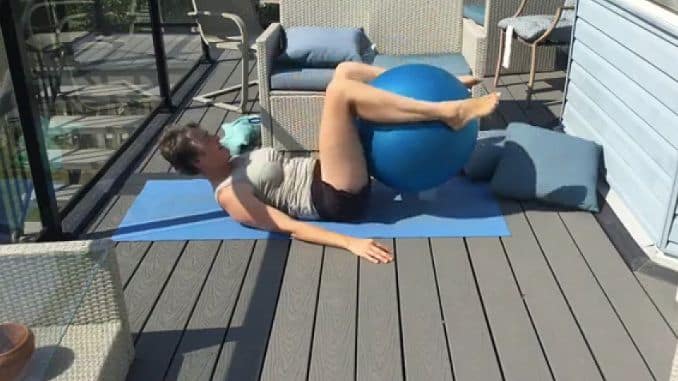
Alternative Exercise 1: Reverse Sit Ups Variations
Lie on the floor, placing the ball between your legs, ideally at 90 degrees. Tighten your core and pull your knees toward your chest while squeezing the ball tightly. Afterward, lower the ball to return to the starting position and repeat the movement.
 |
 |
Alternative Exercise 1: Reverse Sit Ups Variations
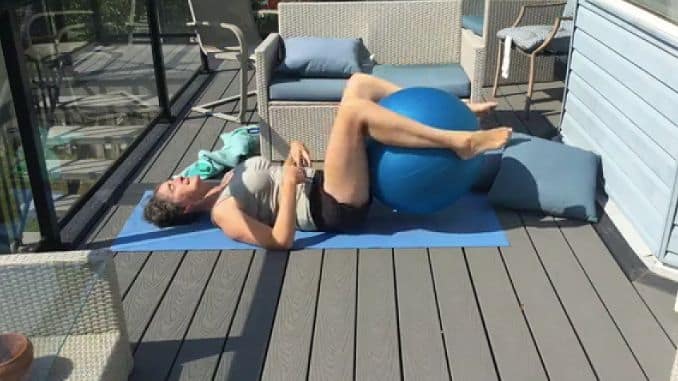
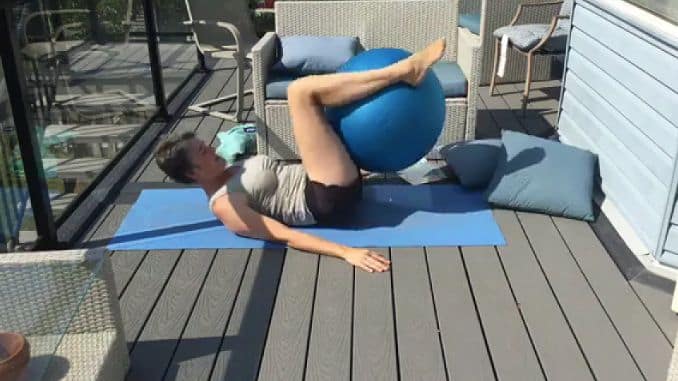
Alternative Exercise 2: Reverse Sit Ups Variations
Lie on the floor, placing the ball between your legs, ideally at 90 degrees. Tighten your core and crunch your upper body forward, bringing your legs into a circular motion while squeezing the ball tightly. Afterward, return to the starting position and repeat the movement in the opposite direction.
Start with 1 set of 5 repetitions in each direction.

Lie on the floor, placing the ball between your legs, ideally at 90 degrees. |
Moved your legs and the exercise ball in a circular motion to the right side – minimal movement |
Legs and the exercise ball are moved in a circular motion from the right side downward – minimal movement. |
Legs and the exercise ball are moved in a circular motion from below to the left side – minimal movement. |
Alternative Exercise 2: Reverse Sit Ups Variations
Question: What Size of Stability Ball Is Recommended?
Answer: The size of the stability ball depends on your height or the length of your legs. You should choose a 45 cm ball if you are between 4’6″ to 5′ tall. From 5’5″, select a 55 cm ball. If you are between 5’6″ and 6’2″, use a 65-cm ball. If your height exceeds 6’2″, opt for a 75-cm ball.
While some people have naturally strong backs, many more of us need to strengthen them. Strengthening your back will help you improve your back mobility and posture and prevent future injuries. Certainly, the first step to building strength in your back is to find a good exercise program that will challenge your muscles and build strength.
After all, this is a great time to start making healthy changes for your body and health and improve your back mobility. Try these four movements for back strength, and you’ll begin to see results in just a few weeks!