

Foam rolling, a simple yet powerful tool, can revolutionize your fitness routine. Whether you’re an athlete or just starting your fitness journey, incorporating a foam roller helps enhance muscle function and ease soreness.
I’ve personally found rolling before a workout warms up my muscles effectively, making exercises feel smoother. This guide will explain how to choose the right foam roller and utilize it to maximize benefits, including reduced injury risk and improved muscle recovery.
Perfect for anyone looking to boost their overall health and fitness, foam rolling is an affordable, effective way to keep your body in top shape.
Basic Techniques for Using a Foam Roller
Warm-Up:
“What foam rolling does pretty well is when it hits a certain area, there’s a neural modulation effect where your nervous system, typically perceiving that area to be generating some pain and discomfort, can be desensitized by foam rolling that area or even another area. You can take the nervous system and kind of desensitize it a little bit. The nervous system kind of freaks out, and afterward, it’s like, ‘Ah, whatever,’ and then it feels nice and loose and less painful. It can give the athlete the mental confidence to execute the technique for the exercise that’s being targeted much better, and that does happen to some people, which is why a lot of people like foam rolling.”- Ethan Suplee, Body Builder/Actor
Cool-Down:
Use the foam roller after exercise to help your muscles recover and lessen soreness. Roll over your legs and back to help release built-up lactic acid and ease muscle tightness. This quick session can prevent stiffness and improve your mobility for the next day.
Advanced Techniques
1. Isolating Muscle Groups:
Use the foam roller for targeted exercises like isolating the scapula or doing bench presses and push-ups. For the scapula, lie lengthwise on the roller and move your arms to stretch your back and shoulders. For bench presses and push-ups, use the roller to challenge your balance, which also engages your core.
2. Injury Rehabilitation:
Foam rolling can be very helpful for rehabbing injuries. It helps lengthen and relax tight muscles. Regularly roll out tight areas and strengthen surrounding muscles to support recovery and prevent future injuries. This practice helps maintain healthy muscles and joints.
Exercises with a Foam Roller
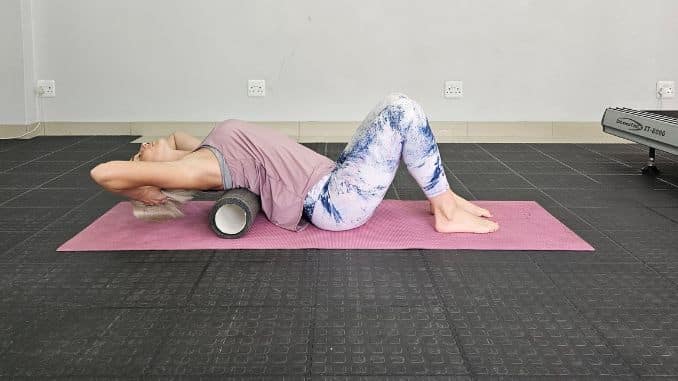
1. Back Roll
- Lie on the floor with the foam roller positioned underneath your back, your knees bent, and your feet flat. Position the foam roller behind your body, then lean back so the roller is lying across your lower back.
- Interlock your fingers behind your head or place your hands on your stomach. Slowly alternate bending and straightening your legs to move the foam roller up and down your back.
Tips and Precautions: Start with slow, controlled movements, focusing on the upper and mid-back while keeping your core engaged. Avoid rolling over the lower back, spine, or bony areas, and stop if you feel sharp pain.
Start with 1 set of 10 repetitions.
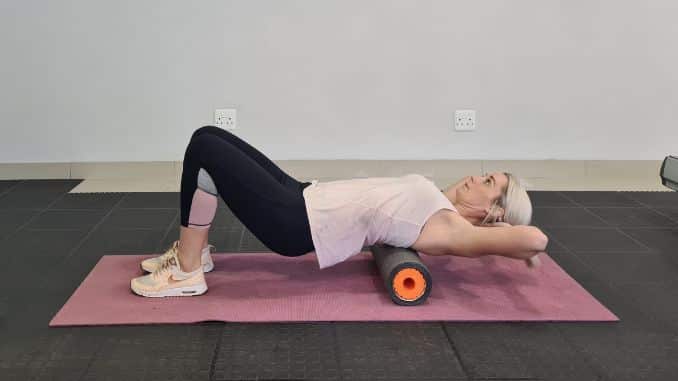
2. Chest Opener
- Lie on your back on the floor with your knees bent and your feet flat. Place the foam roller horizontally under your mid back. Position your hands by your ears or interlace your fingers behind your head for support.
- Engage your core, lower your head to the floor, and arch your spine over the foam roller, opening your chest up. Hold this position for a few seconds. Relax and return to the starting position. Repeat the movement as needed.
To make this foam rolling exercise easier, place a pillow or rolled blanket underneath to support your head.
Note: To intensify the movement, place the foam roller higher, lift your hips, and then roll back and forth or rotate from side to side.
3. Latissimus Dorsi Roll
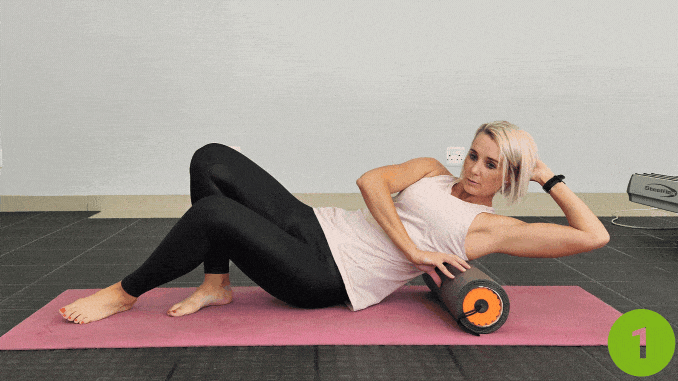
- Lie on your back on the floor with your knees bent and your feet flat. Place the foam roller on the outer part of your back, lifting your upper body and maintaining good alignment with your head, shoulders, and hips.
- Tighten your abdominal muscles and roll the foam roller from your midback up to your armpit and back. Repeat the movement. Complete 5 repetitions on each side.
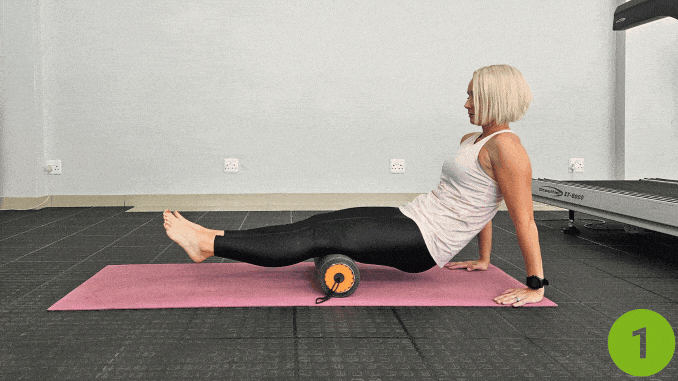
4. Glute Foam Rolling
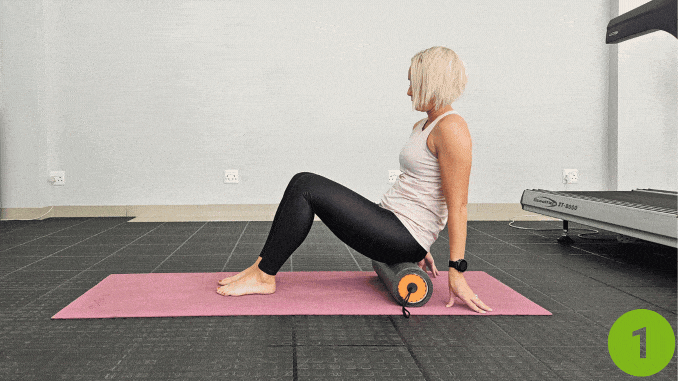
- Begin in an upright sitting position on the floor, place the foam roller under your glute area with your knees bent and feet flat on the floor. Maintain good alignment with your upper body. Place your hands at the back for support.
- Extend your left leg as you move your body towards the left side, ideally to a 45-degree angle. Place your right hand on your bent knee. Engage your core and run the foam roller from the bottom of your seat to the top and back. Repeat the movement. Perform the movement for 10 repetitions on each side.
To intensify the massage, apply additional pressure to the tense glute muscle by bending the knee on the corresponding side and crossing the opposite ankle over it. Roll it repeatedly, targeting the tight spot.
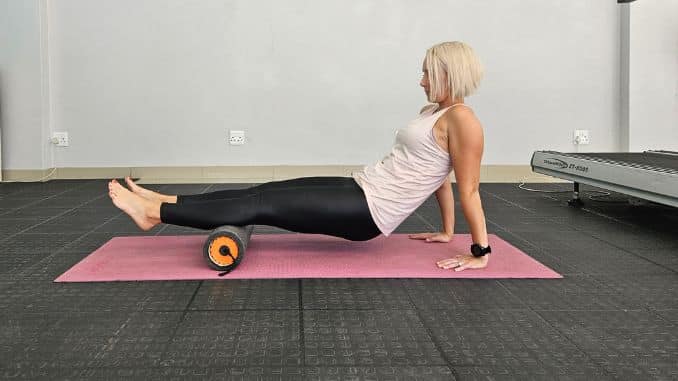
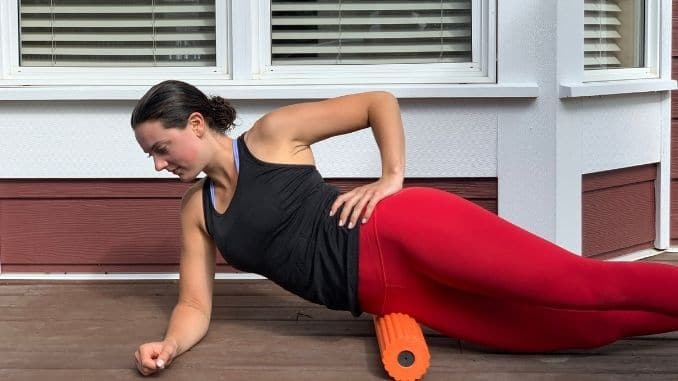
5. Quad Rolling
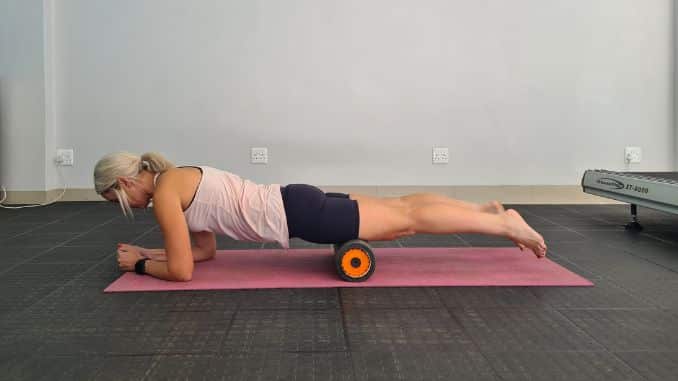
- Move into a forearm plank position with the foam roller under your body, just above your knees. Maintain good alignment with your head, shoulders, hips, and toes.
- Contract your core, then run the foam roller from the top of your knees to your hip area and back. Avoid rolling directly over your knees to prevent joint strain; focus on the quadriceps above the knee instead, and keep your upper body flat. Perform the movement for 10 repetitions.
6. Hamstring Roll
- Begin in an upright sitting position on the floor with your legs bent and your feet flat on the floor, maintaining good alignment in your upper body. Place both hands behind you for support.
- Extend both legs out front and place the foam roller under your hamstrings. Straighten both arms to lift your seat off the floor, then roll the foam roller from just above your knees to the bottom of your seat and body and back. Repeat the movement.
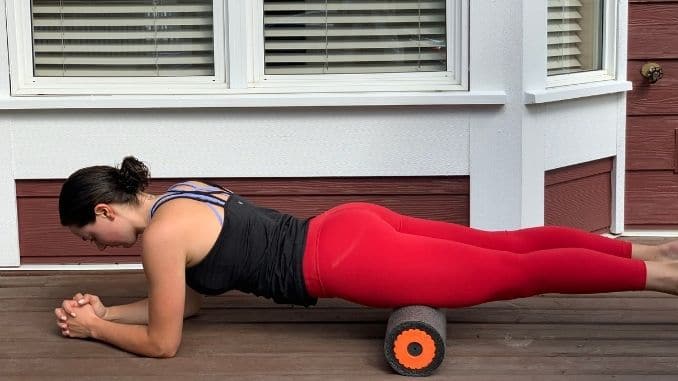
7. Inner and Outer Thighs Foam Rolling
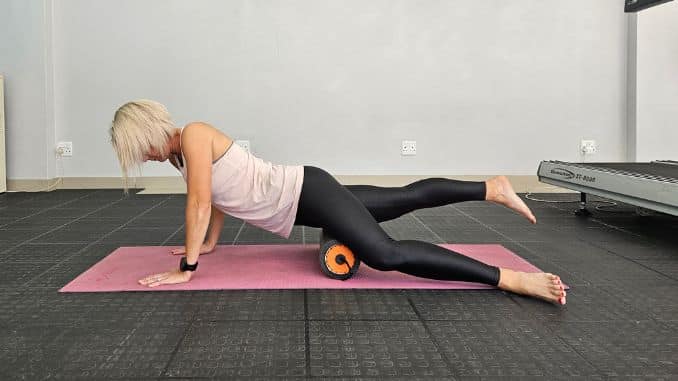
- Move into a straight arm plank position, maintaining good alignment with your head, shoulders, hips, and toes. Place the foam roller along the inside of your thigh.
- Contract your core, then run the foam roller from just above your knee towards your hip and back. Repeat the movement. Perform the movement with 10 repetitions on each side.
8. IT Band Foam Rolling
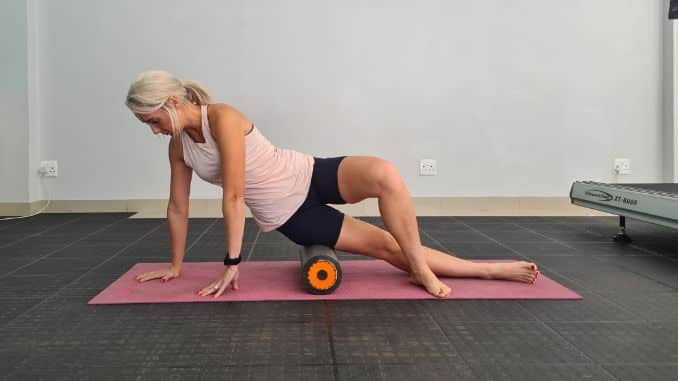
- Begin in a straight-arm plank position, maintaining good alignment with your head, shoulders, hips, and legs. Move to one side and place the foam roller underneath your hip.
- Cross your top leg over your bottom leg and flatten your foot on the floor. Engage your core and slowly roll the foam roller from the hip down to just above your knee and back, focusing on the upper leg area. Perform the movement for 10 repetitions on each side.
9. Calf Foam Rolling
For this exercise, utilize the foam roller or an exercise ball.
- Begin in an upright sitting position on the floor with your knees bent and your feet flat on the floor, maintaining good alignment in your upper body. Place it under your calf area.
- Extend both legs out in front with your legs straight, and place both hands behind you for support. Engage your core. Push from your hands to slightly lift your seat from the ground. Slowly roll the foam roller from just below your knees to your ankles. Roll slowly back and forth over the calves, pausing at any particularly tight spots.
Note: For a deeper massage, you can cross one leg over the other to increase the pressure on the calf being rolled.
10. Snow Angel
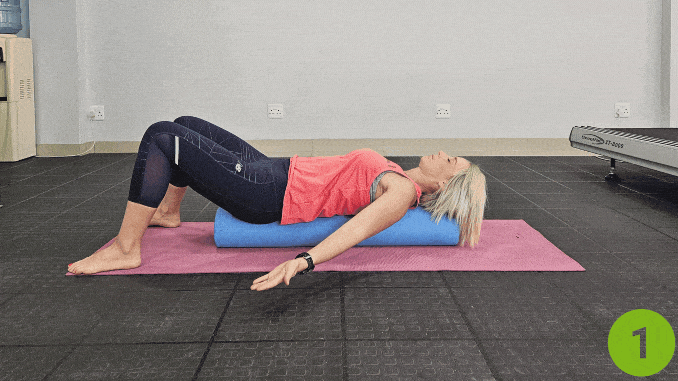
- For this foam roller exercise, lie on your back on the floor with your knees bent and your feet flat on the floor. Place the foam roller vertically along your spine, with your head supported on one end of the roller and your seat on the opposite end of the roller. Maintain a good alignment with your head, shoulders, and hips as you keep your balance.
- Engage your core and slowly bring your arms overhead in wide arcs, similar to a snow angel movement. Lower your arms to return to the starting position and repeat the movement. Start with 1 set of 10 repetitions.
Start with 1 set of 1 repetition on each side, holding for 10 – 15 seconds.
11. Breaths
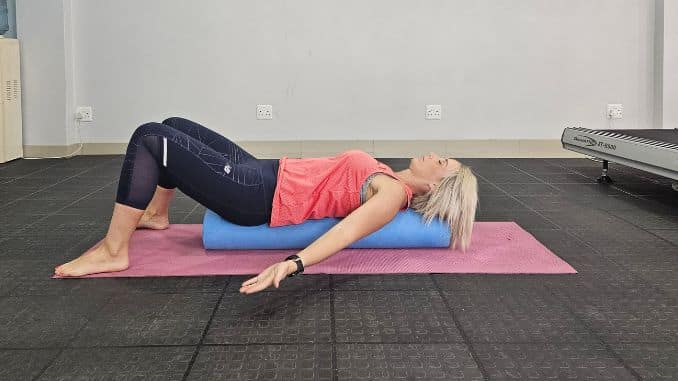
- Lie on your back on the floor with your knees bent and your feet flat on the floor. Place the foam roller vertically along your spine, with your head supported on one end of the roller and your seat on the opposite end of the roller. Maintain a good alignment with your head, shoulders, and hips as you keep your balance.
- Place your hands at your sides, relaxing your upper body. Close your eyes and take several deep belly breaths, in through your nose and out through your mouth. Complete 10 full belly breaths.
What Is a Foam Roller?
A foam roller is a cylindrical tool made from compressed foam, used primarily for self-myofascial release [1] — a form of self-massage aimed at treating muscle tightness, improving blood circulation, and releasing tension in the connective tissue. It comes in various sizes and densities to cater to different muscle recovery needs and can also be used for fitness exercises and physical therapy.
Uses for Foam Rollers
- Warm-Up: You can use a foam roller to warm up for your workout or activity. You can roll out tight or sore muscles to get your muscles warm and ready for your workout. This can help prevent injuries such as muscle strains and tears. Some common areas to roll out before workouts are the quadriceps (front of the thighs) and the hip flexors (front of the hips).
- Cool-Down: Immediately after a workout our bodies are warm, making this the perfect opportunity to roll out our muscles. You can roll out your legs, your upper back, and any other areas that you worked on during your activity. You will likely notice a huge improvement in your muscle soreness level and mobility the next day. You should be able to work out more and recover faster.
- Injury Rehabilitation: Often, injury rehabilitation programs will incorporate a foam roller, such as many of the programs on ExercisesForInjuries.com. You will most likely roll out muscles that have become overly shortened and tight, and strengthen the muscles that are weak. A foam roller is an absolute must for any athlete or individual with an injury.
- Every Day: There is no bad time to use a foam roller. The next time you are watching TV, try rolling out your legs or upper back and see how much better you feel. When you find a tight spot, spend more time in that area, and breathe.
Benefits of Using a Foam Roller
- Eases Muscle Tension: Smooths out knots and reduces tightness for better mobility.
- Boosts Flexibility: Helps increase joint movement and muscle stretchiness. [2]
- Improves Circulation: Enhances blood flow to muscles [3], speeding up recovery.
- Lowers Injury Risk: Prepares muscles for workouts, helping to prevent injuries.
- Saves Money: Offers massage benefits without the high cost of a therapist.
- Aids in Rehabilitation: Useful in therapy to help recover from injuries.
- Enhances Workouts: Makes exercises more effective by reducing muscle stiffness before starting.
Choosing the Right Foam Roller: A Simple Guide
Selecting the perfect foam roller depends on your specific needs, like how tight your muscles are and what you want to achieve. Here’s a straightforward guide to help you make the best choice:
- Outer, Low-Density Foam Roller:
- What it is: Soft and gentle, ideal for beginners.
- Best for: Large muscle groups like the back and thighs.
- Why use it: It’s easy on your body, perfect for those new to foam rolling, helping ease into the practice without too much discomfort.
- Inner, High-Density Foam Roller:
- What it is: Firm with a solid core, some have textures for extra pressure.
- Best for: Tight areas like calves and shins.
- Why use it: Provides a deep massage to break up knots and increase blood flow in focused areas.
- 3-in-1 Foam Roller:
- What it is: A combo of different densities, sometimes includes a rolling stick.
- Best for: Full-body use, adjusting from gentle to intense massage.
- Why use it: Versatile and suitable for all levels of firmness, catering to various muscle recovery needs.
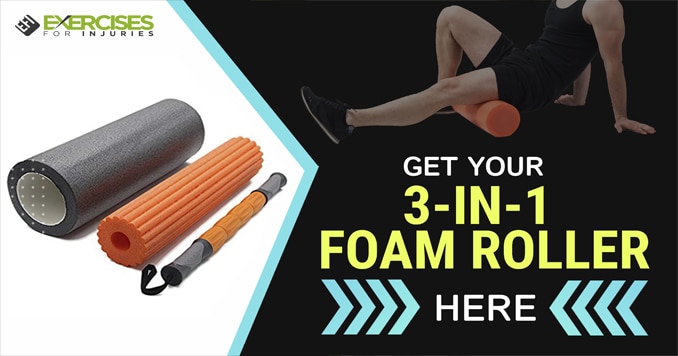
The 3-in-1 Foam Roller

This is the 3-in-1 foam roller that you can purchase from the Exercises For Injuries shop. The large grey roller is the outer, low-density roller. The orange roller is the inner, high-density roller. The grey and orange stick is the self-massage stick. Let’s take a look at how we can use each component of the foam roller.
1. The Outer, Low-Density Foam Roller
The outer part of the foam roller is the most versatile part of the foam roller. It is low-density foam, which means it will be less intense than the inner roller and is perfect for when you are just starting out. Its large size allows it to cover larger body parts and roll out large areas at once.
Use this part of the foam roller | 404 to roll out your quadriceps (as pictured), hamstrings (the backs of your thighs), calves, and upper back. You can roll out your glutes by placing the roller under one side of your glutes and crossing that ankle over your opposite knee, rolling out one side and then the other. You can also use the foam roller to stretch.
Most of us have tight chest muscles from sitting too much with poor posture. To stretch your chest, place the roller horizontally under your upper back and lie back over it, spreading your arms out to the sides. This should help open up through your chest and shoulders.
2. The Inner, High-Density Foam Roller
The inner part of the foam roller is made of a higher density foam and has ridges. Both of these features allow it to penetrate deeper into the muscles and results in a more intense massage.
The ridges can get into different target areas, which makes this part of the roller perfect for rolling out the hip flexors (as pictured). To roll out your hip flexors, place the roller under the front of your hip and place as much of your body weight as you can on the roller, being careful to avoid any bony areas.
Roll up and down, spending more time in the tightest spots, making sure to take deep breaths. Once you have been using the outer roller for some time and you are used to the sensation of foam rolling, you may choose to start using the high-density roller for other areas. This is a simple way to intensify the massage and get deeper into your muscles as you progress.
3. The 18-Inch Self Massage Stick
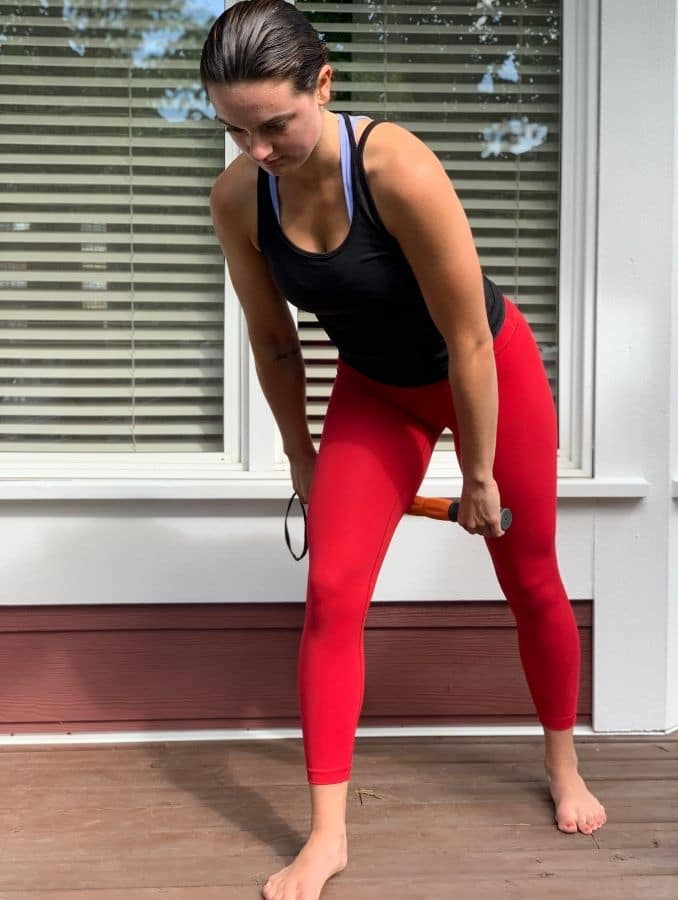
The massage stick is perfect for massaging hard to reach areas, and for people who have trouble getting up and down off the ground or supporting their body weight. You can use the self-massage stick while sitting or lying down, making it an accessible option for many people.
Some ways you can use the self-massage stick are rolling out your hamstrings (as pictured), quadriceps, calves, and glutes. Again, you can control the intensity of the massage by how hard you press the massage stick into your muscles. Start light and see how you feel the next day before progressing to a more intense self-massage.
As you can see, the 3-in-1 foam roller is an extremely versatile and useful tool. It can be used for a variety of activities and is completely adaptable to your needs. Choose from three different layers and apply as much pressure as you need.
Use the 3-in-1 foam roller to warm up, cool down, and recover from injuries. The foam roller is one of the most cost-effective ways to keep your body healthy, pain-free, and injury-free.
Final Thoughts
Foam rollers offer incredible versatility and a host of benefits for anyone looking to enhance their fitness and wellness routines. From easing muscle soreness to improving flexibility and preventing injuries, the simple foam roller can be a game-changer in your regular exercise regimen.
Remember, foam rollers are a cost-effective solution that can deliver significant benefits—much like having a personal masseuse on call, but without the hefty price tag.
Embrace the variety and practicality of foam rolling to keep your body strong, supple, and pain-free.
Soothe, Stretch & Strengthen! One tool, endless benefits—reduce soreness and boost mobility with the 3-in-1 Foam Roller. Get Yours Now!
FAQs
Where should you not use a foam roller?
Avoid using a foam roller on joints, bones, the lower back, and the neck. These areas are sensitive and prone to injury when too much pressure is applied directly.
Is there a wrong way to use a foam roller?
Yes, rolling too aggressively, using improper form, or focusing only on painful areas can be harmful. It’s important to use gentle pressure and to roll both the surrounding and affected areas to properly release muscle tightness without causing injury.
How to use foam hair rollers for beginners?
To use foam hair rollers, start with slightly damp or dry hair. Take a section of hair and wrap it around the roller from the ends to the roots. Secure the roller and leave it in place until your hair is completely dry or overnight for best results. Remove the rollers gently to reveal curls or waves.