

Shoulder pain can be a frustrating barrier for many, particularly when it is linked to anterior humeral glide (AHG) [3].
This common issue occurs when the head of the humerus moves excessively or abnormally forward during shoulder motions, resulting in discomfort and potential injury in the shoulder joint.
AHG typically becomes apparent during activities that involve shoulder extension or horizontal abduction, especially when there is insufficient posterior humeral head control.
In this article, we will explore how AHG contributes to shoulder pain, provide step-by-step exercises to correct it, and discuss preventive measures to enhance shoulder mobility.
Joint Exercises for Anterior Humeral Glide
AHG can manifest during a variety of exercises that involve shoulder extension or horizontal abduction. While we will focus on a few popular activities, the strategies for correcting AHG are often similar and can be applied across different exercises.
Step-by-Step Exercises to Correct Anterior Humeral Glide
1. Horizontal Row
- Begin in an upright standing position in front of a wall with a cable pulley, with your feet hip-width apart.
- Maintain good alignment with your head, shoulders, hips, and then legs.
- Hold the handle of the cable pulley with your hands.
- After that, straighten your arms and engage your core muscles.
- Pull the handle towards your chest while keeping the humeral head centered in the socket; focus on initiating the movement from the scapula by squeezing your shoulder blades together.
- Hold the position for a few seconds and repeat the movement with 10 repetitions.
Cues and Possible Fixes:
- Place your hand medial to their scapula [2] and cue them to squeeze back.
- Point to the anterior part of their humeral head and then tell them to pull that back.
- Help guide them into the proper position. Place one hand on the anterior part of their humeral head and the other on their scapula. As the person grows, guide the scapula into retraction while applying gentle posterior pressure to the humeral head to encourage centering within the glenoid.
- Lastly, have them try rowing with both arms. Sometimes their inability to retract is just a coordination problem, which will allow them to feel their shoulder blades being squeezed together.
2. Dumbbell Row
- Begin in an upright standing position with your feet shoulder-width apart.
- Maintain good alignment with your head, shoulders, hips, and then legs.
- Hold a dumbbell in one hand and take a step back with your left leg.
- Slightly bend your right knee and hinge through your hips as you move your upper body forward and place your right hand on your bent knee to keep your spine straight while your left hand hangs at your side.
- After that, engage your core muscles.
- Initiate the row by retracting your shoulder blade, then bend your elbow to pull your arm back without allowing the front of the shoulder to shift forward.
- Lower it back to return to the starting position and then repeat the rowing movement with 10 repetitions.
Cues and Possible Fixes:
- Same lines and fixes as described in the horizontal row above.
- Make sure the spine is neutral. If the upper back is not flat, you will likely see a faulty rowing pattern.
3. Push-Up
- Begin in a straight arm plank position on the floor with your arms beneath your shoulders and your legs straight.
- Maintain good alignment with your head, shoulders, hips, and legs.
- After that, engage your core muscles.
- Bend your elbows to lower your body to the floor.
- Raise back up to return to the starting position and then repeat the movement with 10 repetitions.
Cues and Possible Fixes:
- Make sure the spine is neutral [1]. This will help to better position the scapula on the rib cage, which will help facilitate proper retraction on the eccentric (lowering) phase.
- Cue them to squeeze their shoulder blades together to activate their scapular muscles as they lower their body.
- Use an incline or raise the pitch to make the exercise less challenging.
- Shorten the range of motion (i.e., do not have them lower as far).
4. Chin-Up
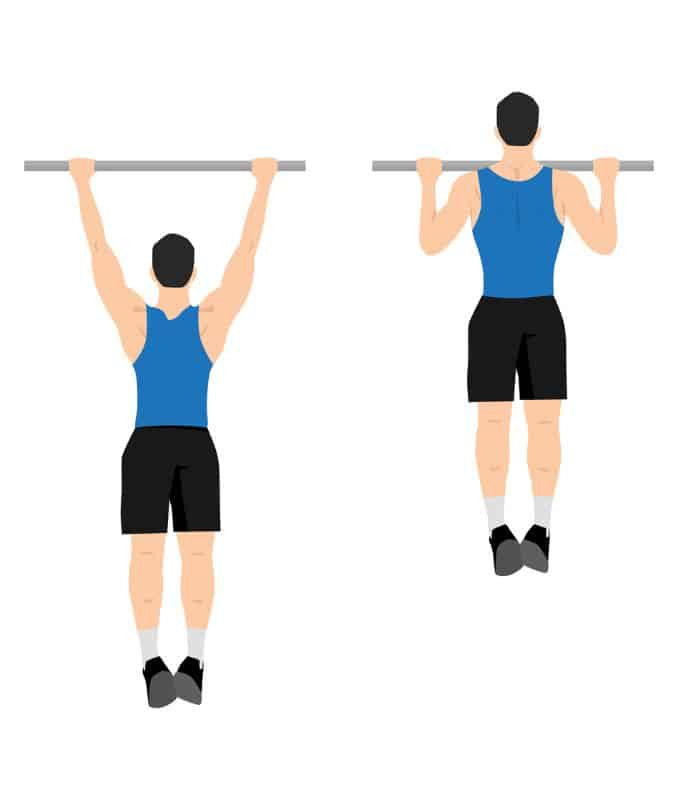
- Begin in an upright standing position under a pull-up bar with your feet hip-width apart.
- Maintain good alignment with your head, shoulders, hips, and then legs.
- Extend your arms overhead and grip the bar with an overhand grip; your hands should be wider than shoulder width apart and hang from the bar with your arms fully extended.
- Engage your core muscles and pull your body up towards the bar until your chin is over the bar.
- Slowly lower yourself back down to the starting position, maintaining control throughout the movement.
- Repeat the movements with 5 repetitions.
Cues and Possible Fixes:
- Tell them to think about putting their shoulder blades into their back pocket.
- Have them pre-set scapular depression and retraction at the start of the movement, maintaining this engagement throughout the ascent. This will ensure they know what you mean.
- Use a band or increase the band tension to make it easier.
- Try a Chin-Up ISO. This is an exercise we usually give to clients at IFAST before progressing them to a full chin-up. You get into the top position of a chin-up with chest to the bar and scaps depressed. You then hold this position for the maximum time. It is very effective for teaching people the final portion of this exercise.
- Lastly, if the above strategies do not work, I would take them to a Lat Pulldown where the stability requirements are less demanding.
5. Bench Press
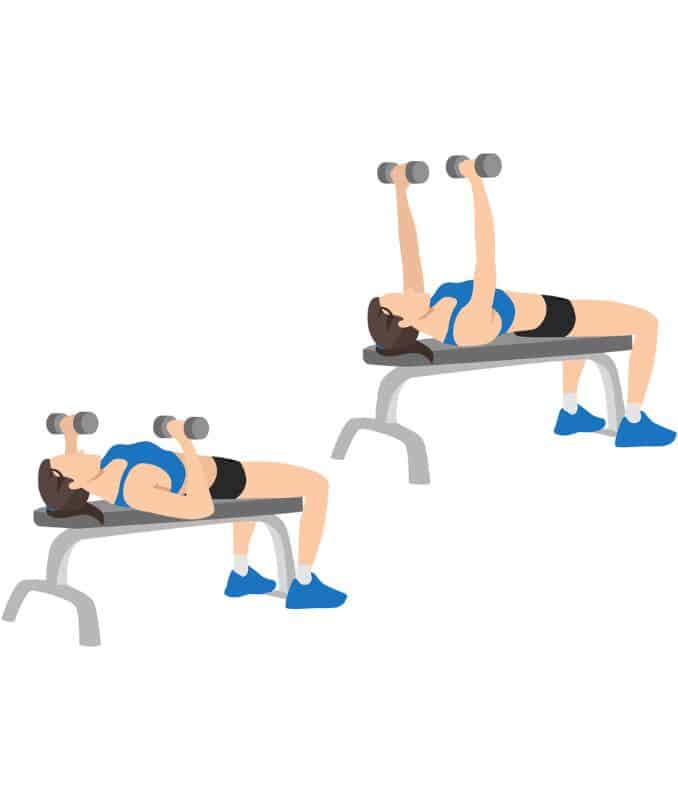
- Lie on your back on a flat bench with your knees bent and then feet flat on the floor.
- Maintain good alignment with your upper body.
- Hold a dumbbell in each hand and then bend your elbows at your side at chest height.
- Engage your core muscles.
- Inhale and push your arms fully upwards.
- After that, hold the position for a few seconds.
- Lower your arms back to the starting position, and repeat the movement with 10 repetitions.
Cues and Possible Fixes:
- First, I would ensure the person could perform a push-up properly without AHG before giving them a bench press.
- If AHG occurs during this exercise, you know they are not keeping their shoulder blades retracted, which is desirable when performing a bench press.
- Please ensure the client knows they should not protract (i.e., make arms long) at the end range. This will better allow them to keep their shoulder blades together.
Understanding Anterior Humeral Glide
Anterior humeral glide refers to the excessive forward movement of the humeral head during activities such as shoulder extension or horizontal abduction.
This abnormal motion can result in pain and dysfunction, often affecting the rotator cuff and then surrounding structures.
Excessive anterior glide of the humeral head can place strain on the anterior capsule, irritate the long head of the biceps tendon, and then contribute to subacromial or internal impingement syndromes.
Why is it Important to address AHG?
If left uncorrected, the anterior humeral glide can contribute to:
- Anterior shoulder pain
- Strains in the pectoral and latissimus dorsi muscles
- AC joint problems
- Decreased range of motion and then shoulder mobility
Prevention Strategies
Preventing anterior humeral glide is crucial for maintaining shoulder health.
Here are some effective strategies:
- Strengthening Exercises: Focus on rotator cuff exercises that enhance stability in the glenohumeral joint. Strengthening the rotator cuff can help balance the forces acting on the shoulder.
- Mobility Work: Incorporate shoulder mobility exercises to improve range of motion. This includes movements that promote both internal and external rotation, as well as shoulder flexion and extension.
- Postural Awareness: Pay attention to thoracic spine [5] mobility and overall posture. A strong upper back promotes better shoulder blade positioning, reducing the likelihood of the humeral head gliding anteriorly.
- Proper Loading: When performing exercises such as the bench press or push-up, ensure that the load is appropriate for your strength level. Lightening the load can help maintain proper form.
- Regular Assessment: Regularly assess your shoulder mechanics during exercises. If you notice symptoms of anterior shoulder pain or poor movement patterns, consult a professional for guidance.
Final Points
According to Zach Moore, never be afraid to lighten the load or decrease the stability requirements. Performing an exercise over and over with incorrect form (in this case, anterior humeral glide) will not fix the problem/form.
If the cueing and loading strategies above do not work, you may need to resort to other corrective procedures such as soft tissue treatment and rotator cuff exercises.
For gentle tissue treatment, I would first examine the posterior shoulder capsule. It can often be stiff and restricted, which will not allow the humerus to glide posteriorly as it is flexed.
Next, examine the pecs as they can become dominant and pull the humeral head anterior [4].
For the rotator cuff, I would examine the subscapularis. If the subscapularis is lengthened or weak, its ability to provide anterior stabilization and posterior pull on the humeral head is compromised, reducing its capacity to counteract anterior forces from dominant muscles like the pectoralis major, which pull the humeral head anterior.
Therefore, strengthening exercises for this muscle may be appropriate.
Summary:
Learn to retract/depress appropriately by squeezing the scapula back/down without allowing the humeral head to glide anteriorly.
Familiar Cues and Fixes:
- Make sure the person is in a good spinal position.
- Place your hand near their scapula and cue them to squeeze their shoulder blade toward your hand to promote awareness of retraction.
- Point to the interior part of the humerus and say to the person to pull it back.
- If performing a unilateral pulling exercise, try to pull with the other arm simultaneously, which may allow for better proprioception.
- Lighten the load.
- Reduce stability requirements
- Ensure the problem is not due to soft tissue restrictions and a weak cuff.
I hope this helps! It is always great to hear other cues! If anyone has any other tips or suggestions, leave them in the comments.
Take control of your recovery with the Achilles Tendinitis Exercise Solution – Digital Download. Start strengthening your tendon and relieving pain today—download now!

Frequently Asked Questions
What is the anterior humeral glide test?
The anterior humeral glide test assesses the stability of the shoulder joint by evaluating the anterior movement of the humeral head relative to the glenoid. A positive test may indicate instability or a tear in the shoulder capsule.
What is the anterior glide of the ulna on the humerus?
The anterior glide of the ulna on the humerus refers to the ulna sliding forward (anteriorly) over the humerus during elbow flexion and extension, which is essential for normal elbow function.
What is the gliding joint between the humerus and the ulna?
The humeroulnar joint is a hinge joint, not a gliding joint. It allows for flexion and extension of the elbow.