

Basic first aid is something we all need to know. Being able to help in an emergency can mean the difference between life and death for someone experiencing trauma. Would you know how to respond if a co-worker suddenly collapsed or the diner next to you was choking?
If you aren’t certain that you could administer CPR, stop a rapidly bleeding wound or be truly helpful in an emergency, read on. We’ve put together a little guide with five basic first aid skills that everyone should know.

Always Call EMS First
Nowadays, it’s extremely rare that there isn’t a phone either in your own pocket or somewhere nearby. When you encounter an emergency, even if you are unsure of the extent, call emergency services (911 in the United States and Canada). Keep them on the line while you determine what kind of help you’ll need. If it turns out to be something simple or a false alarm, no problem. Emergency medical services (EMS) will not be upset with you for calling. Even if they’ve dispatched an ambulance, they will cancel the call and move onto the next emergency.
If the situation is a true emergency, keep EMS on the line while you deal with it. Put the phone on speaker and leave it next to you while you administer first aid. The operator will be able to ask you questions and help you provide appropriate care for the injured person until paramedics arrive on the scene.
Recently, I was inside my home when I heard one of my neighbors crying out for help. I dialed 911 from my desk before I even went out of the front door. The operator was more than happy to stay on the line while I surveyed the situation. Fortunately, the necessary ambulance arrived within 3 minutes because I called immediately instead of after I knew exactly what was happening. Never hesitate to call EMS at the first sign of an emergency.
If you do happen to be without a phone when you encounter an emergency, yell out, “Help! Call 911!” Continue calling out this exact phrase until you can either stabilize the injured person and get to a phone or until someone notifies you that they’ve called for help.

1. Stop the Bleeding
When someone is injured and bleeding profusely, you’ve got very little time to stop the bleeding before things become critical. According to the United States Department of Homeland Security, “A person who is bleeding can die from blood loss within 5 minutes.”
When you encounter someone with a bleeding wound, it’s great if you have gloves and sterile gauze on hand. However, most of the time, those items aren’t available. Don’t panic! You can help the person without gloves. According to the Centers for Disease Control and Prevention (CDC), “There have been no documented cases of HIV transmission due to an exposure involving a small amount of blood on intact skin.” If you don’t have open wounds on your hands, you are not at risk of contracting a bloodborne disease while you attempt to stop the bleeding.
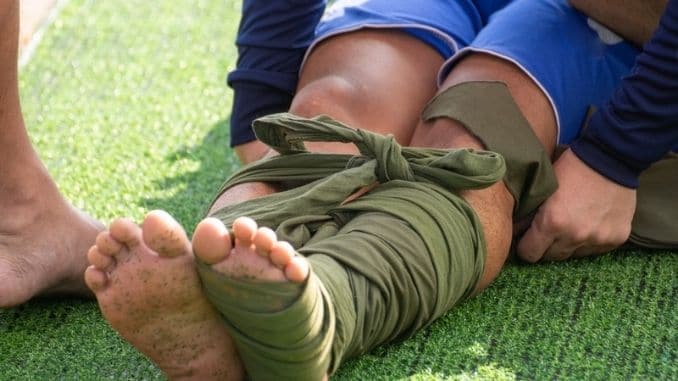
Any cloth, sterile or not, can be used to stop a wound from hemorrhaging. A T-shirt, sock, or any kind of fabric will do the trick. Use the fabric to apply pressure directly to the wound as you elevate it. When the fabric is soaked through, don’t remove it. Doing so will impede the clotting process and cause more bleeding. Add more fabric or padding on top and continue applying pressure. After the bleeding has slowed or stopped, tie the padding in place with strips of fabric, a shoelace or necktie. Don’t tie it so tightly that blood flow is cut off. Keep it secured with pressure. Keep the injured body part elevated and stay with the person until medical professionals arrive to help.
If the bleeding doesn’t stop with elevation and direct pressure, Harvard Medical School recommends applying direct pressure to an artery. “Use direct pressure on an artery along with elevation and direct pressure on the wound. There are specific major arteries in the body where pressure should be placed (see illustration below).”
Image credit: Harvard Medical School |
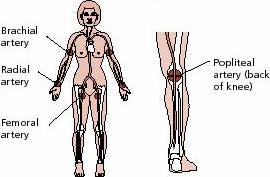
The Harvard experts added, “When you apply pressure to an artery, you stop bleeding by pushing the artery against bone. Press down firmly on the artery between the bleeding site and the heart. If there is severe bleeding, also apply firm pressure directly to the bleeding site.” Continue applying pressure until help arrives or the bleeding stops. Do not apply pressure to an artery longer than 5 minutes.
2. Help Someone Who Is Choking
When a piece of food or another object is lodged in a person’s windpipe, it blocks the flow of oxygen to the brain and other organs. Signs of choking include noisy or difficult breathing, not being able to talk, skin flushing, lips or skin turning blue or loss of consciousness. If the person is coughing, allow them to continue coughing as that may force the item out of the windpipe.
The Mayo Clinic recommends using the Heimlich maneuver for helping to dislodge an object that’s blocking someone’s airway. These are the steps to perform the Heimlich maneuver as instructed by the Mayo Clinic staff:
- Stand behind the person. Place one foot slightly in front of the other for balance. Wrap your arms around the waist. Tip the person forward slightly. If a child is choking, kneel down behind the child.
- Make a fist with one hand. Position it slightly above the person’s navel.
- Grasp your fist with the other hand. Press hard into the abdomen with a quick upward thrust ― as if trying to lift the person up.
- Perform between six and 10 abdominal thrusts until the blockage is dislodged.

3. Administer CPR
The goal of CPR is to keep blood flowing through the body when the heart has stopped beating. While it’s best to take a full CPR course and become certified, anyone can and should perform hands-only CPR in an emergency. According to Linda Hepler, a registered nurse that writes for Healthline, “CPR performed within the first 6 minutes of the heart-stopping can keep someone alive until medical help arrives.”
With the unresponsive person on his or her back, locate the middle of the chest, directly between his or her nipples. Place one hand on top of the other in the middle of the chest. Then, use your body weight to press hard and fast at least 2 inches deep into the chest. Let the chest rise completely between compressions. Apply these compressions at a rate of 100 to 120 beats per minute. When I was CPR-certified, my instructor advised me to sing the song “Stayin’ Alive” by the Bee Gees in my head to keep the correct tempo while I administered compressions. You’ll be pushing hard and fast for a while and watching for signs of breathing or consciousness. You may become fatigued after a few minutes. If you do, ask a bystander to come and help with compressions while you rest. Continue compressions until the person begins breathing or a trained professional can take over.
4. Make a Splint
When someone has broken a bone, you may need to make a splint to stabilize the injured area and prevent further injury. To make a splint, use a pair of rigid items of any kind. Sticks or cardboard make good splint supplies. Even rolled up blankets or newspapers will work. When there’s nothing rigid you can use nearby, an injured bone can be splinted to an adjacent, uninjured bone, such as a finger splinted to another finger or a broken leg to an unbroken leg.
If there is an open wound, treat that first to stop any bleeding. It’s also normally best to splint the body part in the same position in which it was found until you can get the person to a trained medical professional. Place your rigid supports on either side of the injured body part. Place some kind of padding between the supports and skin. Then, tie the supports in place with a couple of strips of fabric, a shoelace, belt or anything that you can wrap around and tie. If the person complains of a new type of pain after you’ve splinted the injured limb, remove the splint and wait for EMS to arrive.

5. Treat Hypothermia
When a person’s body temperature drops more rapidly than it can produce heat, he or she is in danger of developing hypothermia. When someone is suffering from hypothermia, that person might become confused. He or she may seem drowsy and experience numbness in the hands or feet. The person’s breathing might become shallow, and he or she may be shivering and not making sense.
According to WebMD, the first thing to do when you encounter someone showing signs of hypothermia is to get the person indoors. Take off any wet clothing the person is wearing and make sure he or she is dry. Warm the person’s body gradually beginning with the trunk. Warming the hands and feet first could cause shock. Wrap the person in dry blankets. Use hot water bottles, heating pads and hot packs on top of the blankets to help warm the body to a normal temperature. Your own body heat can be helpful as well.
Offer warm beverages, but nothing with caffeine as it can make symptoms worse. Monitor the individual’s body temperature with a thermometer. If you don’t get a reading of at least 95 degrees Fahrenheit after treating the person with the above measures for several minutes, you’ll need to seek further medical intervention.
Be Helpful in an Emergency
You don’t have to attend medical school to learn a few simple first aid skills to be helpful in an emergency. Having a well-stocked first-aid kit can also be helpful. Your willingness and ability to help could truly save someone’s life. Keep this guide handy so that you know what to do in an emergency.
For your guide to the best foods to heal your body, make sure to check out The Best Foods that Rapidly Slim & Heal in 7 Days, here!

.