

Medical Disclaimer: The information in this blog is for enlightening and educational purposes only and is not intended as medical advice. The content in this post is not meant to substitute for a professional medical diagnosis, advice, or treatment. Moreover, always ask advice from your physician or other qualified health providers with any questions you may have regarding a medical condition.
Tight hips can lead to pain, poor posture, and even injuries. Whether you’re dealing with hip stiffness, limited mobility, or discomfort during movement, incorporating hip range of motion exercises can help.
Moreover, these exercises target the hip joint [2], hip muscles, and surrounding areas to improve flexibility, strengthen weak muscles, and enhance movement patterns.
Why Hip Mobility Matters?
The hip joint is a ball-and-socket joint, allowing a wide range of movements [1]—flexion, extension, abduction, adduction, external rotation, and internal rotation. However, factors like a sedentary lifestyle, muscle strain, or even certain hip problems can restrict movement.
Poor hip mobility [3] can affect the knees, lower back, and overall movement efficiency, making it essential to incorporate hip mobility exercises into your routine.
Best Hip Mobility and Stretching Exercises
Below are some of the most effective hip exercises to improve hip range of motion, strengthen the hip flexors and hip extensors, and reduce tight muscles.
1. Piriformis Stretch (Targets: Hip flexor muscles, hip abductors, piriformis)
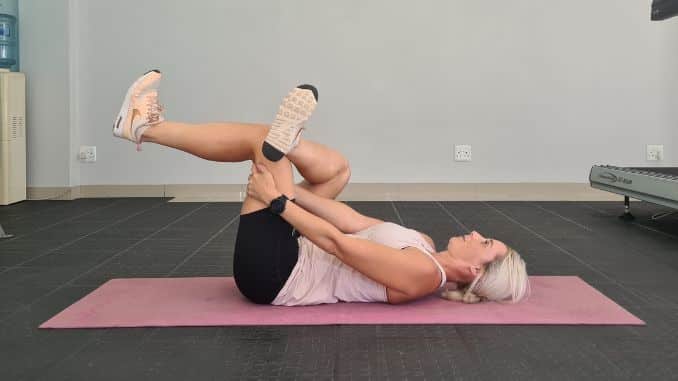
- Lie on your back on the floor with your knees bent and feet flat on the floor.
- Maintain good alignment with your head, shoulders, and hips.
- Then, tighten your abdominal muscles.
- Cross one ankle over your opposite knee.
- Place your hands at the back of the knee and pull your knee closer to your chest.
- Moreover, hold this position for several deep belly breaths, in through your nose and out through your mouth.
2. Lying Hip Rotations (Targets: External and internal rotation of the hip joint)

- Lie on your back on the floor with your knees bent and feet flat on the floor.
- Maintain good alignment with your head, shoulders, and hips. Engage your core muscles.
- Cross one ankle over the opposite knee and move in and out of the stretch by rotating the hip in and out.
- For the hold, use your hand for assistance to press into the knees.
3. Butterfly Stretch (Targets: Hip abductors, hip rotation, hip ROM)
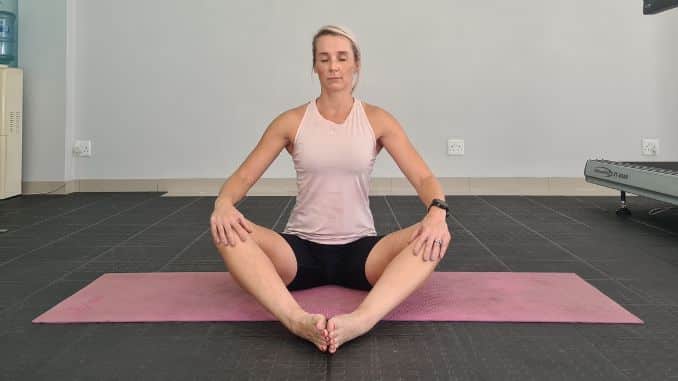
- Begin in an upright sitting position on the floor, while maintaining good alignment with your head, shoulders, and hips.
- Then, engage your core and bring the soles of your feet together, spreading your knees out to the sides while keeping your spine straight and placing your hands on your knees.
- Moreover, hold the position for several deep belly breaths, in through your nose and out through your mouth.
4. Frog Stretch (Targets: Hip flexors, deep squat mobility)
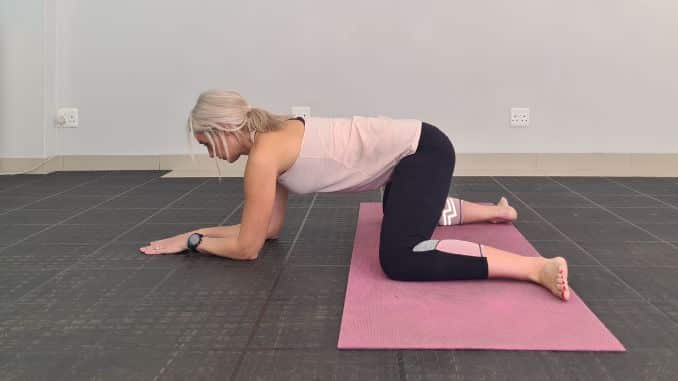
- Begin in a 4-point position with your arms beneath your shoulders and your knees under your knees.
- Maintain good alignment with your head, shoulders, and hips.
- Then, bend your elbows to move into a forearm position as you move your knees wider than shoulders width apart until you start to feel a stretch.
- Press your shins on the floor with your toes facing on each side.
- Keep your spine straight and parallel to the floor.
- Moreover, hold the position for several deep belly breaths, in through your nose and out through your mouth.
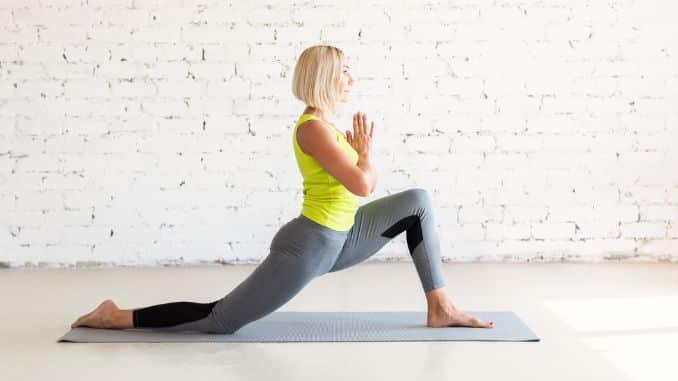
5. Kneeling Lunge Stretch (Targets: Hip flexors, front knee stability, back hip mobility)
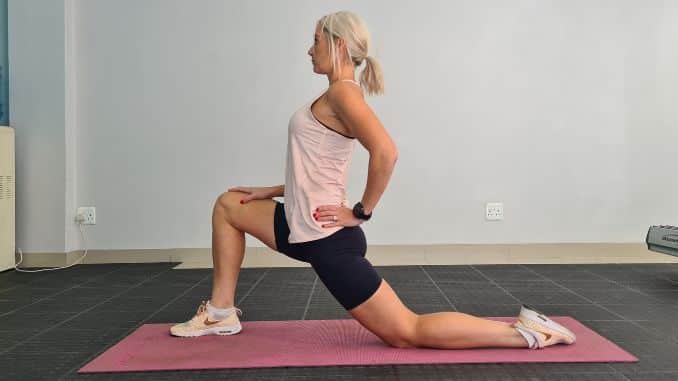
- Begin in a lunge position with your front knee bent and back knee on the ground.
- Maintain good alignment with your head, shoulders, and hips.
- Then, place one hand on your bent knee and the opposite on your hip.
- Engage your core, keep your upper body tall, and gently press forward to stretch the back hip flexor.
- Hold the position for several deep belly breaths, in through your nose and out through your mouth.
- Moreover, relax and repeat the movement on the opposite side.
6. Hip Hikers (Targets: Hip abductors, hip ROM, and movement patterns)
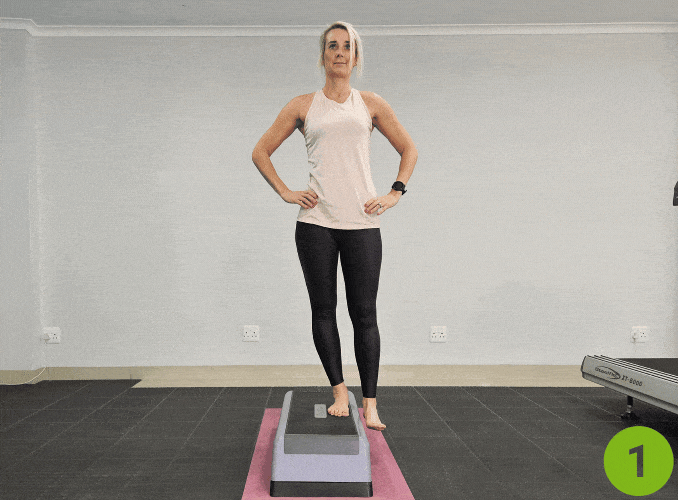
- Begin in an upright standing position on an elevated surface with one leg hanging off the floor.
- Maintain good alignment with your head, shoulders, hips, and legs.
- Then, place your hands on your hips. Engage your core muscles.
- Slowly lower your hip on the unsupported side, then raise it back to the starting position.
- Repeat the movement with 10 repetitions.
- Moreover, relax and repeat the movement on the opposite side.
7. Hip Squeezes (Targets: Hip adductors, groin muscles, and hip width stability)
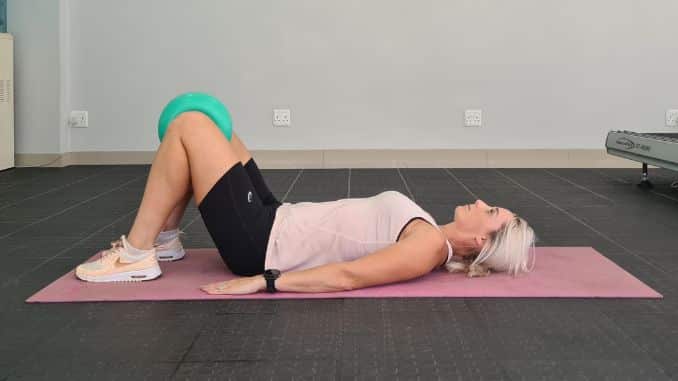
- Lie on your back on the floor with your knees bent and feet flat on the floor.
- Maintain good alignment with your head, shoulders, and hips,
- Then, place a small ball or pillow between your knees and press your palms on the floor.
- Tighten your abdominal muscles.
- Squeeze and hold for 5 seconds, then release.
- Moreover, repeat the movement with 10 repetitions.
8. Pigeon Pose (Targets: Hip external rotation, hip flexor muscles, and deep hip stretch)
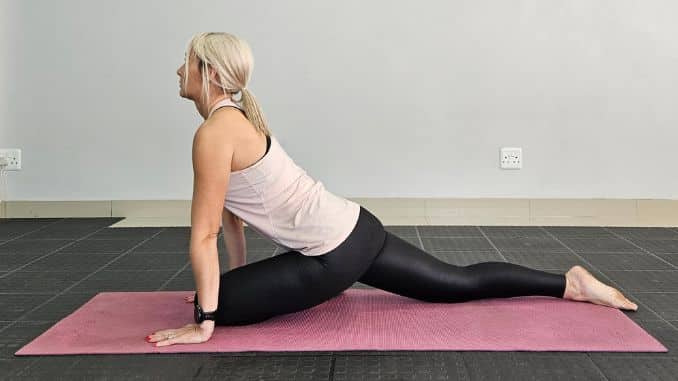
- Begin in a 4-point position with your knees below your hips and your hands under your shoulders.
- Then, lift one knee towards your shoulder, cross your foot under your opposite hip, and lower your knee to the side.
- Lower your hips toward the ground, keeping your chest lifted.
- Hold the position for several deep belly breaths, in through your nose and out through your mouth.
- Moreover, relax and repeat the movement on the opposite side.
9. Standing Hip Circles (Targets: Hip mobility, external rotation, and internal rotation)
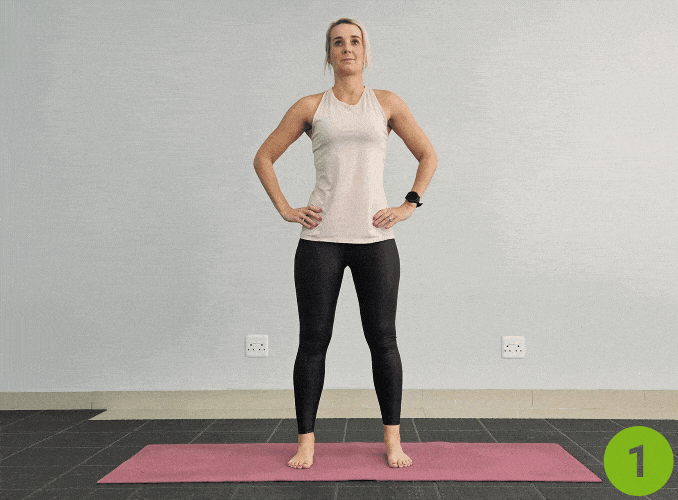
- Begin in an upright standing position with your feet hip-width apart.
- Maintain good alignment with your head, shoulder, hips, and legs.
- Then, place your hands on your hips. Engage your core muscles.
- Slowly make circles with your hips in one direction with 10 repetitions.
- Moreover, repeat the movement in the opposite direction.
10. Side-Lying Leg Raises (Targets: Hip abductors, leg strength, and hip ROM)
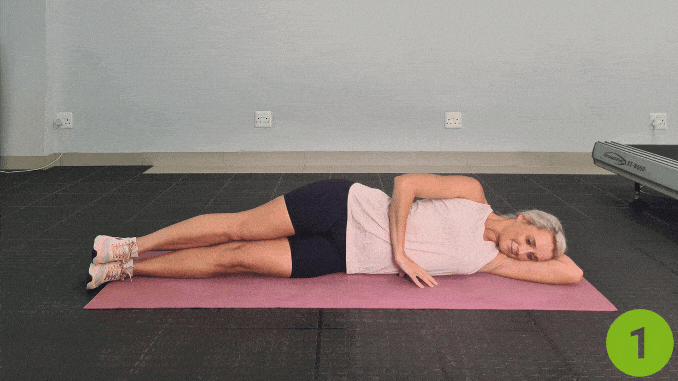
- Lie on your side on the floor with your legs straight and stacked together.
- Maintain good alignment with your head, shoulders, hips, and legs.
- Then, bend your bottom arm and place your head on top of it.
- Cross over your top arm in front of your chest to support your body.
- Tighten your abdominal muscles.
- Lift the top leg as high as possible without tilting your upper body.
- Lower your leg to return to the starting position and repeat the movement with 10 repetitions.
- Moreover, relax and repeat the movement on the opposite side.
Final Thoughts
Incorporating these hip range of motion exercises into your routine can improve flexibility, strengthen the hip muscles, and prevent hip pain or hip problems.
According to Dr. Andy Fata-Chan, a New York-based physical therapist, static stretching alone may not be enough to relieve hip pain. Instead, incorporating targeted movements that both stretch and strengthen the hip flexors is crucial for long-term mobility.
Whether you’re an athlete, someone recovering from a muscle strain, or just looking to increase mobility, these exercises will help keep your hips strong and functional. Moreover, add them to your exercise routine and feel the difference in your movement patterns!
Ready to unlock your hip mobility and move pain-free? Start incorporating these exercises into your routine today and feel the difference. Check out our Unlock Your Hip Flexors program to take the next step toward better mobility!
FAQ’s
How to Improve Range of Motion in the Hip?
Incorporate hip mobility exercises like piriformis stretches, hip rotations, butterfly stretch, and kneeling lunges into your routine. Moreover, strengthening exercises for the hip flexors, abductors, and extensors also help improve flexibility and movement. Consistent stretching, strengthening, and movement drills enhance hip ROM over time.
How to Self Assess Hip Range of Motion (ROM)?
You can test hip ROM using flexibility tests such as:
- Hamstring Test: Lie on your back and lift one leg straight up.
- Hip Rotators Test: Cross one ankle over the opposite knee to feel for tightness in the groin, thigh, or lower back. Try simple tests:
- Standing Hip Rotation Test: Does rotating your hip cause pain?
- Deep Squat Test: Can you reach a deep squat without stiffness or pain?
If you experience persistent pain, popping, or weakness, consult a physical therapist or doctor.
What Are the First Signs of a Hip Problem?
- Pain in the groin, thigh, or hip joint
- Stiffness and reduced mobility
- Discomfort when standing, walking, or sitting for long periods
- Clicking or popping sounds when moving the hip
- Weakness or instability in the hip or leg
Can Poor Hip Mobility Lead to Other Injuries?
Yes, limited hip mobility can cause compensatory movements that increase stress on the knees, lower back, and ankles, leading to injuries.
How Often Should You Do Hip Mobility Exercises?
Perform hip mobility exercises at least 3-4 times a week, or daily if experiencing stiffness or pain, while avoiding overtraining.