

Medical Disclaimer: The information in this blog is for educational purposes only and is not intended to replace professional medical advice. The content in this post is not meant to substitute for a professional medical diagnosis, advice, or treatment. Always seek advice from your physician or other qualified healthcare providers if you have any questions regarding a medical condition.
A handstand is a great way to build core strength, improve balance, and boost confidence. It challenges your entire body, enhances focus, and fosters a sense of strength and accomplishment. Eventually, you’ll progress to holding just your hands on the ground, relying solely on your strength and balance.
For beginners, using the wall is a helpful tool. It provides support while you practice the moves and build the necessary strength, making it easier to learn.
I remember my first time trying a handstand against the wall. I was nervous, unsure of what would happen, but once I got into position and felt the wall helping me, I felt a sense of achievement. It was a fun and empowering experience that showed how small steps can lead to big progress.
How to Properly Perform a Wall Handstand for Beginners?
To properly do a handstand against the wall, follow these steps:
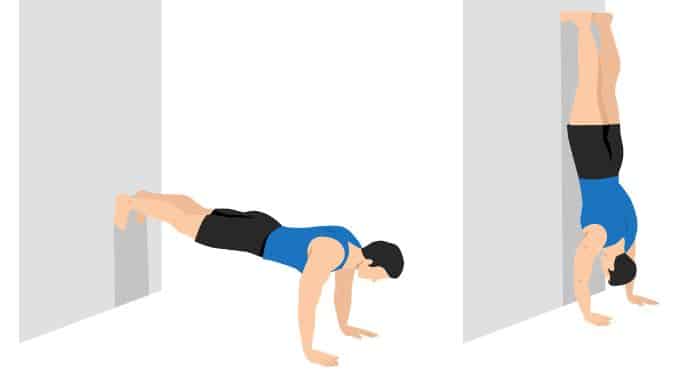
1. Start with the Plank Position (Left Image):
- Place your hands slightly wider than shoulder-width apart on the ground.
- Position your feet on the wall, ensuring your body forms a straight line from head to heels with no sagging or arching.
- Engage your core and legs to build strength and stability.
- Maintain straight arms and engage your core, mimicking a hollow body position to stabilize your body.
2. Kick Into the Handstand (Right Image):
- Gently kick one leg up towards the wall while keeping the other leg slightly bent.
- Once your feet touch the wall, push firmly through your hands, engaging your shoulders and scapular stabilizers.
- Keep your core tight and lean forward slightly to help lift your body.
- Bring your legs straight and fully extend your body, standing vertically against the wall.
3. Hold the Position:
- Ensure your arms are straight and locked out, maintaining a fully aligned posture from wrists to toes.
- Keep your body tight and your core engaged to avoid arching your back.
- Push lightly with your feet to reduce reliance on the wall for support.
- Aim to maintain balance, working toward a freestanding handstand.
4. Practice with Control:
- Maintain a straight line from your hands to your feet.
- Gradually hold the position longer, reducing the wall’s support over time.
- Eventually, balance with knees bent or one foot off the wall.
- Work toward a free handstand, lifting your feet and shifting to the opposite direction to test your balance.
5. Build Strength:
- As you progress, aim for max hold times to build endurance and stability.
- Focus on achieving a proper handstand with a tight body and strong core.
- Transition to a freestanding handstand without wall support and engage your upper body strength to maintain control.
A pro tip from a yoga teacher: Hold the position for as long as it feels comfortable, and when you’re ready to exit, gently bend your knees and carefully walk your feet back down.
Benefits of Handstands:
- Strengthens the arms, shoulders, and back. [1]
- Improves balance.
- Increases blood flow to the brain and creates new neural connections.
- Easier on the neck compared to headstands.
Muscles Involved: [2]
- Primary muscles: Deltoids (anterior, middle, posterior), pectoralis major, upper trapezius, and triceps.
- Synergist muscles: Serratus anterior, latissimus dorsi, rectus abdominis, and internal and external obliques.
Spine and Core Alignment in Handstands
- Spine Alignment: [3] In a handstand, your spine’s curves become smaller as your body adjusts to being upside down.
- Pelvic Position: Most individuals posteriorly tilt their pelvis during a handstand, flattening the natural lumbar curve. Some tilt forward, affecting the upper back.
- Core Activation: Your core muscles (including lower back and stomach muscles) help keep your spine stable. Strong core muscles are key for better balance and posture.
- Handstands for Spine Health: When done right, handstands can strengthen your spine and improve posture, making it beneficial for back health.
- Adapting to Your Spine: Everyone’s spine is different. Understanding your spine’s natural alignment can guide adjustments to optimize safety and performance during handstands.
- Using the Wall: If you’re new to handstands, use the wall for balance while focusing on core engagement and pelvis alignment to avoid strain.
Using a Spotter or Assistant
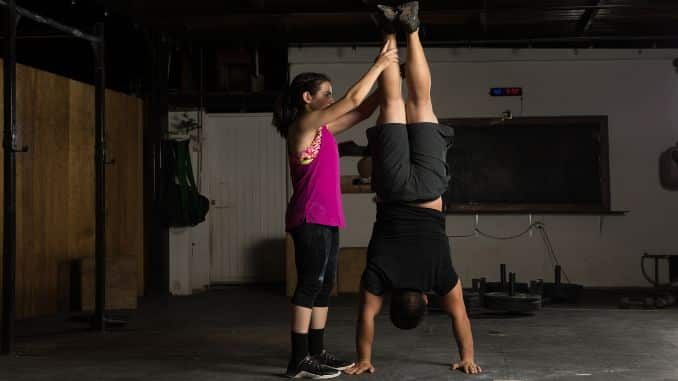
- If you feel unsafe practicing handstands by the wall on your own, get someone to spot you.
- Spotting techniques vary based on potential fall directions, ensuring safe transitions out of a handstand.
- Having a spotter can provide an added layer of safety and support.
Safety Precautions and Exit Strategies
- Always warm up before practicing handstands to prevent injury.
- Make sure you have a clear and safe space to practice handstands.
- Use a spotter or assistant if you’re new to handstands or feeling unsure.
- Focus on proper form and technique to avoid injury.
Exiting a Handstand Safely
- If you fall towards your belly side, simply land on your feet again.
- Try to bend your knees when you fall out to take some of the force out of your landing.
- If you fall towards your backside, use the bail out method by turning out to one side in a cartwheel-like motion.
Conclusion
Practicing handstands against the wall effectively builds upper body strength and serves as a foundational step toward mastering freestanding handstands. They help you develop shoulder muscles, improve balance, and allow you to focus on maintaining a proper handstand position.
When practicing, aim to keep your arms straight and body tight, with legs straight and toes pointed. As you become more confident, try leaning forward or lifting one foot off the wall for a few tries, gradually moving toward a free-standing handstand. Holding a handstand against the wall can help improve shoulder flexibility and build strength, but remember, it’s important to listen to your body and not overstrain.
Want to learn how to do a handstand against the wall? Our step-by-step guide will help you master this impressive exercise. Check out our Thoracic Outlet Syndrome Solved guide for more fitness and health tips!

Frequently Asked Questions
Are handstands against a wall good for you?
Yes, they are great for building shoulder muscles, improving balance, and strengthening your upper body. They also help with posture and core stability.
How long should I be able to hold a handstand against the wall?
Start with a max hold of around 10-30 seconds, and gradually increase as you get stronger. Focus on maintaining a tight, straight body.
How do you handstand against a wall?
Place your hands on the ground, shoulder-width apart, and walk your feet up the wall until your body forms a straight line. Keep your arms straight, engage your core, and make sure your body is tight.
What muscles do handstand push-ups against the wall work?
Handstand push-ups primarily target shoulder muscles, including the deltoids, and engage your core, arms, and upper body. They also enhance overall stability and strength, particularly in the upper body, as they support your weight.