

Bowling has always been one of my favorite activities. It’s fun, social, and even sneaks in a bit of exercise.
But I’ll admit—there have been days when I walked off the lanes feeling more pain than pride, especially in my lower back. If you’ve been there too,
I get it. Back pain can turn what should be a great time into a frustrating experience.
The good news is, back pain doesn’t mean you have to give up bowling. I’ve learned (sometimes the hard way) that with the right approach, you can address the pain, prevent injuries, and get back to enjoying the game you love.
Let’s dive into why bowling can cause back pain and what you can do to fix it.
Essential Warm-Up Exercises for Bowlers
Warming up with dynamic exercises [1] and static stretching will go a long way to help prevent injuries and guarantee you are ready for a successful day of bowling. – National Bowling Academy
One lesson I learned the hard way? Don’t skip the warm-up! Spending just five minutes stretching can save you from days of soreness and prevent lower back pain. Strengthening your core muscles, especially around the lumbar spine, is key to avoiding discomfort. Here’s what works for me:
Dynamic Stretches (Before Bowling)
1. Torso Twists
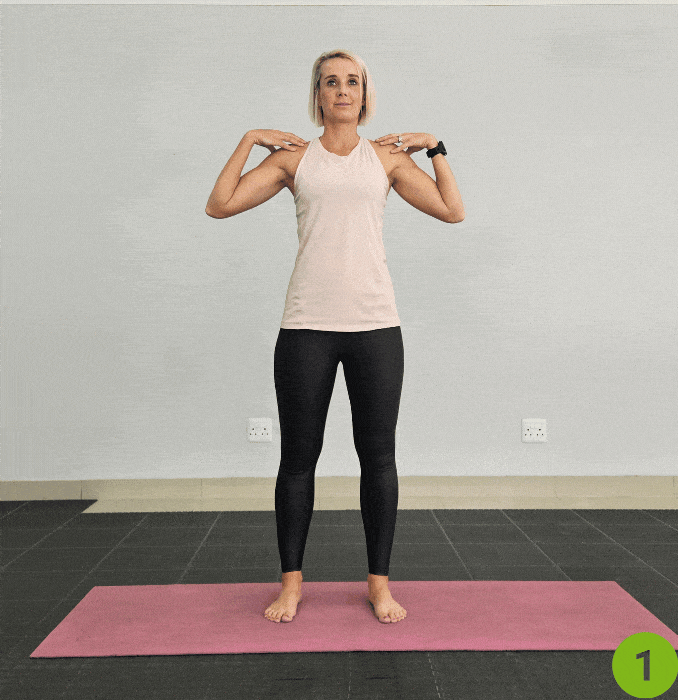
- Begin in an upright standing position with your feet shoulder-width apart, while maintaining good alignment with your head, shoulders, hips, and legs.
- Place your hands on your shoulders. Engage your core. Then. twist your upper body to one side while keeping your hips forward.
- Return to the center and repeat the movement on the opposite side.
- Complete the sequence of movement for 10 repetitions.
2. Lateral Leg Swings
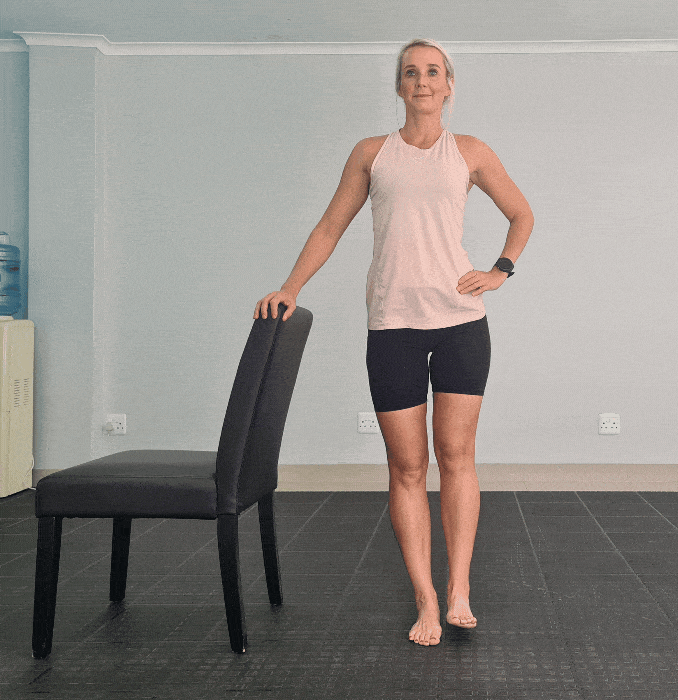
You may utilize a chair or a wall if balance is needed.
- Begin in an upright standing position beside a chair with your feet hip-width apart, while maintaining good alignment with your head, shoulders, hips, and legs.
- Then, place one hand at the back of the chair for support. Engage your core.
- Shift your weight to one leg and swing the other leg to the side.
- Swing back to the starting position and repeat the movement 5 times.
- Moreover, relax and repeat the movement on the opposite side.
3. Side Lunges
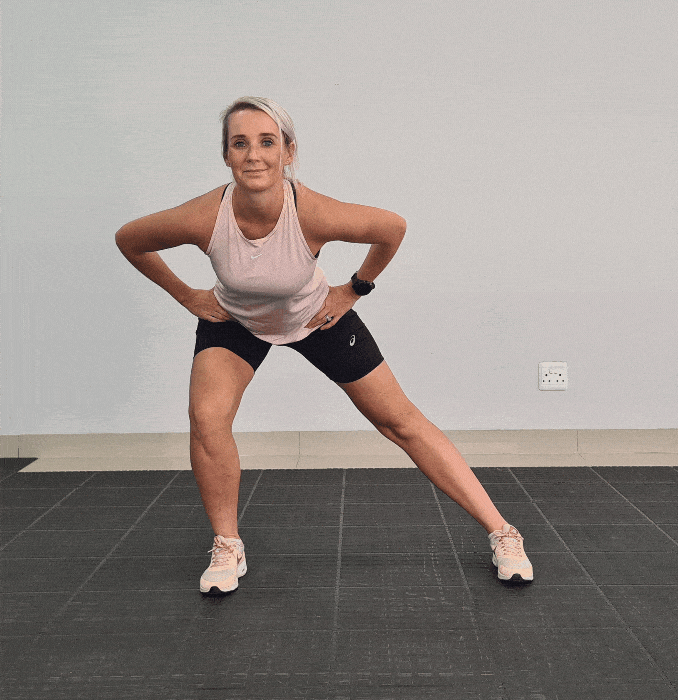
- Begin in an upright standing position with your feet considerably wider than your shoulders width apart, while maintaining good alignment with your head, shoulders, and hips.
- Then, place your hands on your hips. Engage your core. Bend your left knee as you shift your weight towards the left side while extending your right leg.
- Hinge through your hips to bend your upper body forward.
- Hold the position for a couple of seconds and repeat the movement on the opposite side.
- Moreover, complete 10 repetitions per side.
Static Stretches (After Bowling)
1. Hamstring Stretch
- Begin in an upright standing position with your feet hip-width apart, and maintain good alignment with your head, shoulders, hips, and legs.
- Place your hands at your side. Engage your core. Take one step forward with your right foot, bend your left knee to extend your right leg to press your heel on the floor.
- Then, hinge through your hips to bend your upper body forward, with your hands reaching down to your toes while keeping your spine straight.
- Hold the position for several deep belly breaths, in through your nose and out through your mouth. Relax and return to the starting position.
- Moreover, repeat the movement on the opposite side.
2. Cat-Cow Pose
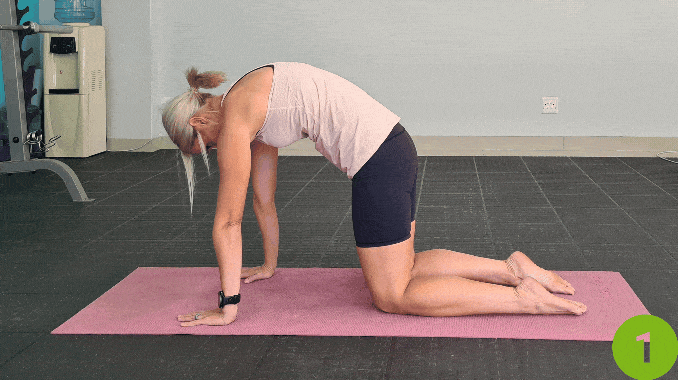
- Begin in a 4-point position on the floor with your hands beneath your shoulders and your knees under your hips.
- Then. contract your abdominal area. Inhale as you round your mid back as you drop your head downward.
- Exhale by arching your mid back as you lift your head upward.
- Moreover, repeat the movement for 5 repetitions, alternating directions.
Why Does Bowling Cause Back Pain?

Bowling seems simple enough—grab a ball, aim, and roll. But in reality, it’s a physically demanding sport. Moreover, carrying a heavy ball, repetitive motions, and awkward postures all take their toll.
1. Improper Technique
This was my biggest mistake as a beginner. I used to hunch forward during my approach, thinking it would give me more power. Instead, it left me with a sore lower back. Moreover, turns out, leaning too far forward or twisting awkwardly can throw your body out of alignment, putting extra strain on your back.
What to Do:
- Keep your posture upright and avoid hunching.
- Make sure your hand is under the ball during your swing, and release it smoothly in line with your ankle.
- If you’re not sure about your form, ask a friend or coach to watch and offer tips.
2. Playing Too Often Without Rest
I used to bowl several games in a row, sometimes two or three nights a week. It felt great at the time, but my back paid the price. Additionally, bowling uses muscles you don’t typically activate, like your lower back, core, and shoulders. Without proper rest, these muscles can become fatigued and prone to injury.
What to Do:
- Space out your games to give your muscles time to recover.
- If you feel sore after a session, rest for a day or two before heading back to the lanes.
3. Weak Core and Back Muscles
I’ll admit, I didn’t think much about fitness when I first started bowling. But over time, I realized how much your core and lower back support your movements. Moreover, without strong muscles in these areas, your body struggles to handle the repetitive strain of bowling.
What to Do:
- Add core exercises to your routine, like planks or crunches.
- Strengthen your lower back with moves like bridge poses or superman stretches.
- Don’t forget about your glutes and hips—they provide stability for your back.
4. Using the Wrong Equipment
There was a time I bowled with a ball that was way too heavy for me. My throws were clumsy, and I ended up hurting my shoulder and back. Using poorly fitted or excessively heavy equipment is one of the easiest ways to injure yourself.
What to Do:
- Choose a ball that’s 10–15% of your body weight. Test it by holding it out in front of you—if your arms tremble, it’s too heavy.
- Make sure the finger holes fit your hand snugly but comfortably.
- Invest in good bowling shoes with proper traction to avoid slips.
What to Do If You Experience Back Pain During Bowling

I’ve had those moments mid-game where my back starts to hurt, and I know I should stop but don’t want to. Trust me, pushing through the pain only makes it worse. Here’s what to do if this happens to you:
- Stop Playing: It’s not worth risking a more serious injury. Sit down and rest.
- Ice the Area: If possible, apply ice to your lower back for 15–20 minutes to reduce swelling.
- Stretch Gently: Moreover, do a seated forward bend or a light torso twist to release tension.
- Reassess Your Form: Sometimes, pain is a sign that something’s off with your technique.
Preventing Other Bowling Injuries
Back pain isn’t the only issue bowlers face. Here are some other common injuries I’ve seen and how to avoid them:
- Wrist Strain: Use a wrist brace for extra support, and make sure the finger holes in your ball fit properly.
- Shoulder Pain: Avoid over-swinging your arm or forcing your throws. Additionally, switch to a lighter ball if needed.
- Knee Injuries: Wear shoes with good traction and practice a smooth, controlled slide.
Strengthen and Protect Your Back
Building strength in your core and lower back has been a game-changer for me. Here are some exercises I recommend:
- Plank: Start with 20–30 seconds and work up to a minute. This stabilizes your core and supports your spine.
- Bridge Pose: Lie on your back, bend your knees, and lift your hips. Hold for 10–20 seconds.
- Superman Stretch: Moreover, lie on your stomach and lift your arms and legs. Hold for a few seconds, then relax.
I also mix in stretching and foam rolling [3] to keep my muscles flexible and pain-free.
When to See a Doctor?
Sometimes, back pain is more than just a strain. If your pain lasts longer than two weeks, feels severe, or comes with numbness or tingling, it’s time to see a doctor. Moreover, a specialist can help diagnose the issue and create a recovery plan tailored to your needs.
Final Thoughts
Bowling is such a fun and rewarding sport, but it’s important to take care of your body. Whether you’re dealing with back pain [2] or trying to prevent it, the key is to listen to your body, warm up properly, and focus on your form and fitness.
For me, these changes have made all the difference. I can now enjoy my games without worrying about the next day’s soreness. If you’ve experienced back pain while bowling, I’d love to hear your story. What helped you manage it? Let’s keep the conversation going and help each other bowl pain-free!
Do you suffer from lower back pain? If so, make sure you check out Low Back Pain Solved, here!

1. Why does bowling cause back pain?
Bowling involves carrying a heavy ball, repetitive motions, and sometimes awkward postures, all of which can put strain on your lower back. Common issues like improper bowling technique, playing without adequate rest, weak core and back muscles, and using the wrong equipment can all contribute to back pain.
2. What are the best ways to prevent back pain while bowling?
To prevent back pain, maintain proper posture throughout the game, ensuring you don’t hunch over or twist your body awkwardly. Space out your games to allow muscle recovery, strengthen your core and back muscles through regular exercises, and choose bowling equipment that suits your body size and strength. Additionally, always perform warm-up exercises before playing to prepare your muscles.
3. What should I do if I experience back pain during bowling?
If you start to feel back pain while bowling, it’s important to stop playing to avoid further injury. Apply ice to the affected area to reduce inflammation and gently stretch to relieve tension. Review your bowling form to ensure it isn’t contributing to your pain. If the pain persists, consider consulting a healthcare professional.
4. When should I see a doctor for bowling-related back pain?
You should consult a doctor if your back pain persists for more than two weeks, is severe, or if you experience symptoms like numbness or tingling. A healthcare professional can diagnose the underlying cause of your pain and provide a treatment plan tailored to your specific needs.